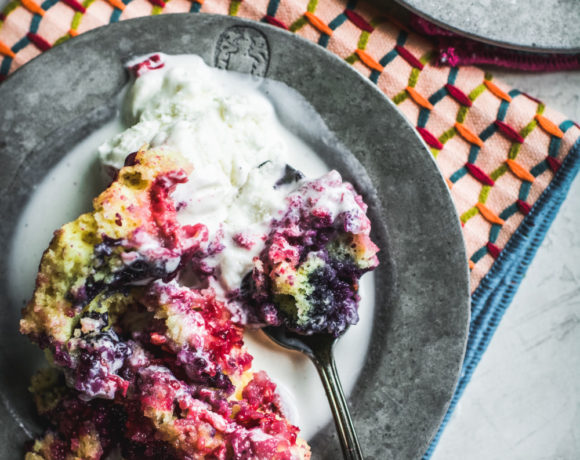
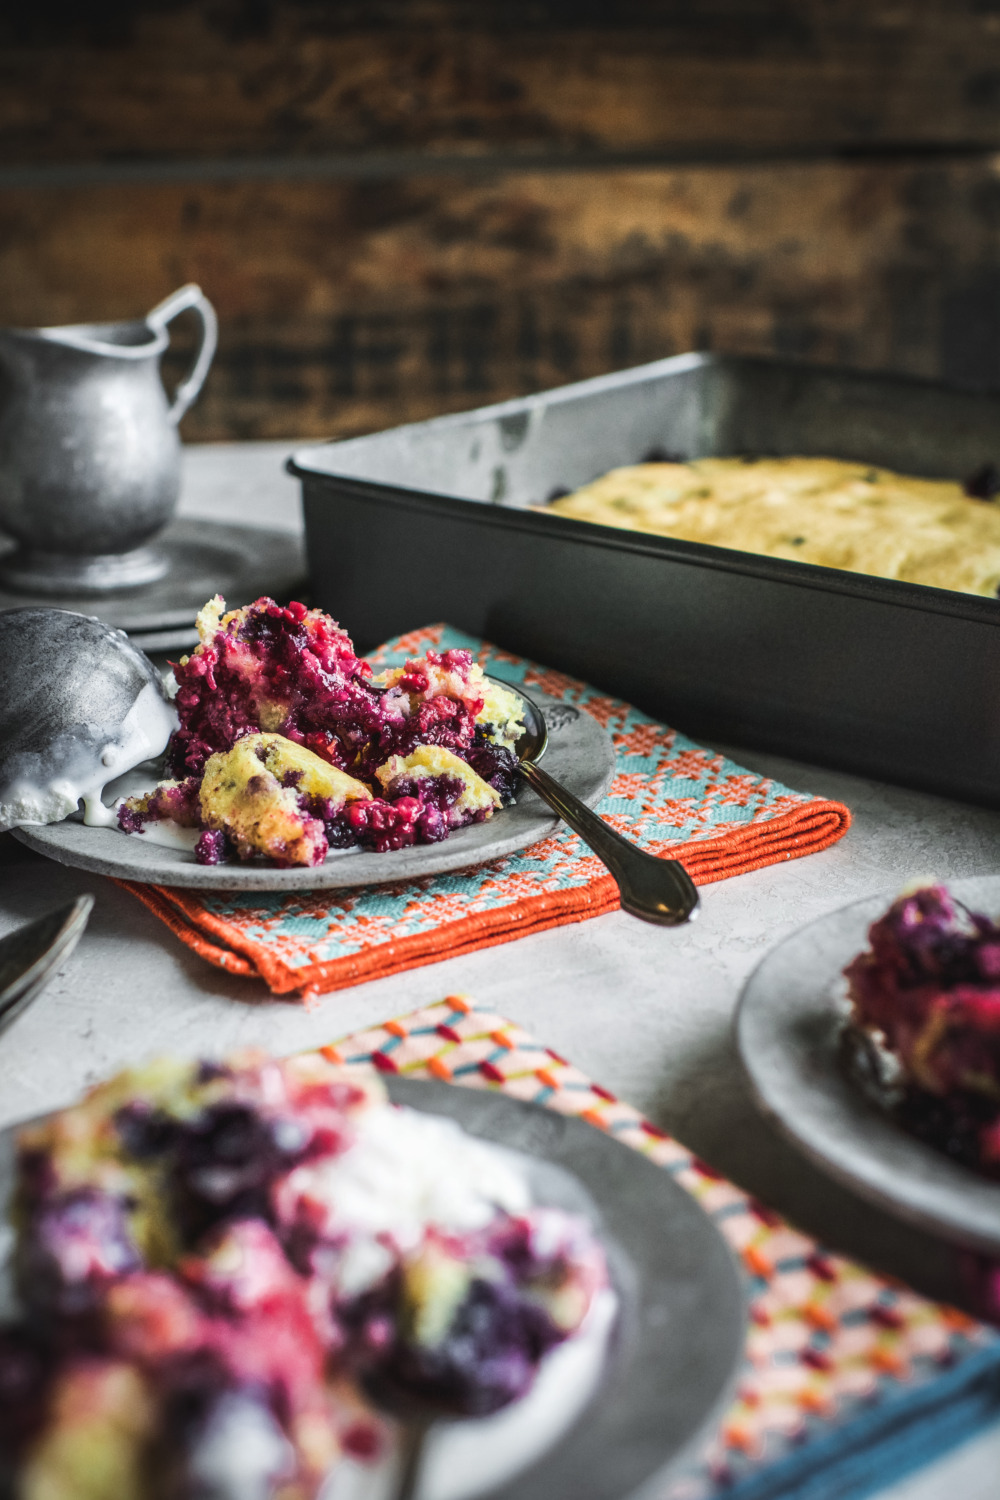
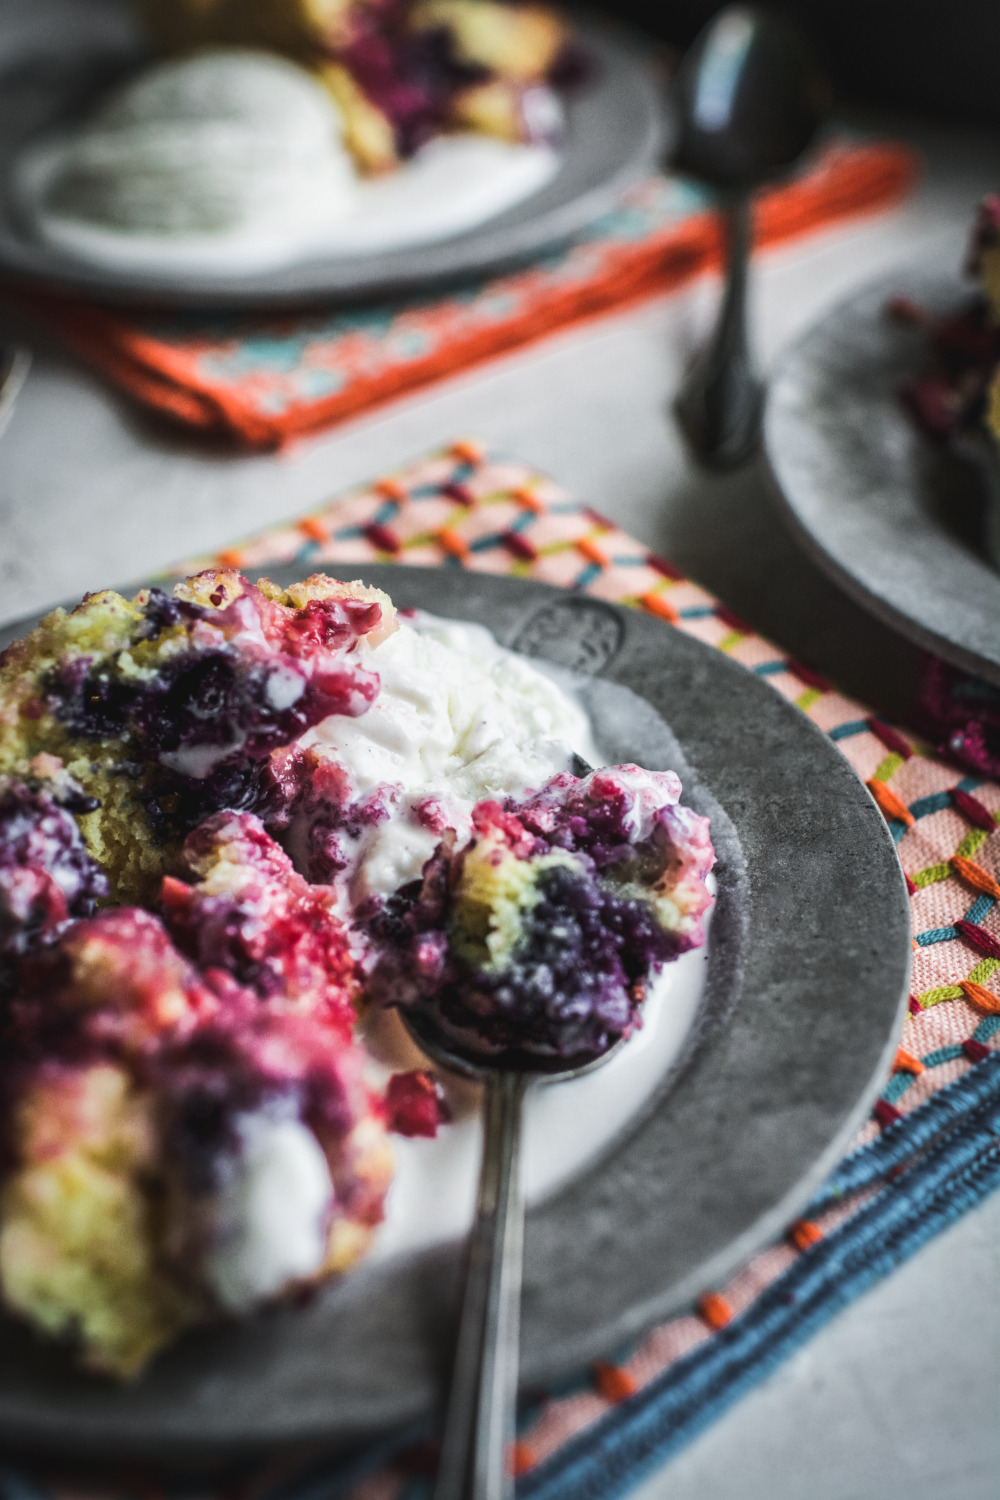
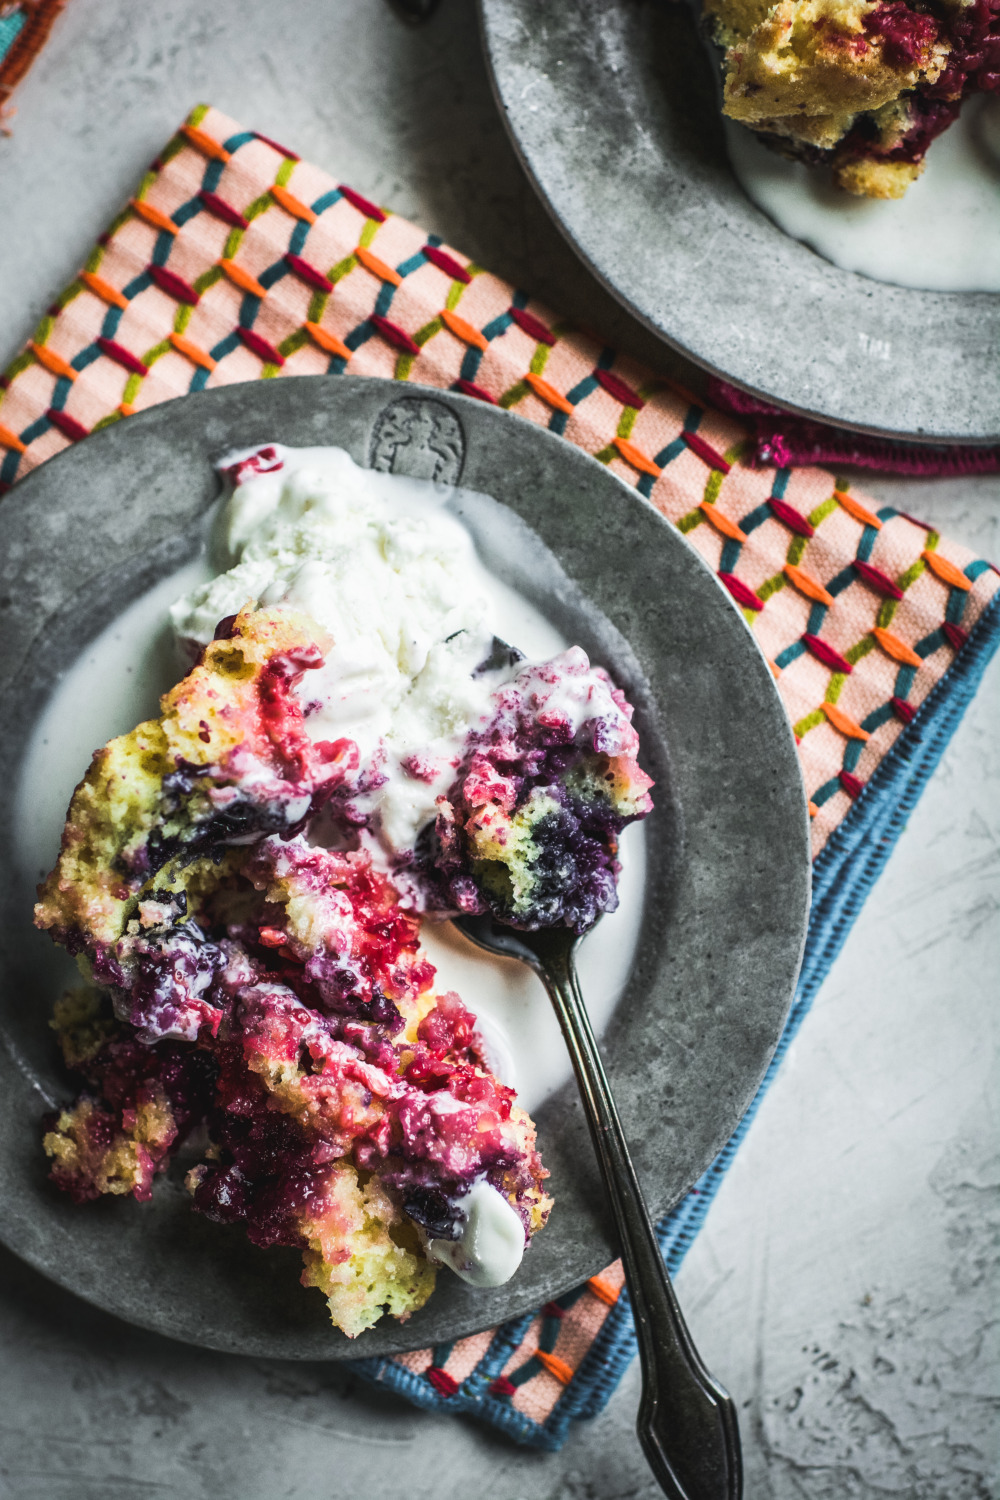
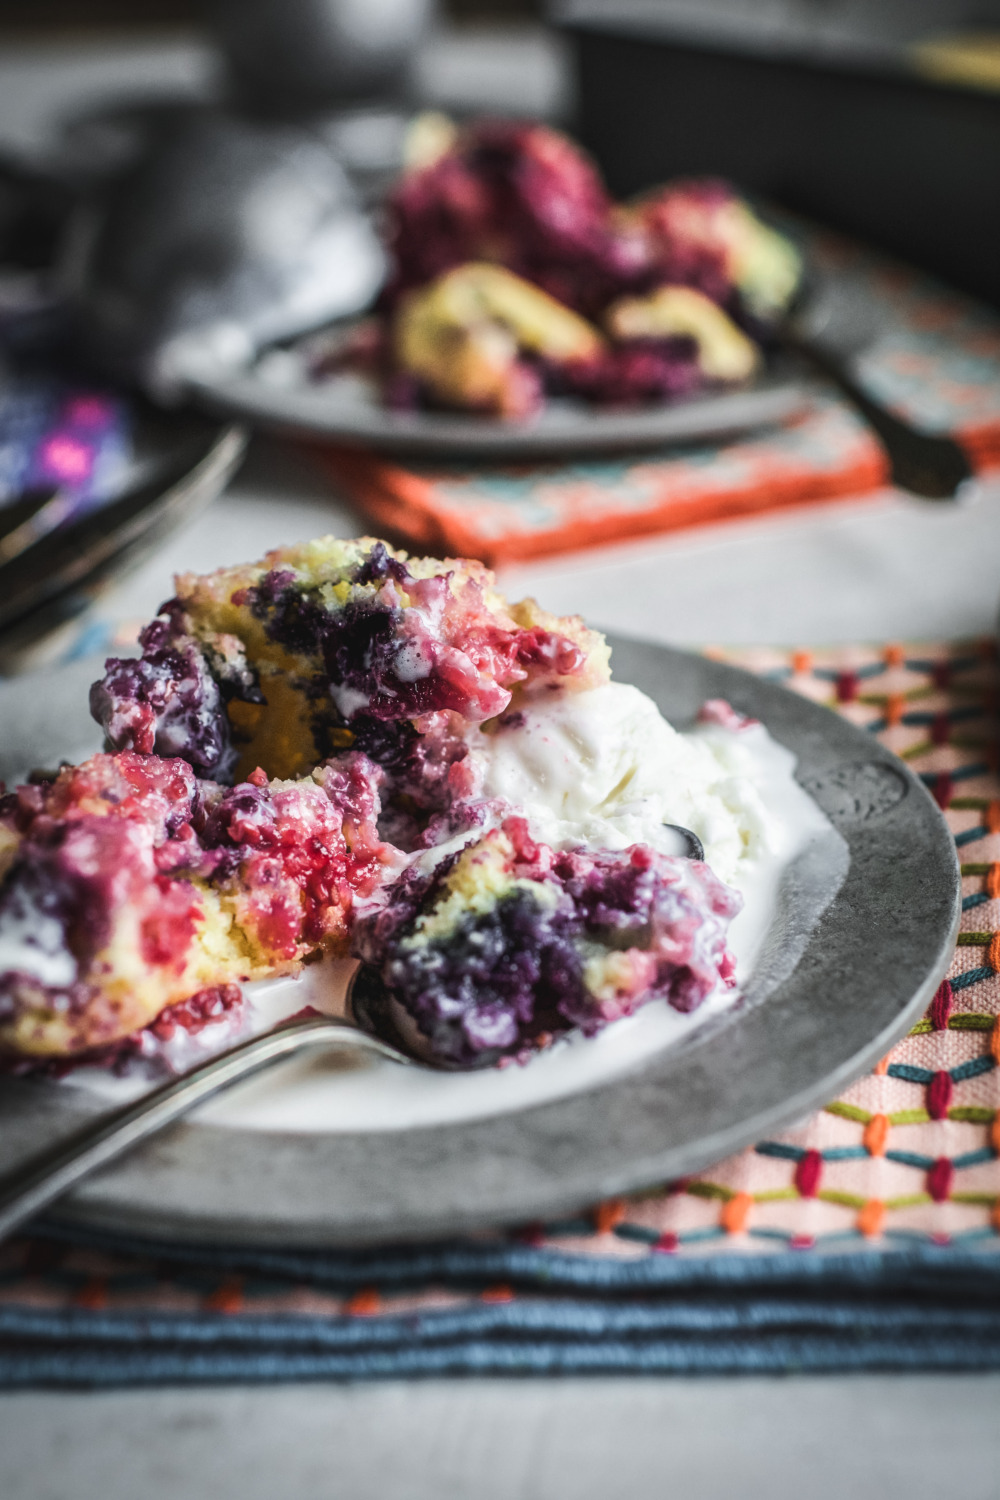
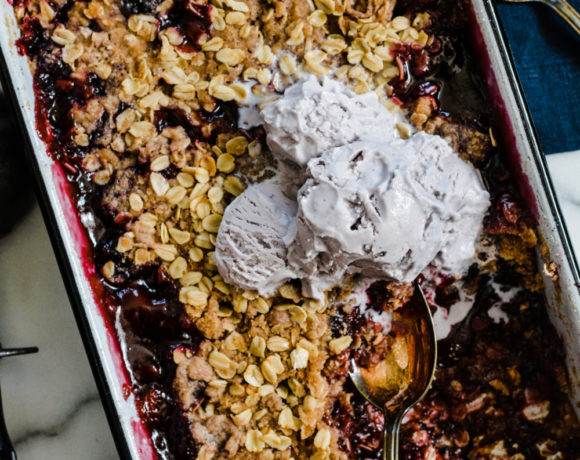
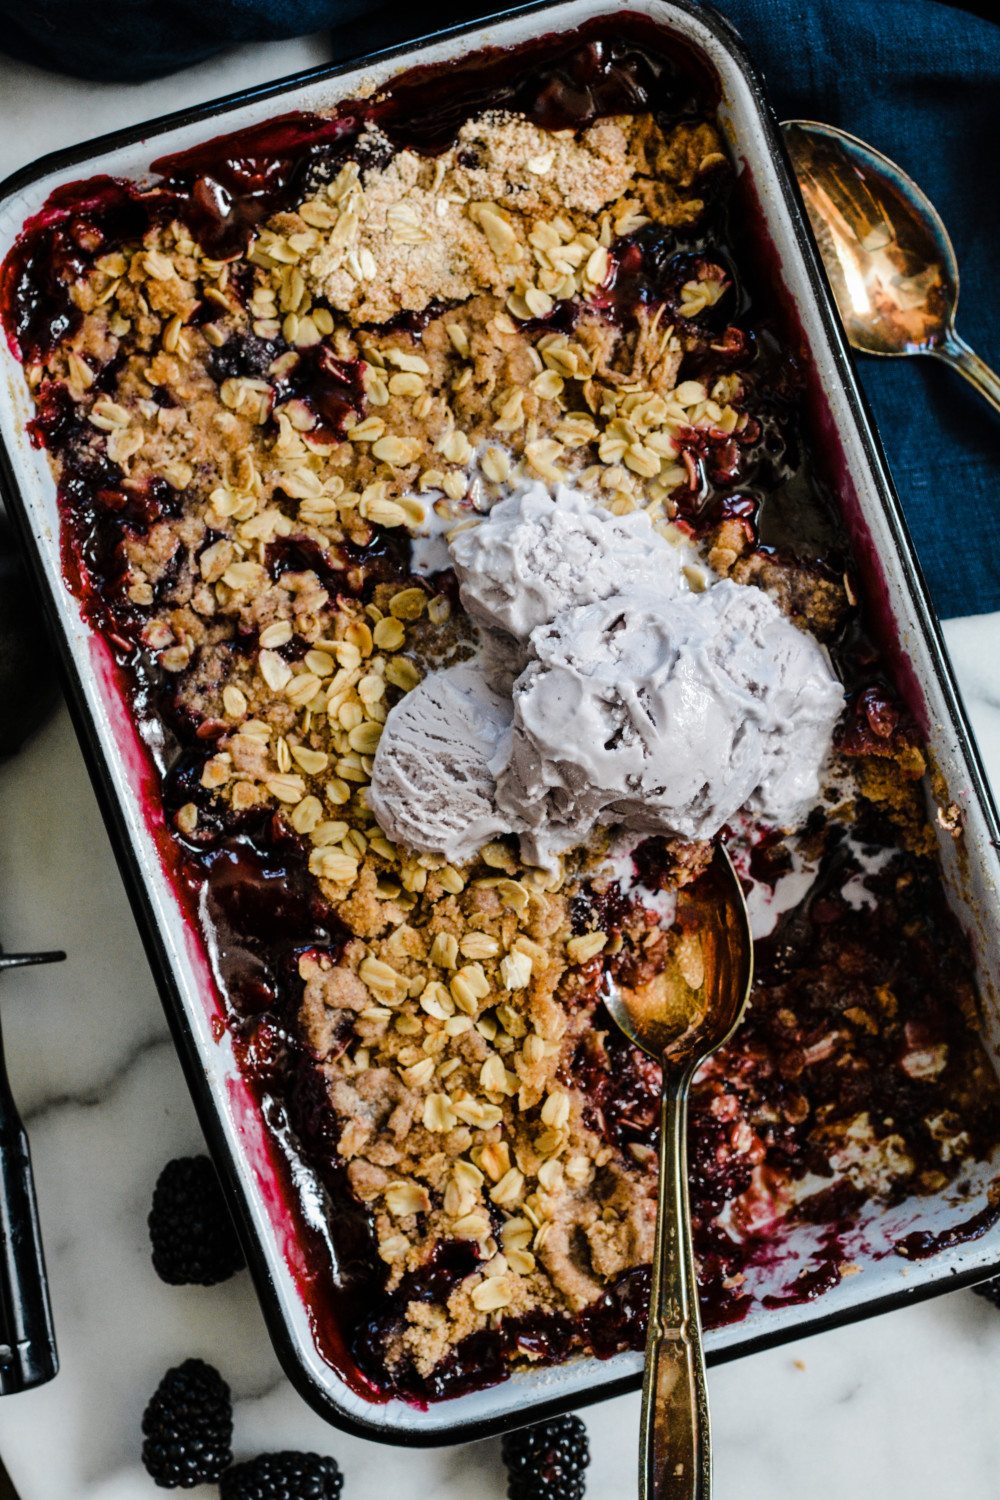
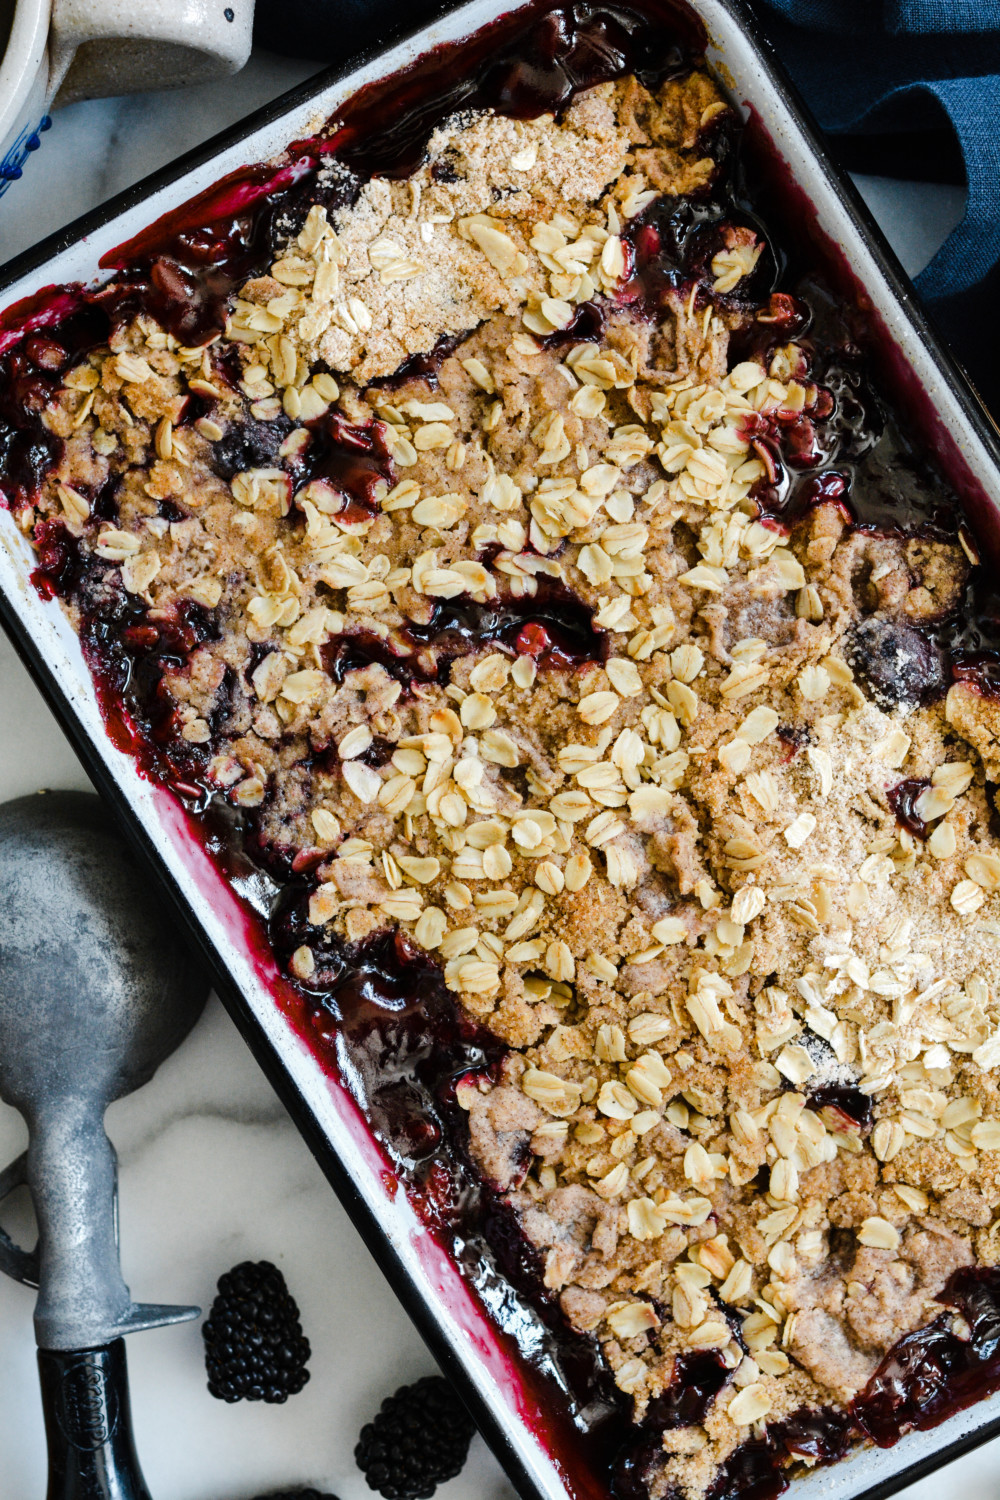
Mixed Berry Spoon Cake with Vanilla Bean Ice Cream is a yummy, easy cake – loaded with fresh fruit – and is the perfect dessert for most any occasion!
I don’t eat enough cake.
Cake is happy.
I need more cake in my life.
Here’s the deal… I have been collecting cookbooks since 1988. It was at my bridal shower where I first received The Silver Palate Cookbook; and let’s just say – life after that would never be the same.
Are you familiar with it? This beautiful book was my first experience with food writing beyond traditional recipes.
With information from how to de-glaze a pan to cooking with herbs, from the well-dressed potato to the perfect tailgate picnic…my 23 year old self quickly realized that there was more to know beyond Sunday sauce.
It was the first time I discovered that you could marinate carrots in raspberry vinegar…the first time I discovered that there is raspberry vinegar…the first time I learned that a whole roasted animal is, in many cultures, the apex of gracious hospitality. Yep.
So. Where The Silver Palate Cookbook was my initial introduction to food writing – creative writing which taught me that words can frame a meal, set a stage, and dress a potato…
Piece of Cake! was my first introduction to one-bowl, no-fuss, from scratch cakes.
I’ve said it before and I’ll say it again… What would we do without our books?
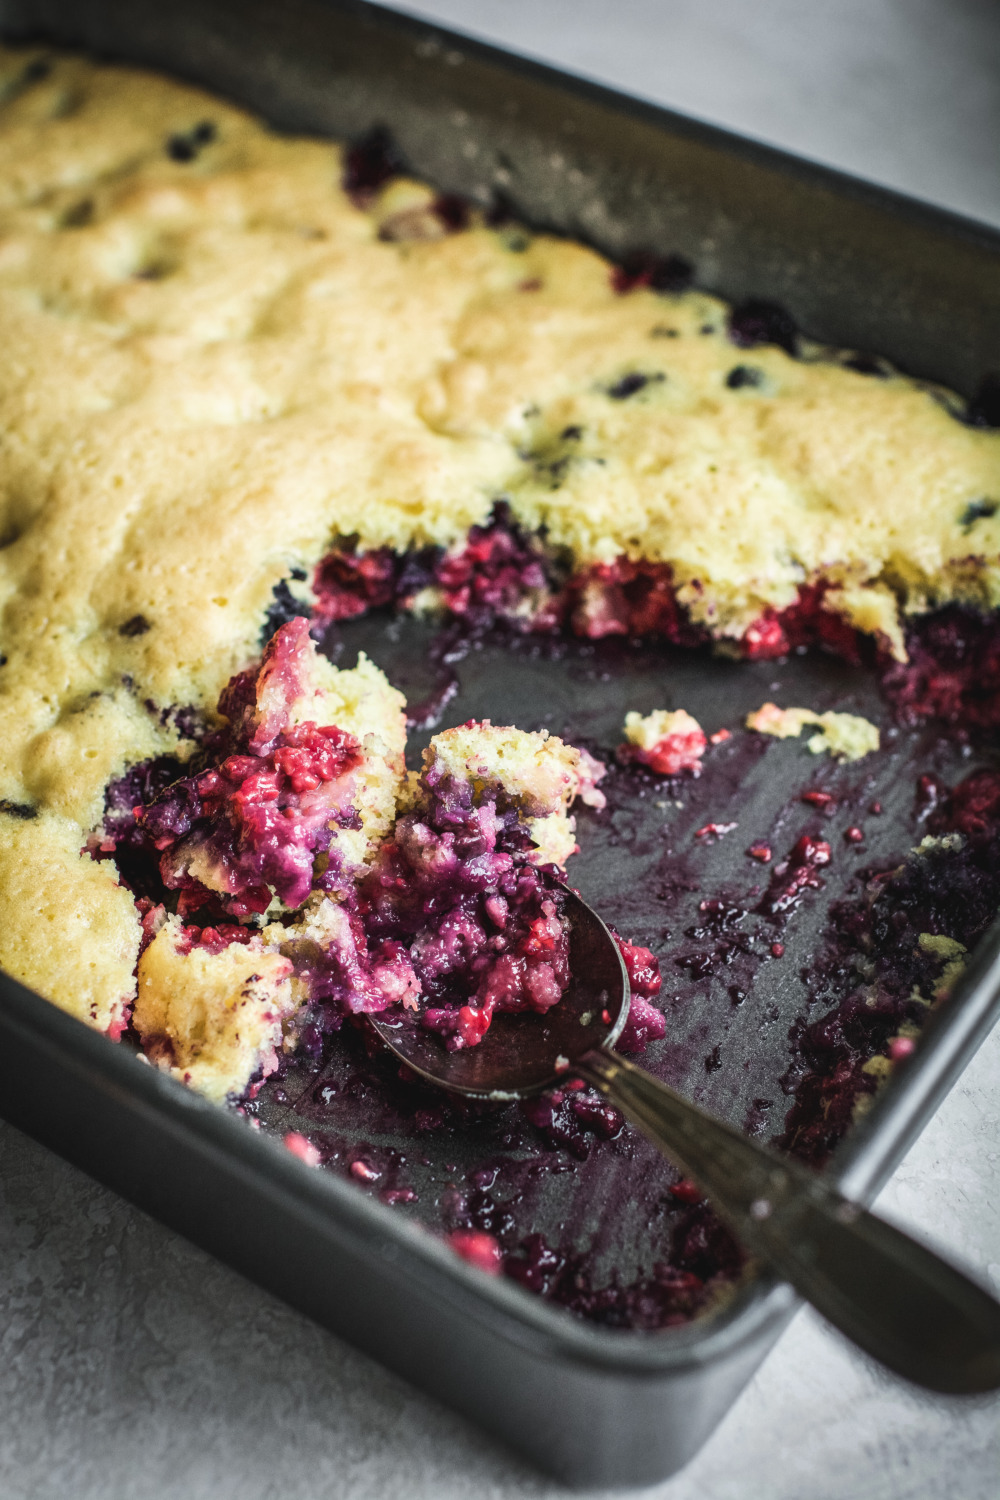
This cookbook has been sitting on my shelf for a bunch of years now, and this recipe for spoon cake is one of my absolute favorites. I love it for its rustic appearance, its bright berry flavor, its soft cake-y crumb, and its whisper of lemon.
INGREDIENTS FOR THIS SIMPLE DESSERT:
- blueberries
- raspberries
- granulated sugar
- all-purpose flour
- baking powder
- salt
- eggs
- finely grated lemon zest
- olive oil
- vanilla extract
- vanilla bean ice cream
I love that only one bowl, one pan, and 30 minutes separate me from it.
So goooood straight out of the oven, but draped over a scoop or two of vanilla bean ice cream – we’re talking special.
This dessert says spring to me…
…making this post very good timing.
Happy spring, my friends!
Now do yourself a favor… Bake a cake, grab a spoon, and say hello to the green grass and baby buds. We’ve earned it!
Buon Appetito!
Print
Mixed Berry Spoon Cake with Vanilla Bean Ice Cream
- Category: Dessert
Ingredients
- 2 cups blueberries
- 2 cups raspberries
- 1 1/4 cup granulated sugar, divided
- 1 cup all-purpose flour
- 1 tsp. baking powder
- 1/4 tsp. salt
- 4 eggs, room temperature
- 1 Tbsp. finely grated lemon zest
- 1 Tbsp. olive oil
- 1 tsp. vanilla extract
- Vanilla Bean Ice Cream
Instructions
- Preheat oven to 350 degrees.
- In a 13 x 9″ metal baking pan, spray nonstick baking spray with flour.
- In a large mixing bowl combine blueberries, raspberries and 1/4 cup sugar.
- Spread fruit mixture in prepared pan.
- In the same large bowl, whisk together the remaining sugar, flour, baking powder and salt.
- Add eggs, lemon zest, oil and vanilla to flour mixture and whisk until blended and smooth.
- Carefully spoon batter over berries and spread evenly.
- Bake for 27 – 30 minutes, until top is golden and springs back when touched.
- Let cool in pan on a wire rack for about 1 hour.
- Scoop and serve with ice cream.
{Recipe adapted from Piece of Cake.}
This post was originally published here March 20, 2015. The recipe remains the same but I’ve updated the photographs and text.
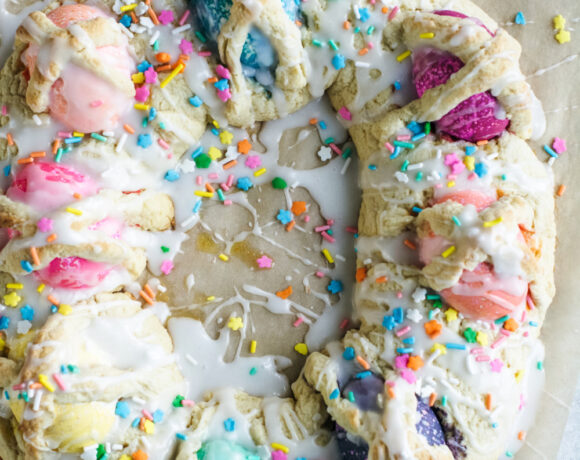
Italian Easter Ring with Colored Eggs
This Italian Easter Ring with Colored Eggs is a wonderful Calabrian tradition.

Nothing but fun coming at you today!
Tender, sweet and super lemony – this Easter Bread is everything you want to wake up to on Easter morning! Or any morning for that matter!
My gram, Mema, would make Easter bread every year. Sometimes she’d prepare it as a ring while other times she’d form it to look like a basket. We were always excited to see what sweet confection she had ready for us. Propped on her washing machine in the corner of her immaculate galley kitchen – the bread would be left cooling and waiting for our eager little hands.
Unfortunately I don’t have Mema’s exact recipe, but I found this beauty in a Calabrian cookbook, which is where she was from. Though she immigrated to America when she was just a toddler – so much of her life reflected the traditions of her hometown of Reggio Calabria…including holiday traditions like this stunning bread.
This is a great recipe that bakes up light, tender and so full of flavor.
INGREDIENTS:
- hard-boiled eggs
- unsalted butter
- granulated sugar
- salt
- egg
- milk
- lemon extract
- lemon zest
- all-purpose flour
- baking powder
- confectioners’ sugar
- colored sprinkles
It comes together pretty quickly and you can go to town on the decorating! As you can see I went a little crazy with the sprinkles. But hey – isn’t that what it’s all about?
COOK’S TIP:
Don’t be afraid to show the dough who’s boss. You will notice that once everything is combined, it’s a pretty sticky dough. Don’t give up. This is not wrong. Just flour your hands and roll and pat until it’s smooth and silky feeling. The dough is so soft and tender – you’ll think you’re patting the back of a baby chick. That’s what we’re looking for.
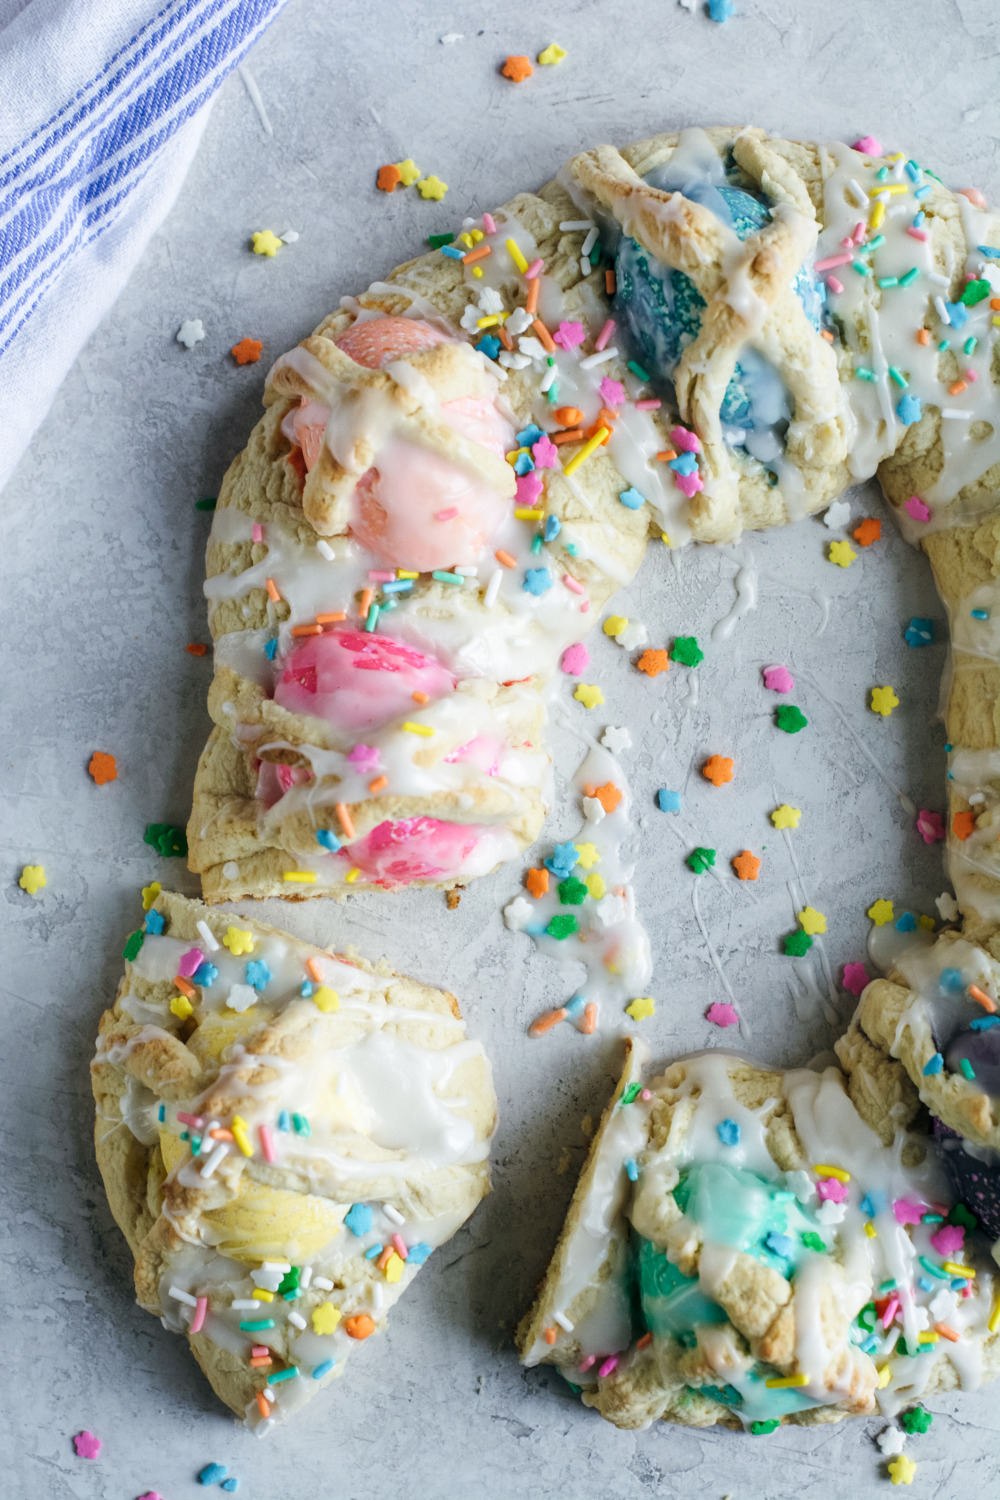
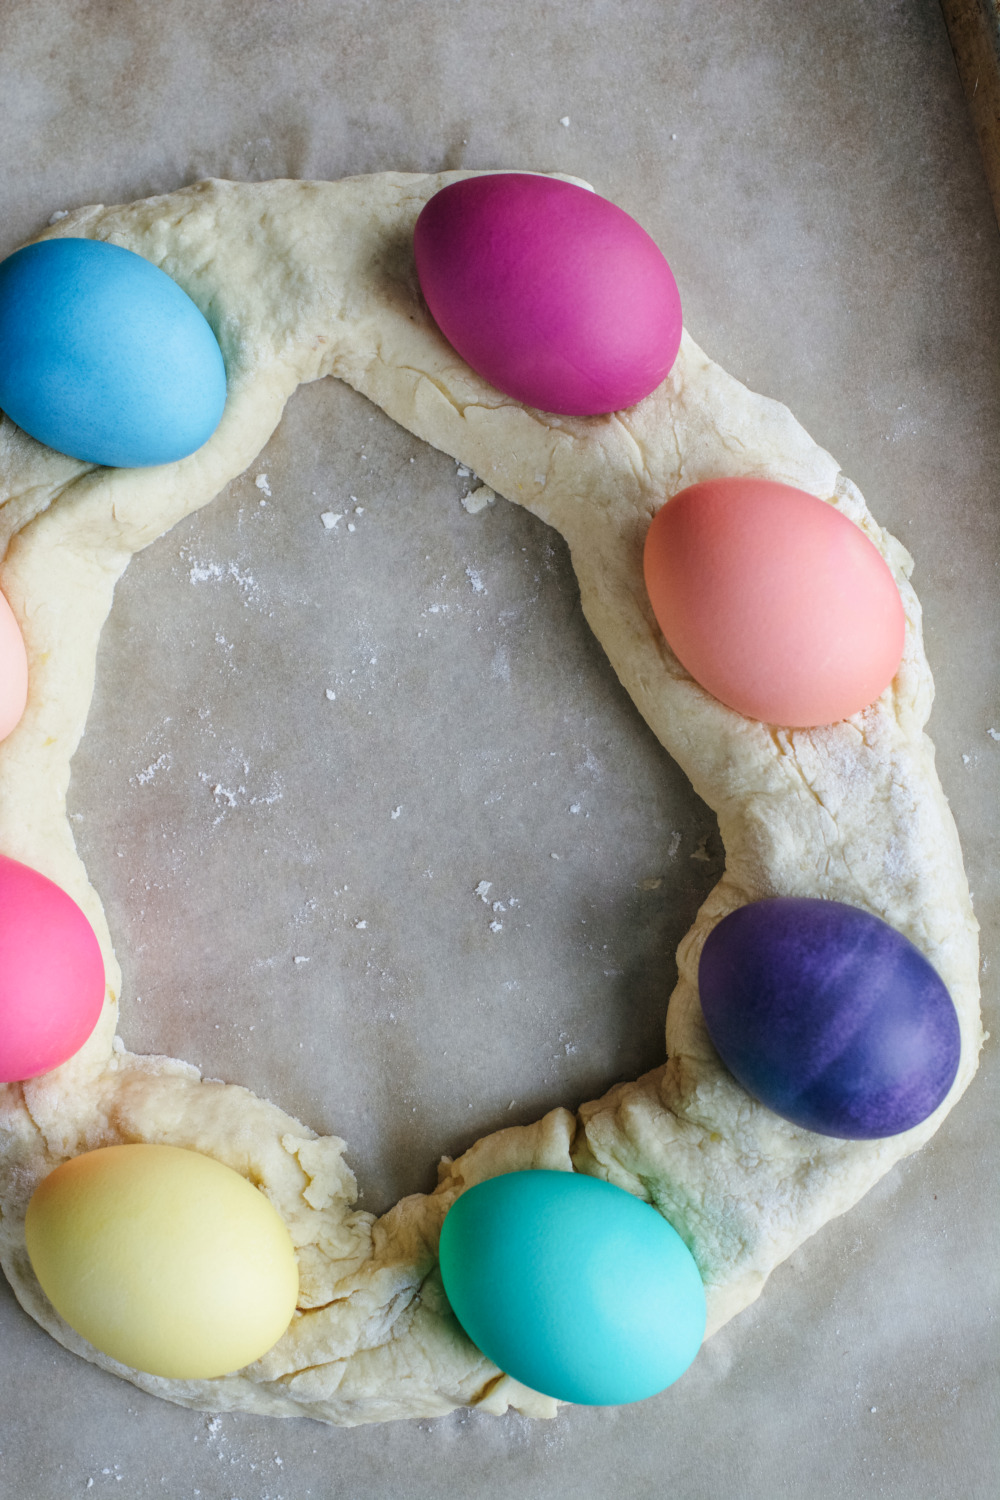
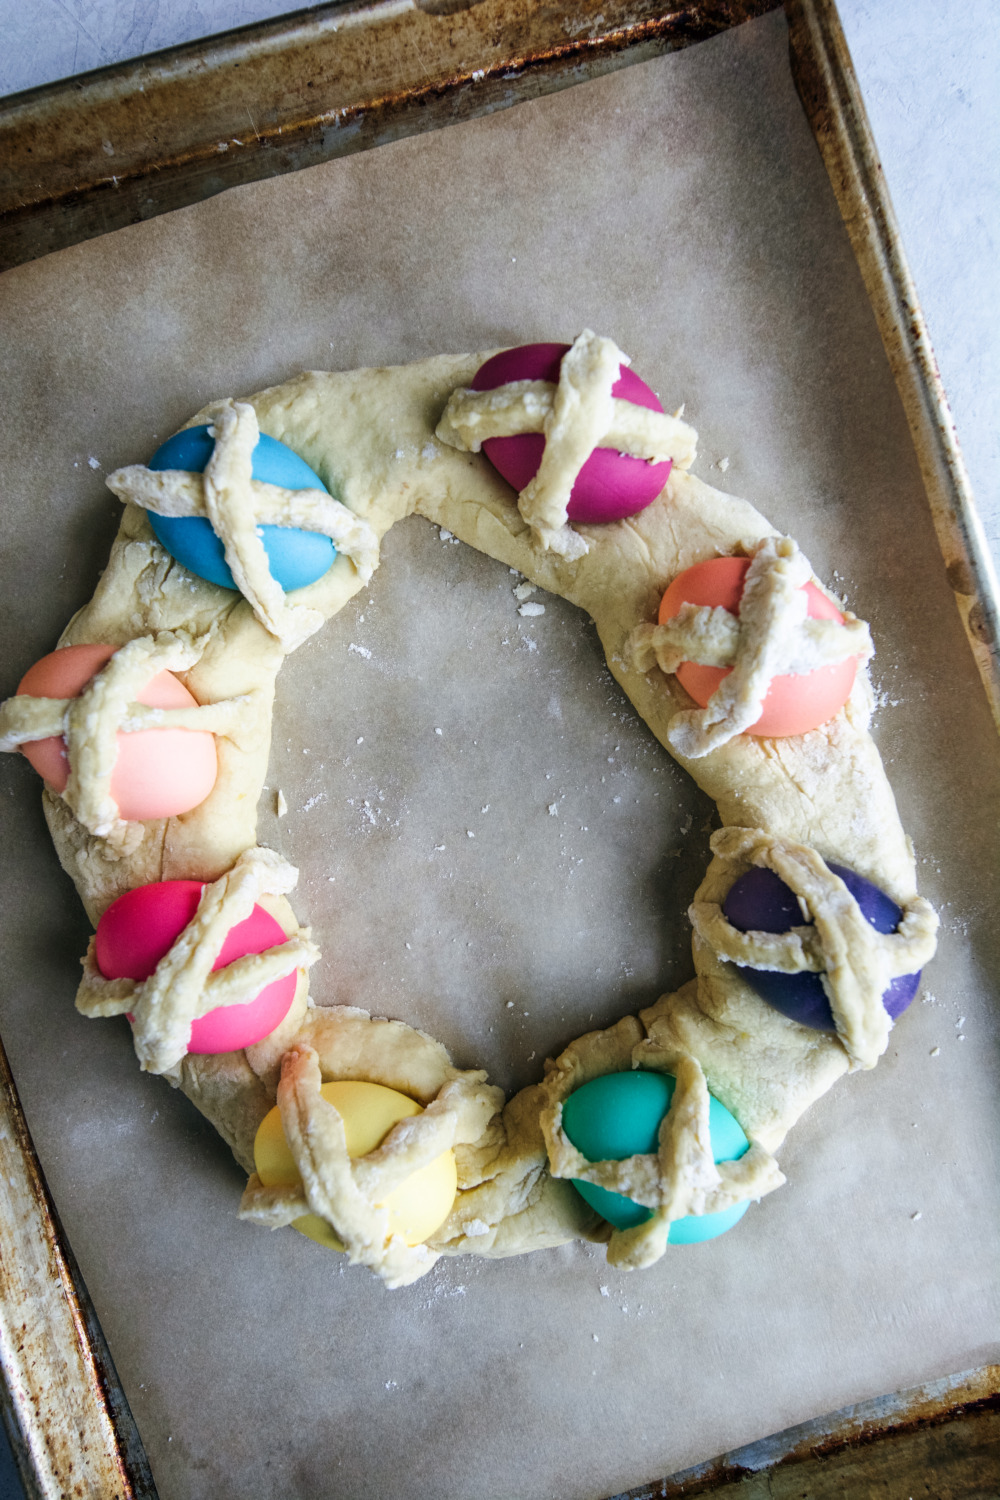
Form it into a ring large enough to hold eight hard-boiled colored eggs, top each egg with a criss-cross of dough, paint with melted butter and bake for about 20 minutes.
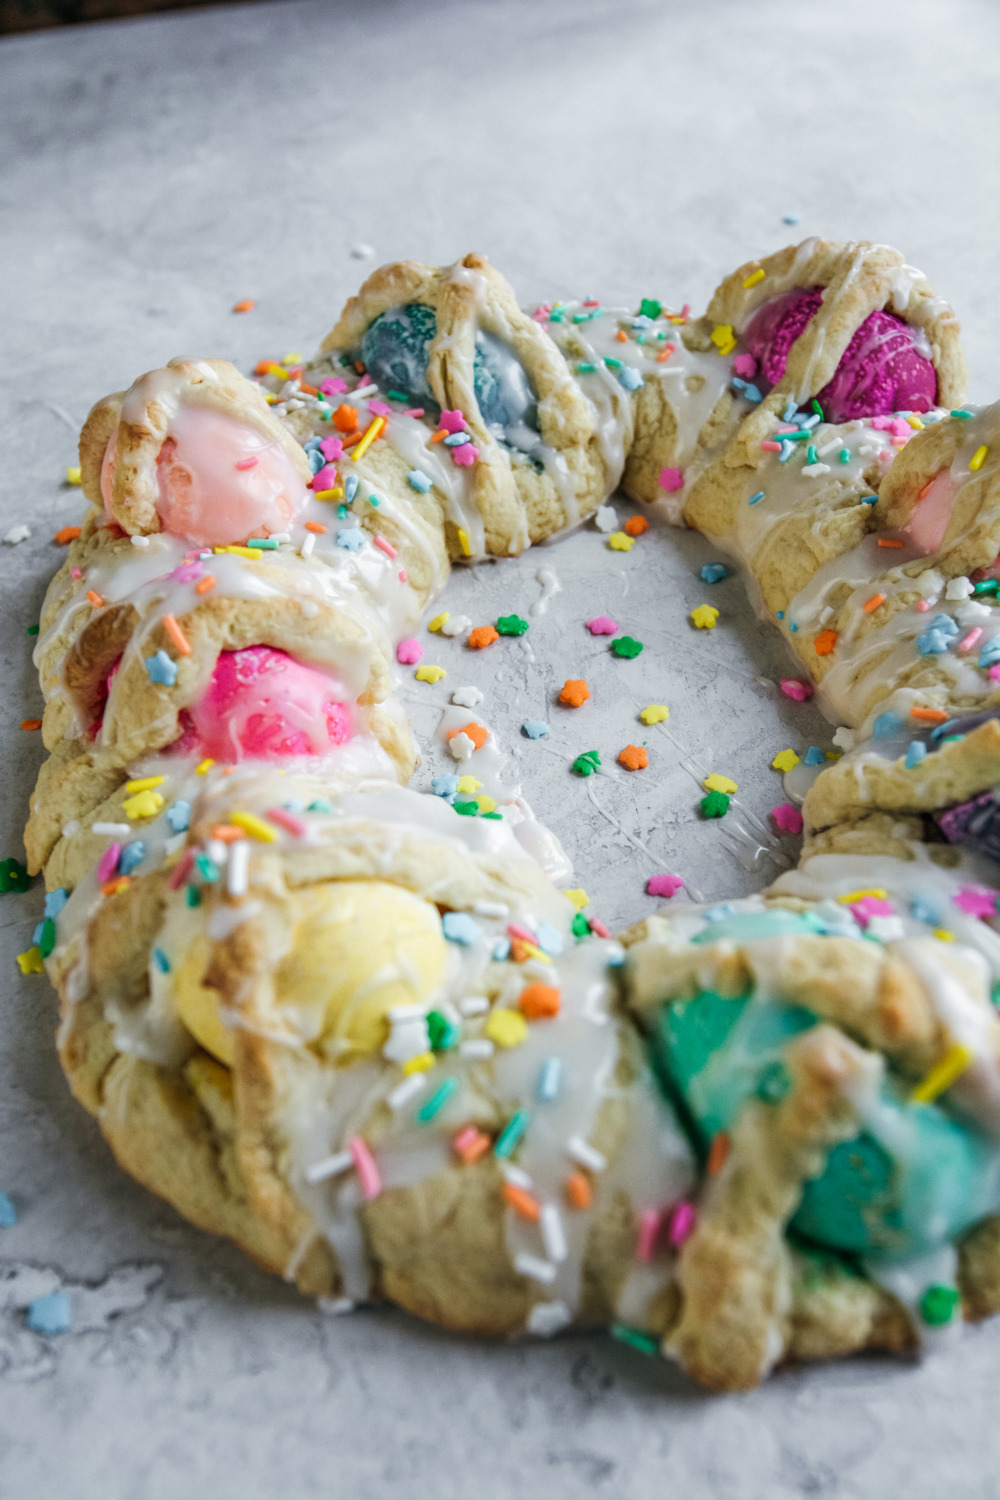
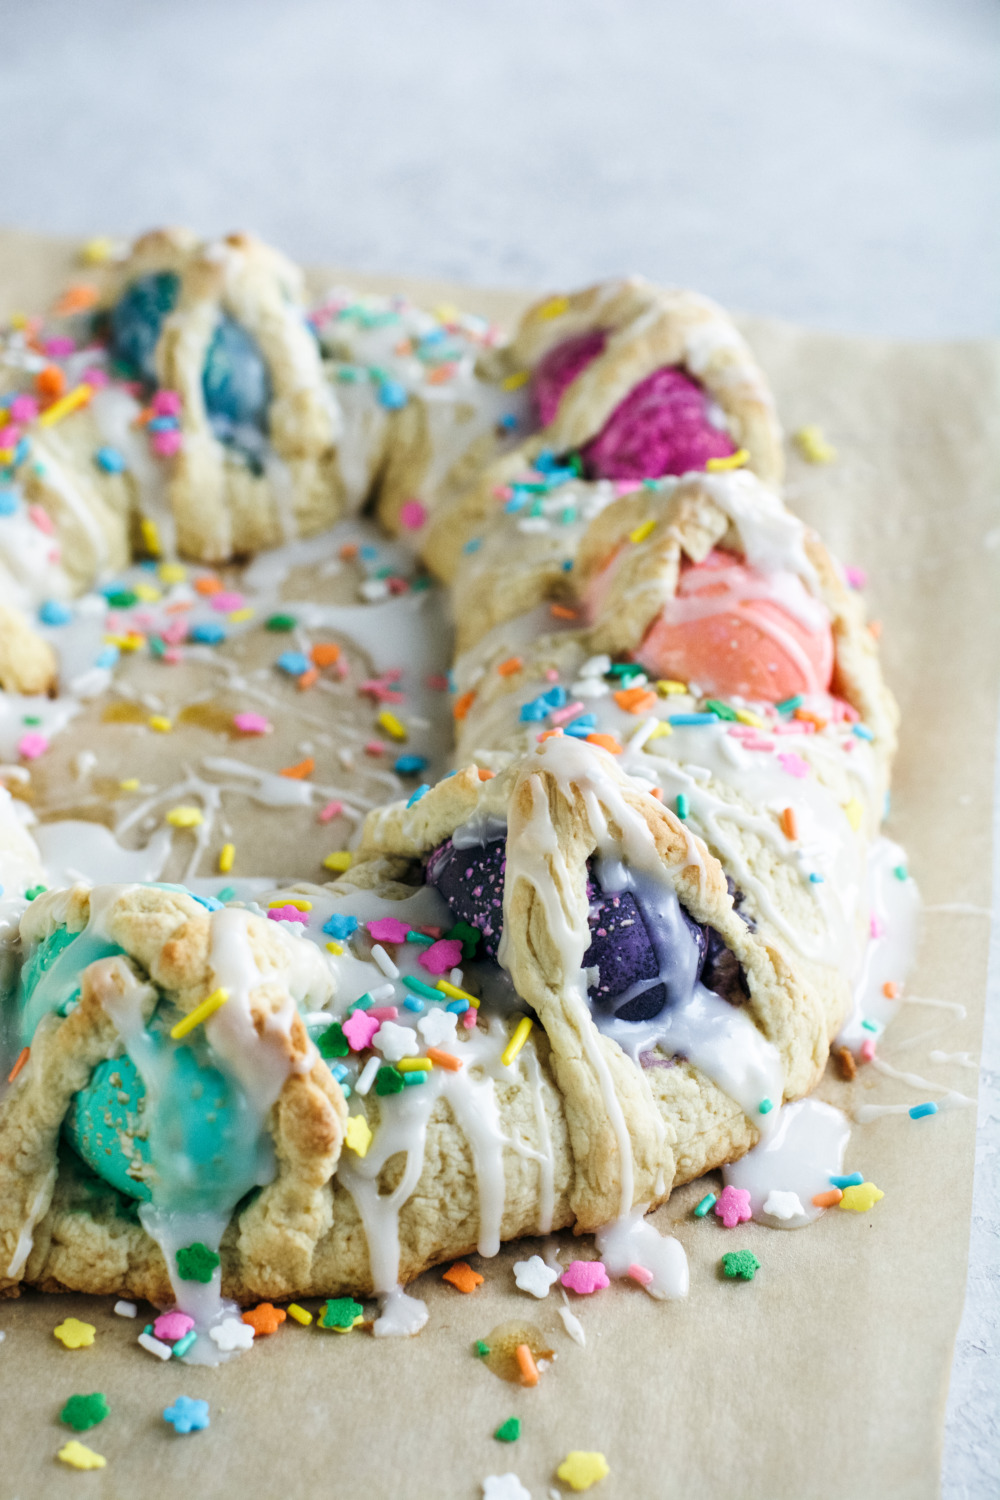
Once it comes out of the oven and cools completely, decorate with a pour of glaze and all the sprinkles you want. All the sprinkles. 🙂
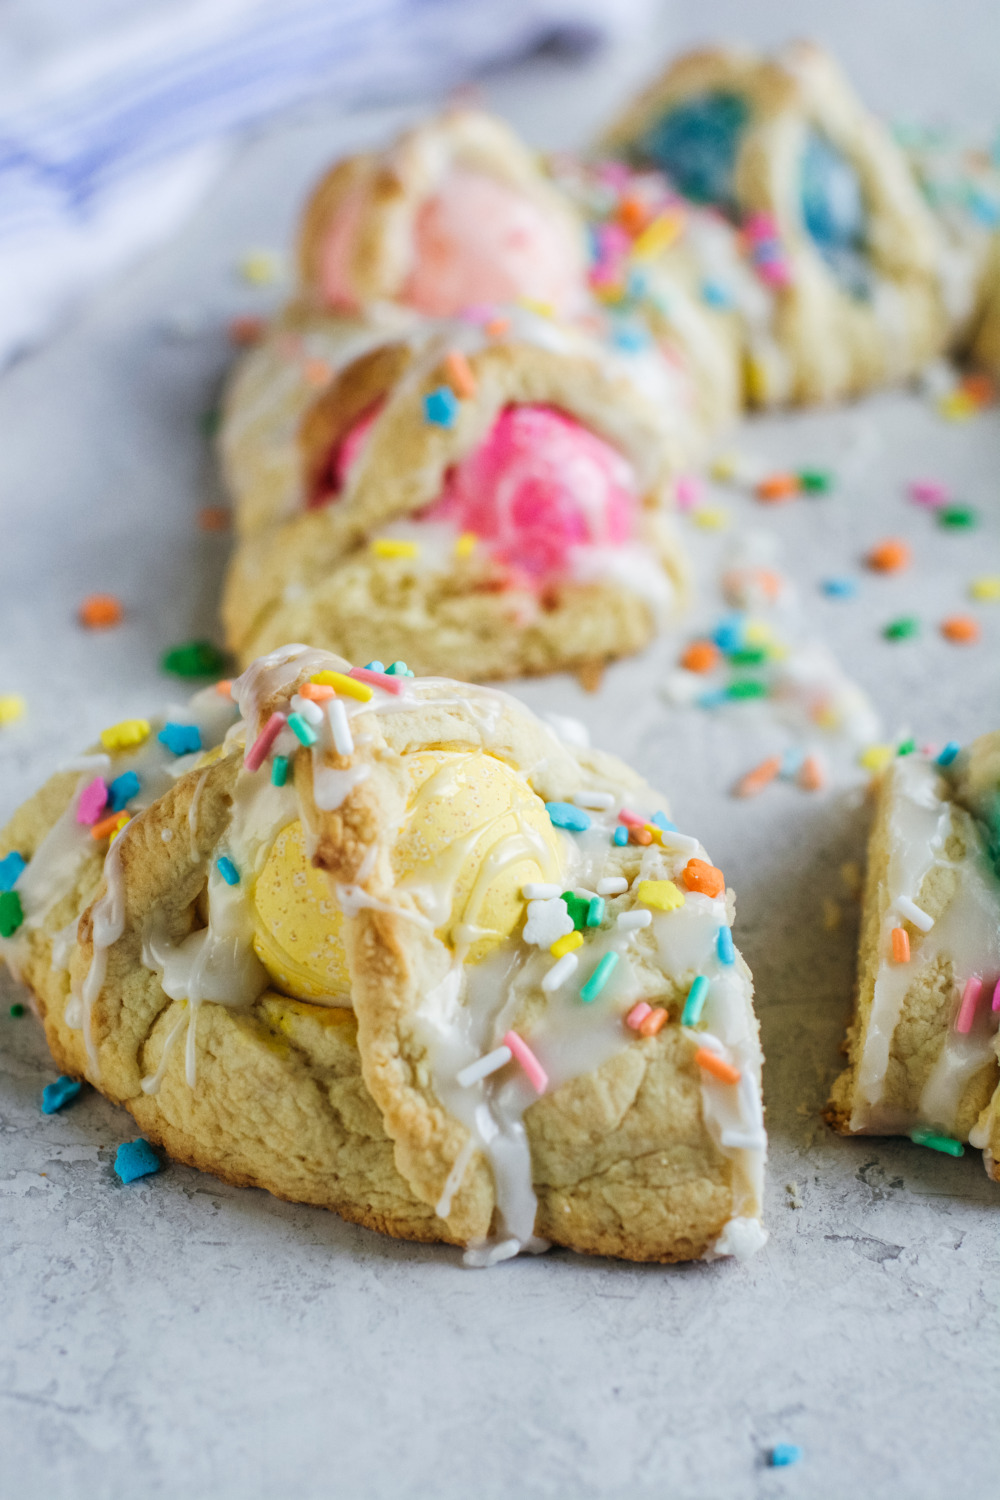
This will make a beautiful edible centerpiece for your Easter table. And boy does it taste good!
Buon Appetito!
MORE SPRING RECIPES:
Spring Minestrone with Chicken Meatballs
Zucchini & Olive Oil Bread with Lemon Crunch Drizzle
Asparagus, Sweet Peas & Prosciutto Salad
Minty Pea & Boursin Bruschetta
Crispy Wedge Salad with Greek Yogurt Creamy Blue & Maple Bacon

Italian Easter Ring with Colored Eggs
- Category: Dessert
- Cuisine: Italian
Description
This Italian Easter Ring with Colored Eggs is a wonderful Calabrian tradition.
Ingredients
- 8 eggs, hard-boiled and colored
- 4 Tbsp unsalted butter, softened
- 1/2 cup granulated sugar
- 1/4 tsp salt
- 1 large egg
- 1/2 cup milk
- 1 Tbsp lemon extract
- Zest of 1 lemon
- 2 cups all-purpose flour
- 1 tsp baking powder
- 3 Tbsp butter, melted
- 1 cup confectioners’ sugar
- 4 – 5 Tbsp milk
- colored sprinkles (optional)
Instructions
- Preheat oven to 375 F and prepare a cookie sheet with parchment. Set aside.
- Prepare 8 hard-boiled eggs, then color in pretty pastels. Set aside.
- In a large mixing bowl, add softened butter, sugar, and salt.
- Cream until well blended.
- Gradually add egg, milk, lemon extract and lemon zest. Mix well.
- Stir in the flour and baking powder and mix until smooth.
- Remove dough from bowl to a lightly floured countertop.
- Cut out 1/4 of the dough and set aside.
- Shape remaining dough into a ring large enough to accommodate the 8 eggs.
- Pinch ends to form a circle.
- Place ring on the prepared cookie sheet.
- Press eggs gently into dough in evenly-spaced intervals.
- Roll out reserved dough and cut into 16 narrow strips.
- Criss-cross strips over each egg to form a cross, pressing edges into bottom dough.
- Brush strips with melted butter.
- Bake for 17 to 20 minutes or until ring is golden and cooked through.
- Prepare glaze while ring is cooling.
- Mix together confectioners’ sugar and milk to make a glaze. Adjust with more sugar or milk to get the correct consistency.
- Once you have a good pourable consistency, pour glaze over ring, then sprinkle with colored sprinkles.
- Let glaze dry before serving.
{Recipe adapted from Cucina di Calabria}
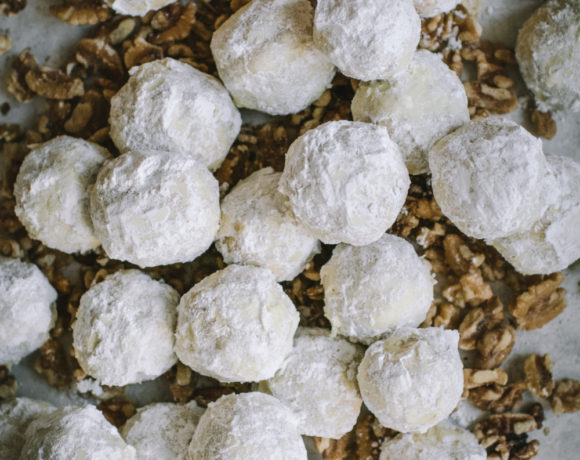
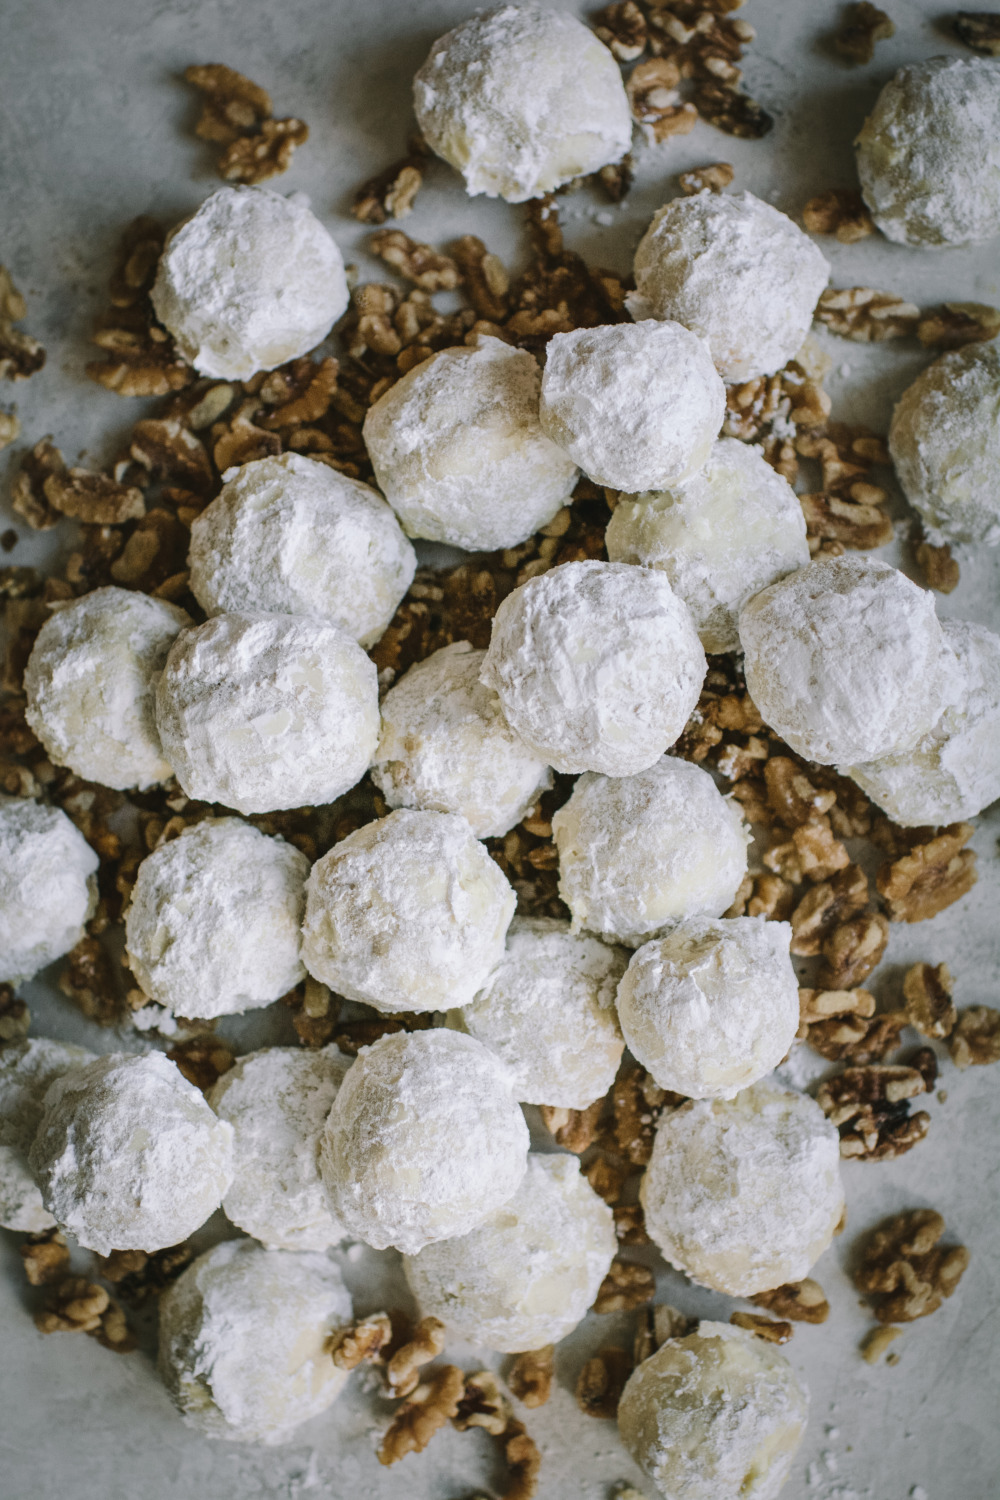
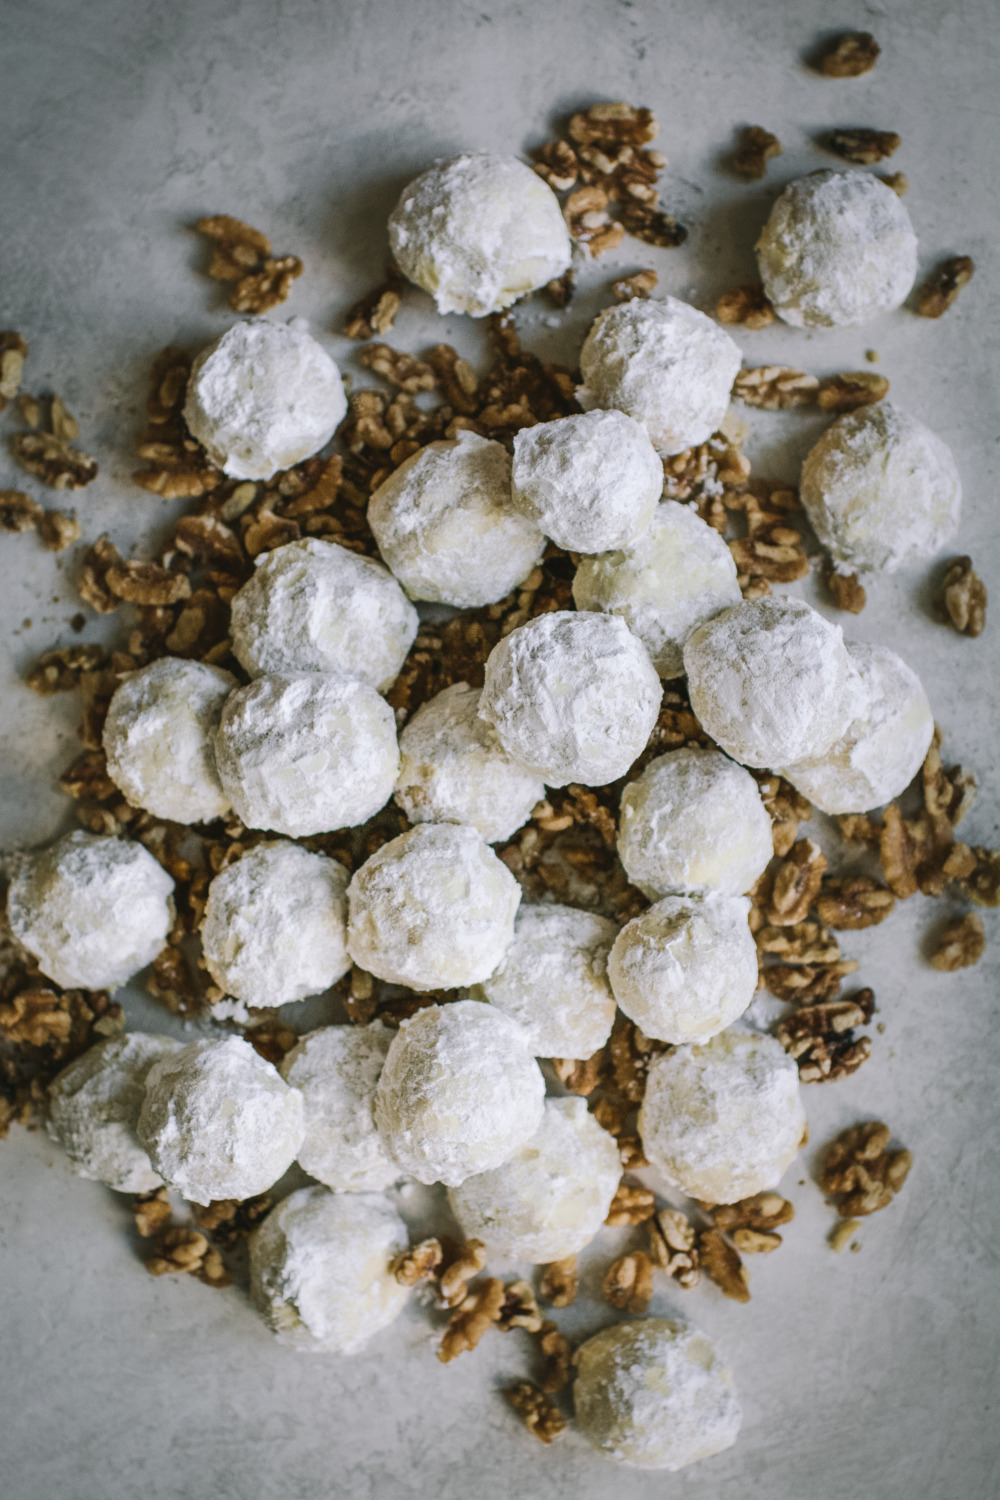
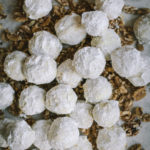
Italian Wedding Cookies
Buttery and soft, these walnut Italian Wedding Cookies are perfect for the holidays and for all of your special occasions! They are melt-in-your-mouth delicious!
I was recently introduced to someone who was just learning about my blog.
When she discovered that I write a food blog, her first question was, “Is it healthy?” Well, I thought to myself, I guess it all depends on what you mean by “healthy”? And I replied, “No. Well – yes, yes it is – healthy for the soul, and there are healthy recipes, but there are also recipes that include whipped cream, and deep frying, bread crumbs, and gooey cheese.” I suddenly felt like I was defending my child. How funny is that? I’m certain it was not her intent to put me on the defensive – I did that all by myself. But I quickly realized that my blog won’t be all things to all people. It can’t be. Which is why it’s so awesome that there is such a diverse offering of beautiful blogs out there. How great is that?!
Let’s talk about these cookies, shall we?
There’s a pretty good chance you have everything you need right now. And don’t worry if your pantry isn’t stocked with walnuts – pecans or slivered almonds will do the trick just as well! Or, we can go sans nuts. The ultimate butter cookie!
INGREDIENTS:
- Softened butter
- Powdered sugar
- Salt
- Water
- Walnuts (substitutions: pecans, slivered almonds, or no nuts)
- Almond extract (substitution: vanilla extract)
- AP flour
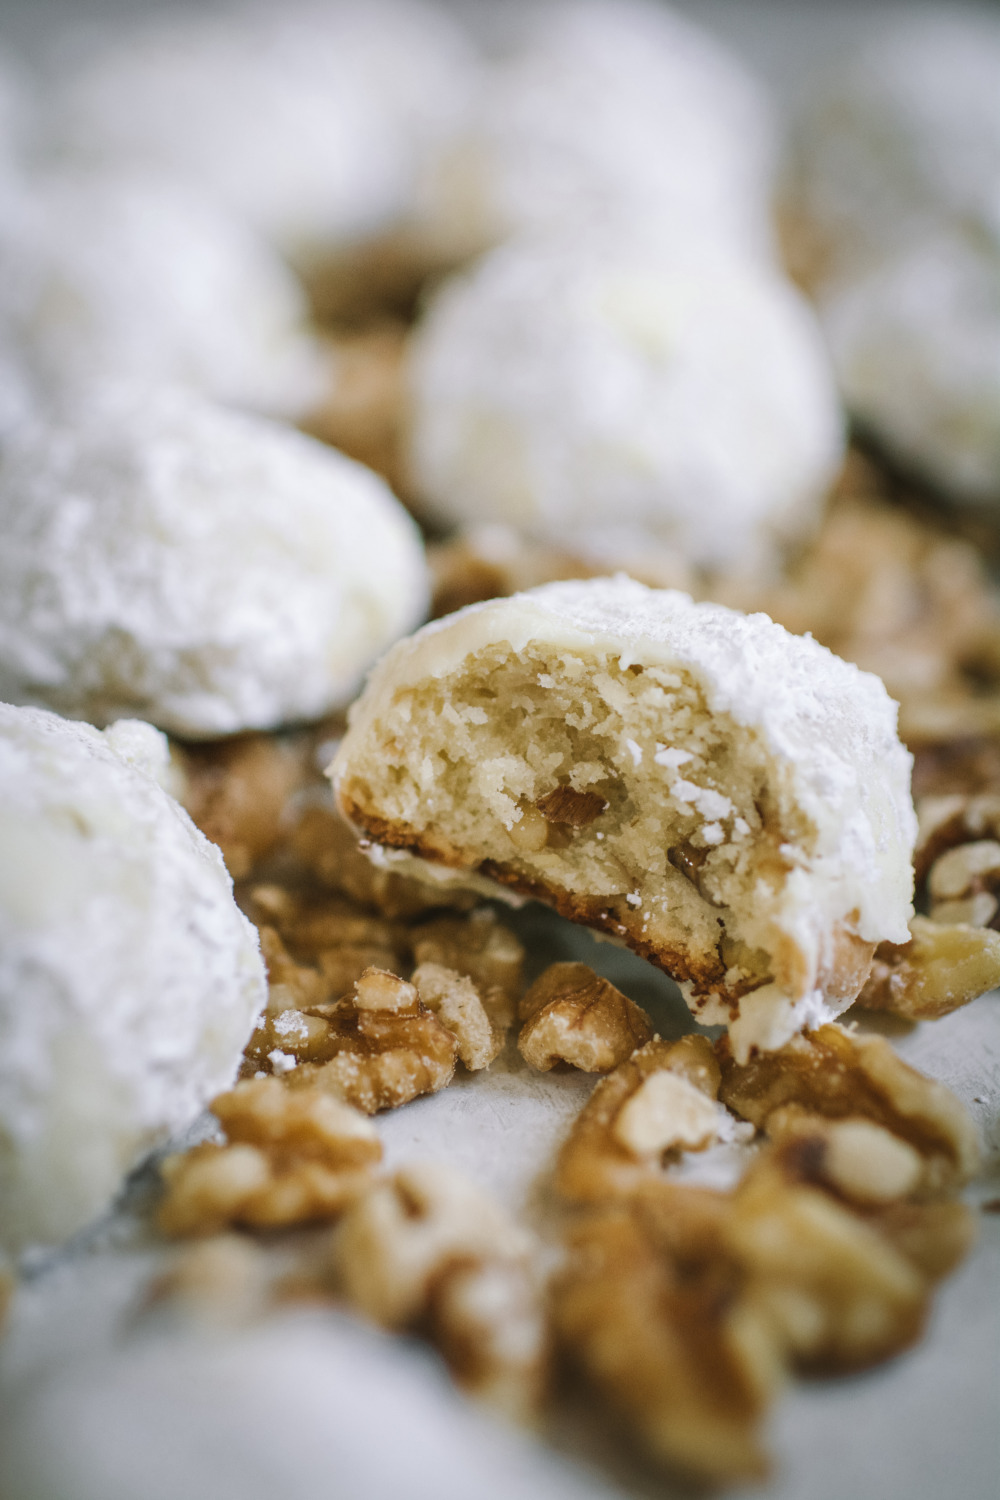
Thanks to the buttery dough – these cookies have a rich melty texture. There is no egg to bind, so they are more crumbly than chewy, like a good shortbread.
HOW TO STORE ITALIAN WEDDING COOKIES:
It’s fine to keep them in an airtight container at room temperature – although if you’re planning to make a bunch to store, say for the holidays – they can be frozen, then brought to room temperature before serving. You may need to give them another roll through powdered sugar.
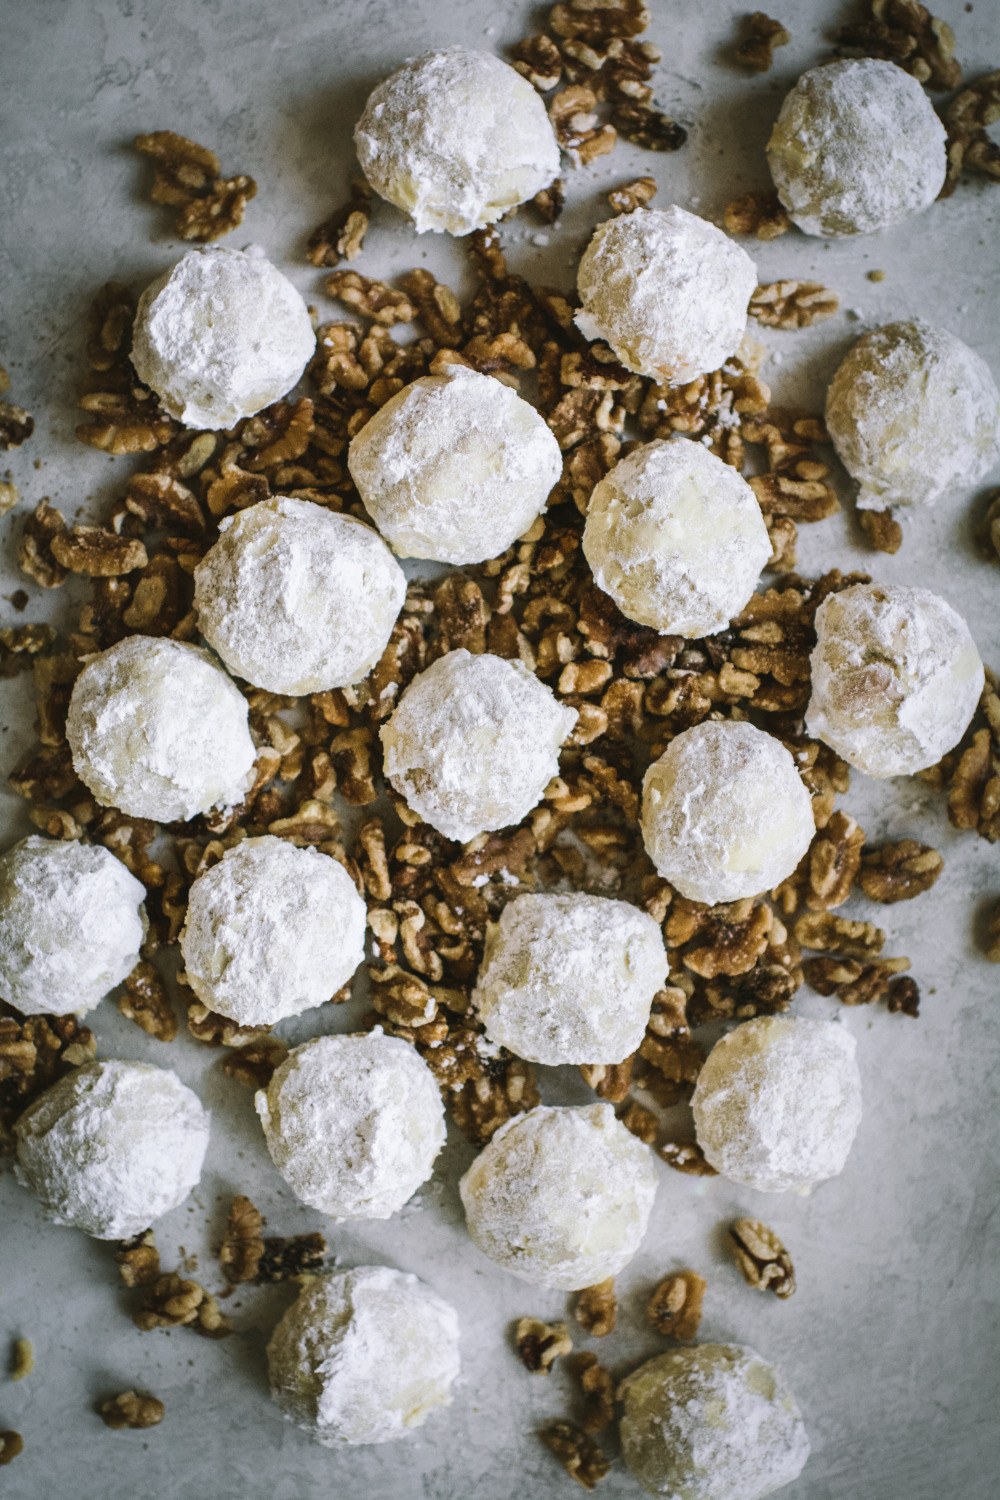
Little clouds of melt-in-your-mouth goodness…little snowballs of crunchy delight… Italian wedding cookies are the perfect treat!
Buon Appetito!
MORE SWEETS:
Doubletree Chocolate Chip Cookies
Italian Wedding Cookies
- Category: Dessert
Description
Buttery and soft, these walnut Italian Wedding Cookies are perfect for the holidays and all of your special occasions! They are melt-in-your-mouth delicious!
Ingredients
- 1 1/2 cups softened butter
- 1 cup powdered sugar (plus more for finishing cookies)
- 1/4 tsp. salt
- 2 1/2 Tbsp. water
- 1 1/2 cups chopped walnuts
- 1 Tbsp. almond extract
- 3 cups sifted all-purpose flour
Instructions
- Preheat oven to 400 F.
- Mix softened butter and powdered sugar with a wooden spoon until well combined.
- Add salt, water, nuts, and extract. Mix well.
- Stir in flour gradually; dough will be stiff.
- Roll into 1-inch balls, and bake for roughly 15 minutes, until cookies are firm to the touch and pale gold in color.
- Immediately, after removing from the oven, roll cookies in powdered sugar. Let cool.
- Once cooled, roll cookies again through the powdered sugar to achieve a deeper “frosted” layer.
(Recipe adapted from Where Women Cook)
Recipe Note:
Updated Post: September 25, 2020
Original Post: September 23, 2013
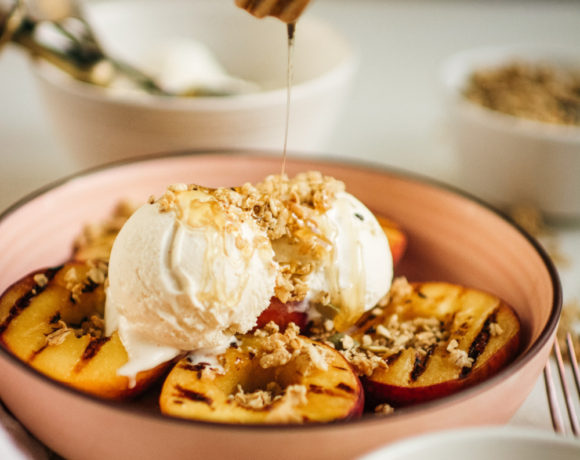
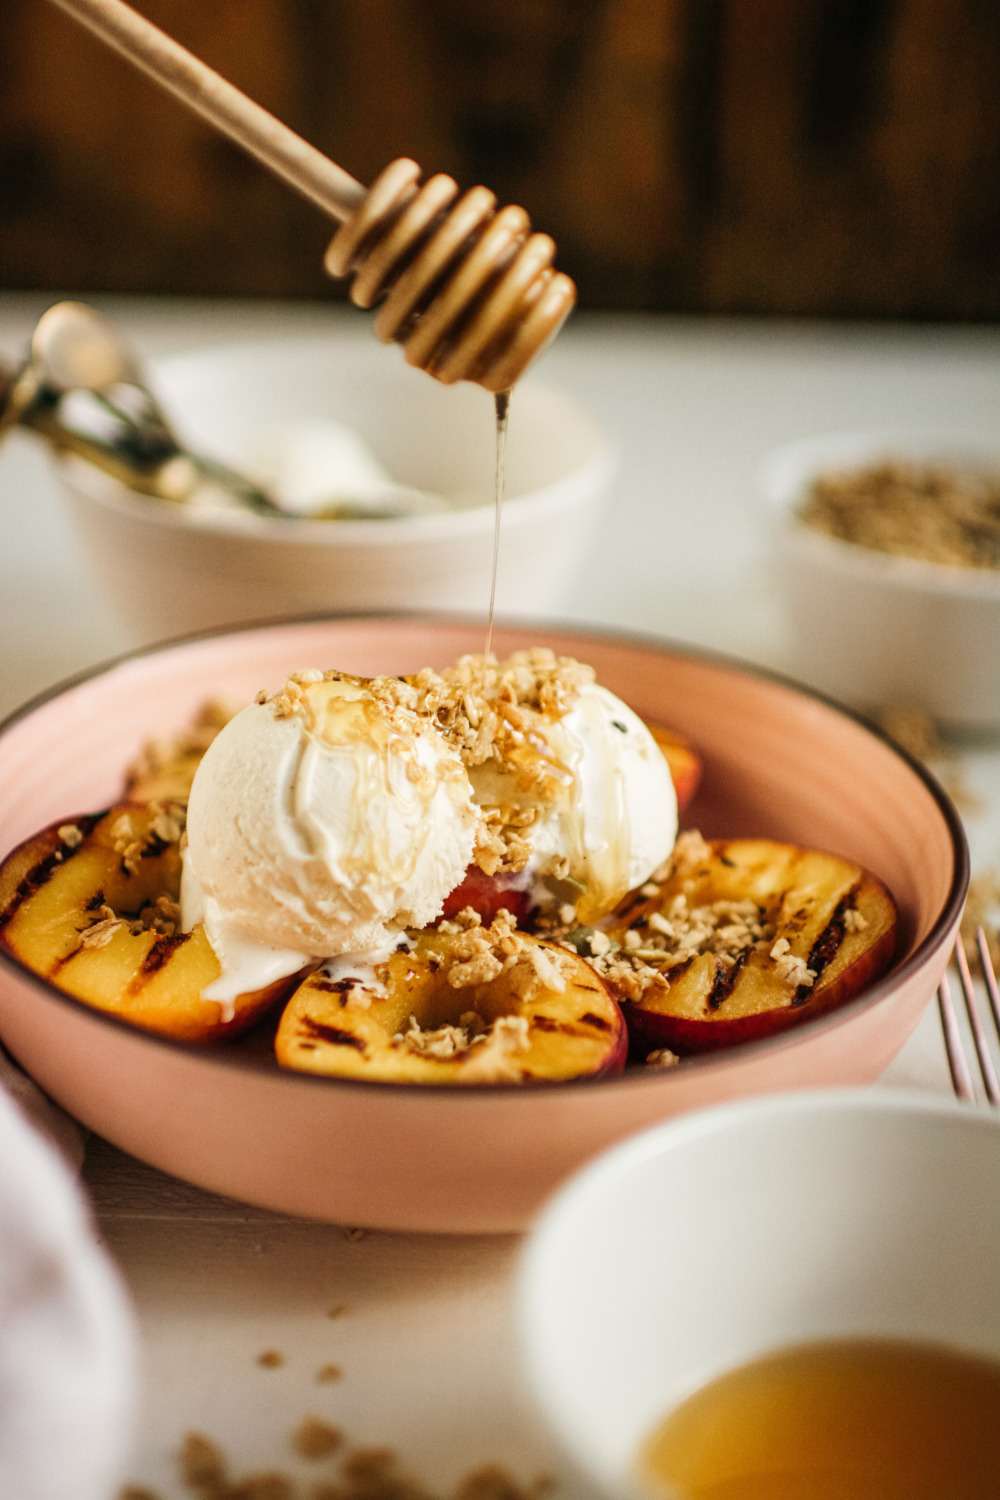
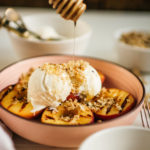
Grilled Peaches With Honey Vanilla Frozen Yogurt
Grilled Peaches With Honey Vanilla Frozen Yogurt is a refreshing summertime dessert that’s a little bit decadent and a whole lot healthy!
“You come on like a dream, peaches and cream…”
In all of the years that I’ve been reading cookbooks and pouring over recipes, I’ve stumbled upon grilled fruit more times than I can count, and I’ve always told myself that I need to make it. So here we go!
So good. So sooo good. I like peaches, but I love grilled peaches. Especially when they’re wading in a little bit of melty, sweet frozen yogurt enhanced with organic honey and topped with a sprinkling of crunchy granola.
INSTRUCTIONS:
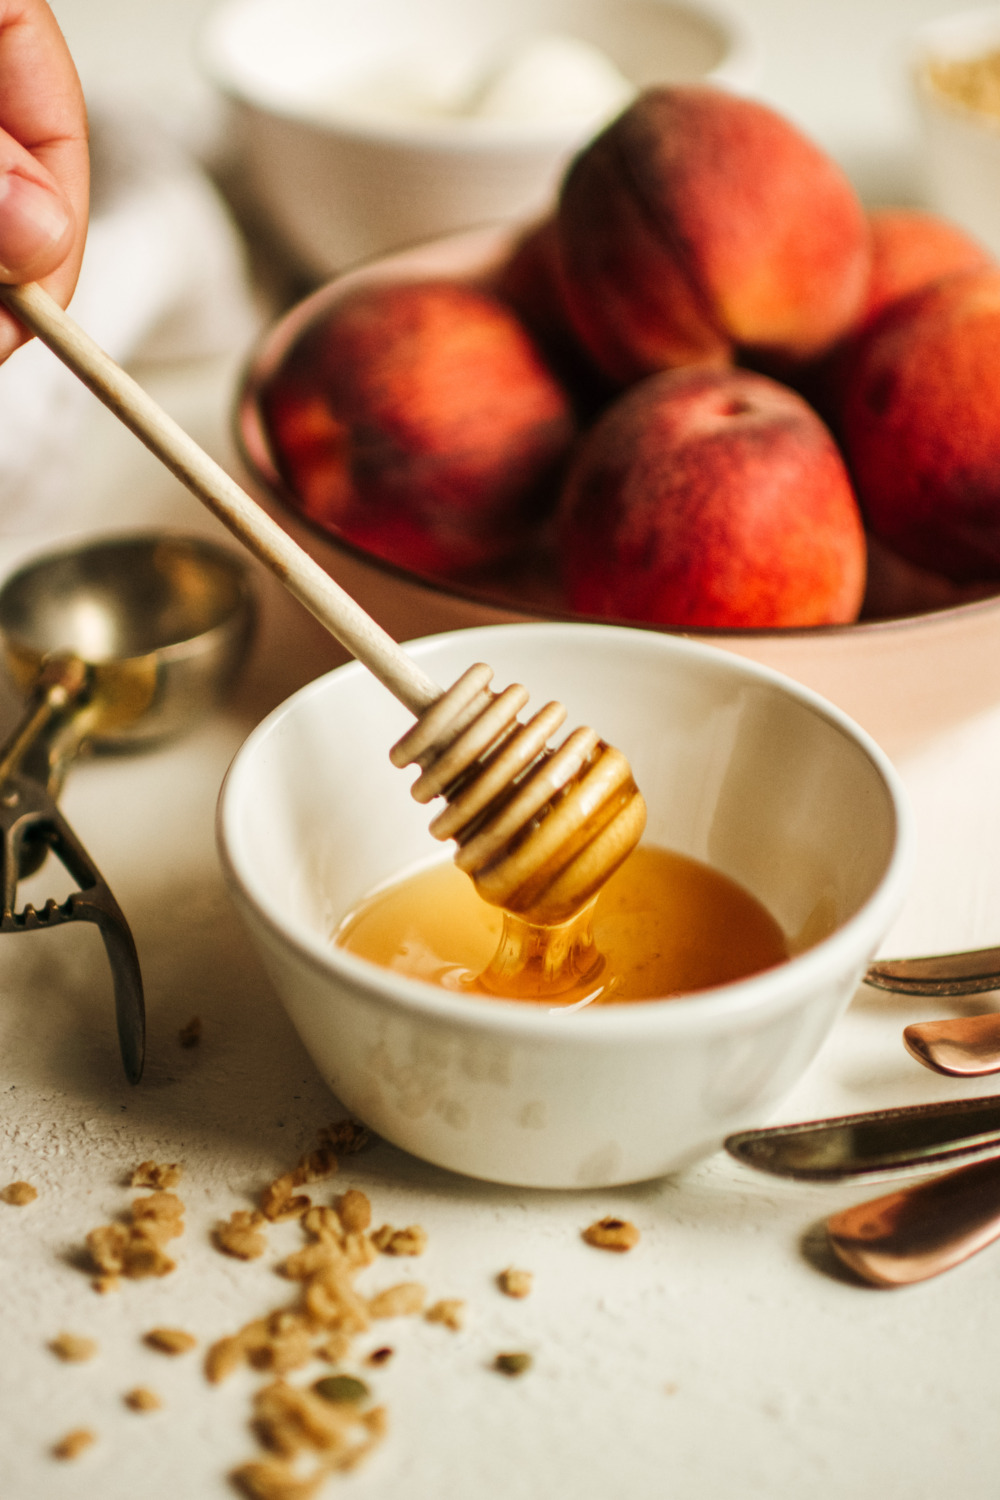
- In a medium bowl using a hand-mixer, combine vanilla bean frozen yogurt with a couple tablespoons of honey. (If you can’t find vanilla bean frozen yogurt, you could mix in the seeds from one bean to get that super vanilla flavor.)
- Place the yogurt back into the freezer as you prepare your grilled peaches.
- Cut the peaches in half and remove the stone. To keep the peaches from sticking to the pan, brush the cut side with a very small amount of coconut oil.
- I used a grill pan on the stove top today, mainly to emphasize how easy it is to make this dessert, even without firing up the grill.
- Allow the peaches to sear for about 2 – 3 minutes to achieve those grill marks that we love so much.
- Serve the warm grilled peaches with a scoop or two of frozen yogurt, a little squeeze of honey, and crunchy granola.
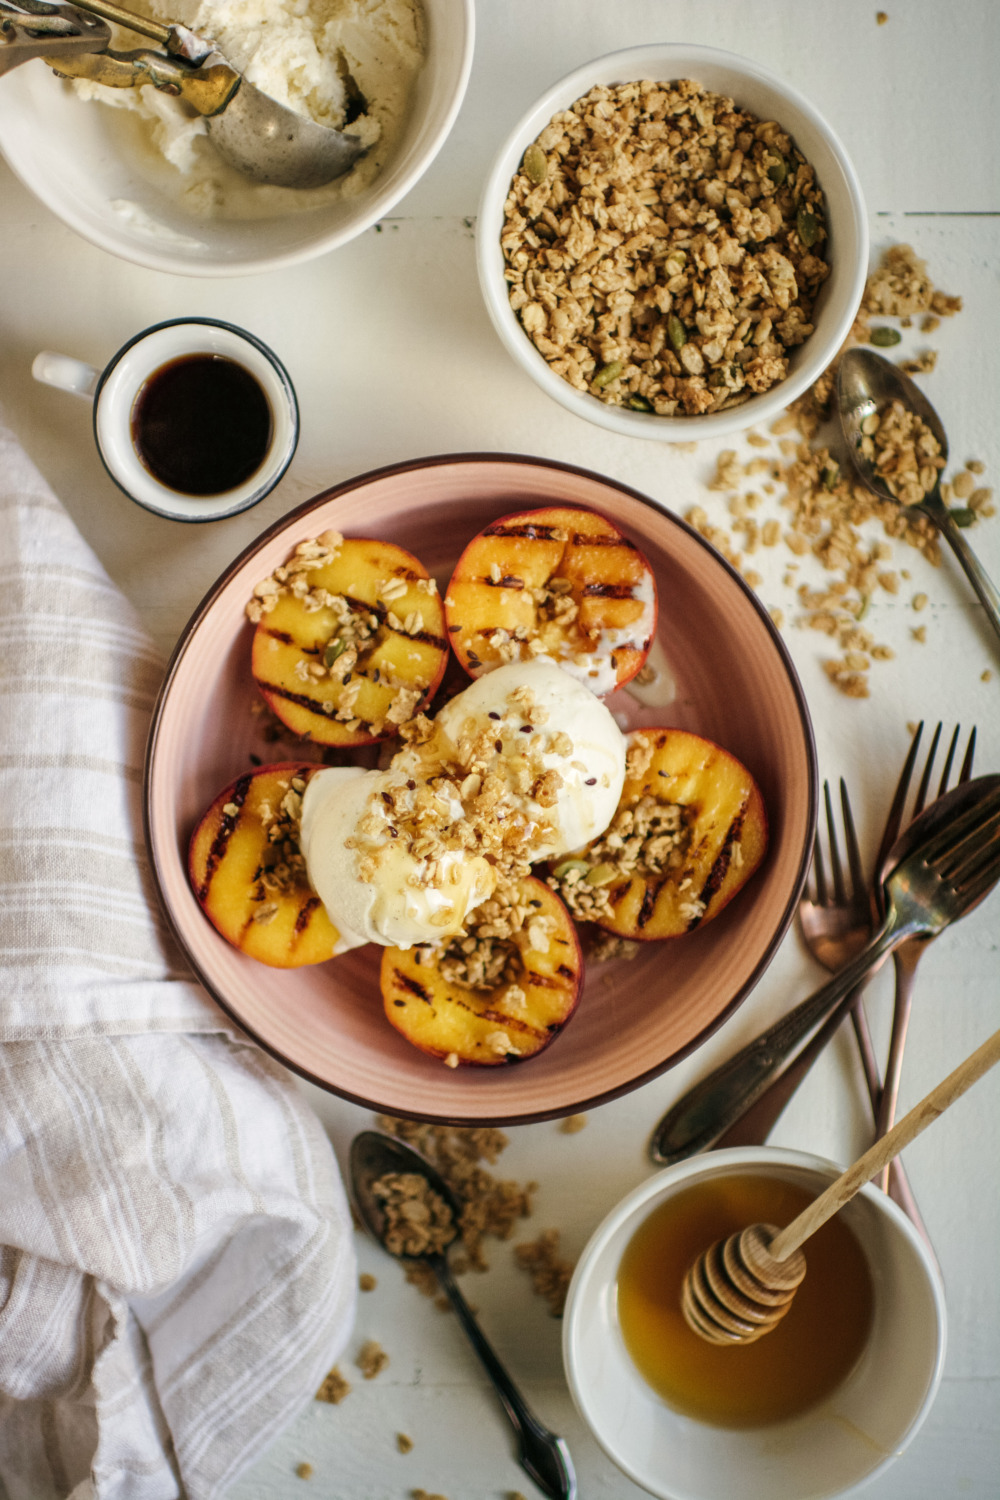
This dessert is simple and stunning. Grilled sweet peaches spotlight the best of the farmers’ offerings these days!
Buon Appetito!
MORE PEACH RECIPES:
Balsamic Peach, Burrata & Prosciutto Salad
Crostini with Ricotta, Prosciutto, Sweet Peaches & Honey
Grilled Peaches With Honey Vanilla Frozen Yogurt
- Category: Dessert
Description
Grilled Peaches With Honey Vanilla Frozen Yogurt is a refreshing summertime dessert that’s a little bit decadent and a whole lot healthy!
Ingredients
- 4 ripe, but firm peaches
- 1/2 Tbsp. coconut oil
- 3 cups vanilla bean frozen yogurt
- 2 Tbsp. honey, plus more for drizzling
- 4 Tbsp. granola or any crunchy topping
Instructions
In a medium bowl using a hand-mixer, combine vanilla bean frozen yogurt with a couple tablespoons of honey. (If you can’t find vanilla bean frozen yogurt, you could mix in the seeds from one bean to get that super vanilla flavor.)
Place the yogurt back into the freezer as you prepare your grilled peaches.
Cut the peaches in half and remove the stone. To keep the peaches from sticking to the pan, brush the cut side with a very small amount of coconut oil.
I used a grill pan on the stove top today, mainly to emphasize how easy it is to make this dessert, even without firing up the grill.
Allow the peaches to sear for about 2 – 3 minutes to achieve those grill marks that we love so much.
Serve the warm grilled peaches with a scoop or two of frozen yogurt, a little squeeze of honey, and crunchy granola.
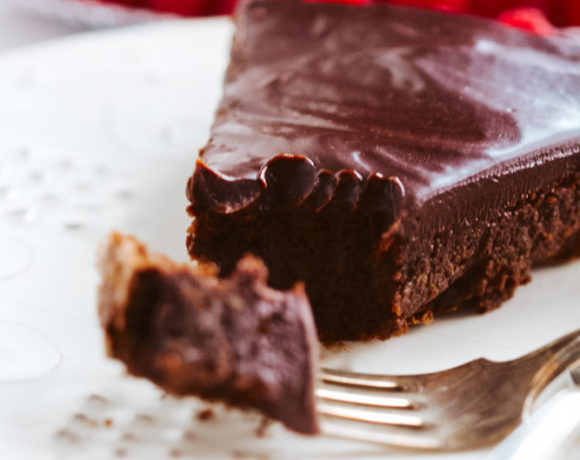
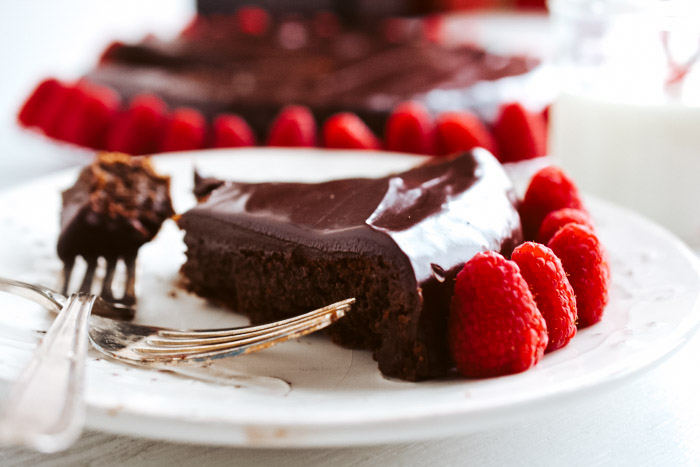
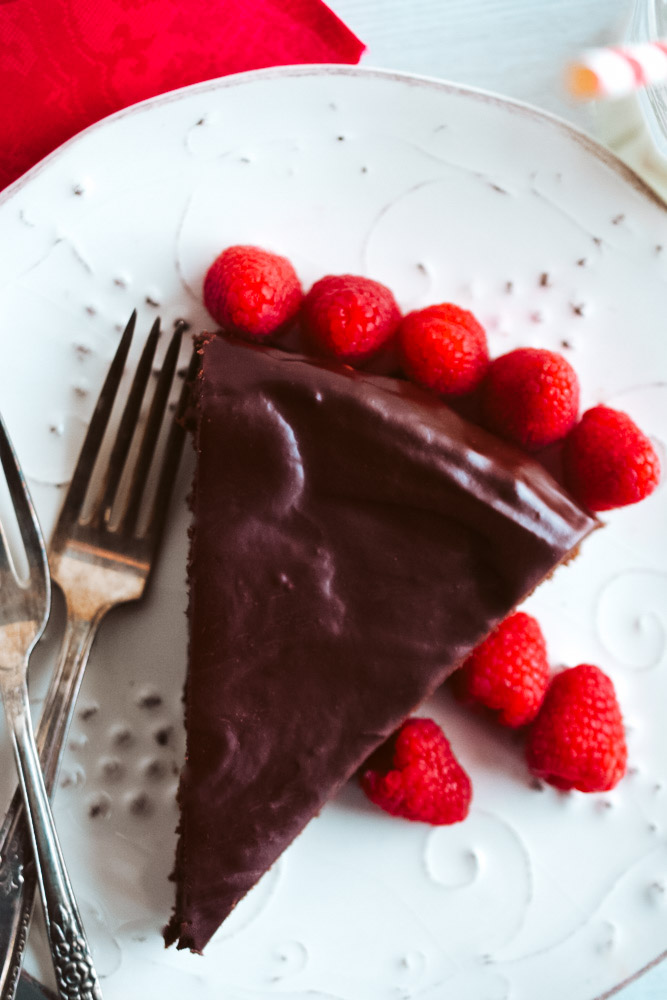
Flourless Chocolate Cake with Bittersweet Chocolate & Raspberry Glaze
This Flourless Chocolate Cake with Bittersweet Chocolate & Raspberry Glaze is rich, decadent, and delicious! Happy Valentine’s Day!
If you look closely enough, I mean get your pretty little nose all squished up to that screen (go ahead, I’ll wait……), you will see one plate with two forks; one glass with two straws.
That, my friends, is how romance is done.
And Flourless Chocolate Cake with Bittersweet Chocolate & Raspberry Glaze doesn’t hurt either.
I’m not sure there’s anything else I could make that would make my guy happier… Well, there is always pizza…but you know what I’m saying….
Dom is kind of a sucker for chocolate, and when I can make a dessert that is this intensely rich, decadent and gluten-free – Jack. Pot. Bing. O. Cha. Ching.
The thing that makes a flourless cake so special, beyond its extreme flavor, you ask? The soufflé-like quality that it possesses.
It rises then falls as it cools – making it possible for you to run, dance, skip and jump in the kitchen as it bakes. No worries about it falling…it will fall by design. So go ahead – get your workout in.
And this glaze? Certainly chocolate alone would be to die for, but because it’s Valentine’s Day, I thought – let’s get fancy. I added seedless raspberry jam to the melted chocolate and heavy cream to create a glaze so special that it just might bring a tear to Dom’s eye.
Okay, my eye, but I could see him getting misty, too.
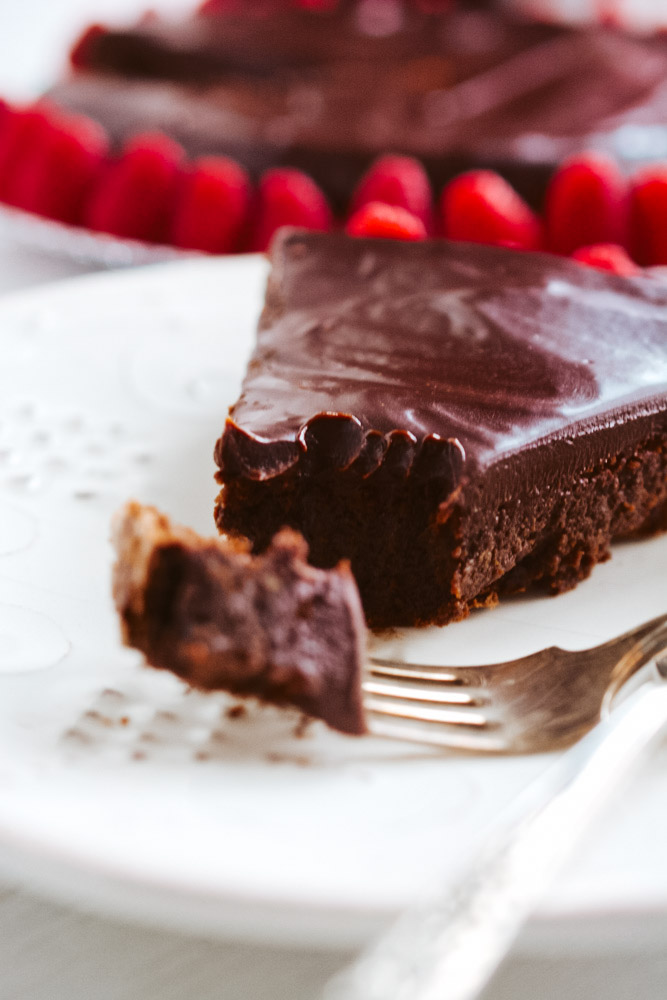
For an elegant finish, a ring around the cake of fresh berries will create beautiful texture and stunning color!
Here’s to a sweet treat that is special enough for you and your favorite Valentine!
*NEWS FLASH*
CCB will be quiet for a short spell, but returning soon with a shiny new look. In the meantime, you can access posts through my Instagram, Pinterest and Facebook!
See you soon!
MORE EXCITING RECIPES FOR VALENTINE’S DAY:
Chocolate Panna Cotta with Raspberry Compote
Roasted Strawberry & Chocolate Hazelnut Panini
Rumchata French Toast with Warm Berry Compote
BUON APPETITO!
Print
Flourless Chocolate Cake with Bittersweet Chocolate & Raspberry Glaze
- Category: Dessert
Description
This Flourless Chocolate Cake with Bittersweet Chocolate & Raspberry Glaze is rich, decadent, and delicious! Happy Valentine’s Day!
Ingredients
- 10 oz. bittersweet chocolate, chopped
- 3/4 cup unsalted butter, cut into pieces
- 3 Tbsp. vanilla extract
- 5 large eggs, room temperature
- 1 cup sugar
- 1/2 cup heavy cream
- 6 Tbsp. seedless raspberry jam
- 8 oz. bittersweet chocolate, chopped
- 1 pint fresh raspberries
Instructions
- Position a rack in the middle of an oven and preheat to 350 degrees.
- Butter a springform pan 9″ wide by 3″ deep.
- Line the bottom with a piece of parchment paper cut to fit precisely.
- In a heavy saucepan over medium-low heat, combine the 10 oz. of chocolate and butter.
- Heat, stirring, until the mixture is smooth.
- Remove from the heat and let cool.
- Whisk in the vanilla.
- In a large bowl, combine the eggs and sugar.
- Using an electric hand mixer set on medium-high speed, beat until the mixture lightens and triples in volume, about 6 minutes.
- Pour the chocolate mixture over the egg mixture.
- Using a rubber spatula, gently fold them together.
- Pour the batter into the prepared pan.
- Bake until the top forms a crust and cracks. A toothpick inserted into the center should come out with some wet batter attached, about 45 minutes.
- Transfer to a rack.
- Immediately run a knife around the pan sides to loosen the cake; it will fall in the center.
- Press down on the edges to even the top.
- Let cool.
- Release the pan sides and remove.
- Trim off any crumbly edges.
- Invert a flat plate over the cake and invert them together. Set aside.
- In a medium-sized, heavy saucepan over medium heat, combine the heavy cream and raspberry jam.
- Bring to a simmer, then reduce the heat to low.
- Add the 8 oz. of chocolate and whisk until melted and smooth, about 1 minute.
- Remove from the heat and let stand until lukewarm, about 10 minutes. The glaze should be thick but still pourable. Set aside.
- Returning to the cake, lift off the pan bottom and peel off the parchment.
- Tuck strips of waxed (or parchment) paper under the edges of the cake and pour lukewarm glaze over the cake top.
- Using an icing spatula, coax glaze down the sides.
- When the glaze stops dripping, remove the paper.
- Press raspberries onto the sides of the freshly glazed cake.
- Refrigerate until the glaze sets, about 1 hour.
- Serve immediately, or cover with a cake dome and refrigerate for up to 1 week.
- Serve cold or at room temperature.
{Recipe adapted from Williams-Sonoma Kitchen Library: Cakes, Cupcakes & Cheesecakes.}
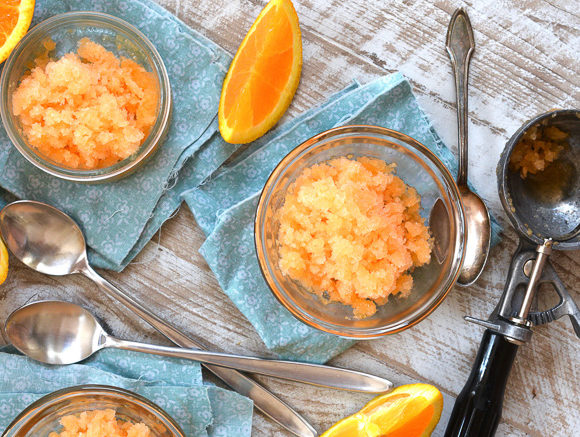
Cantaloupe Orange Granita
Cantaloupe Orange Granita is the best most refreshing answer to the test that many of us are facing these days……..
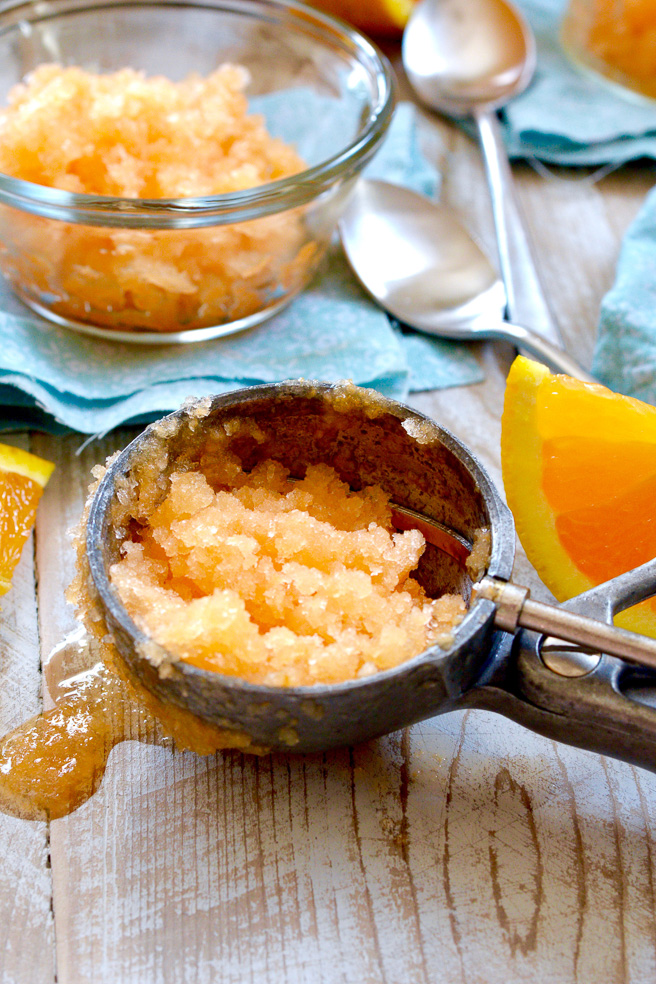
The heat!
…
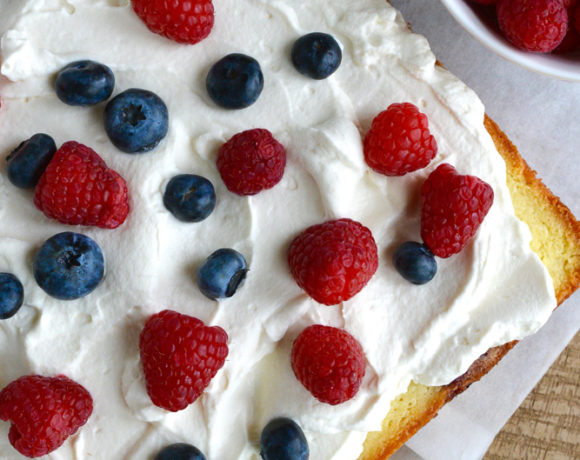
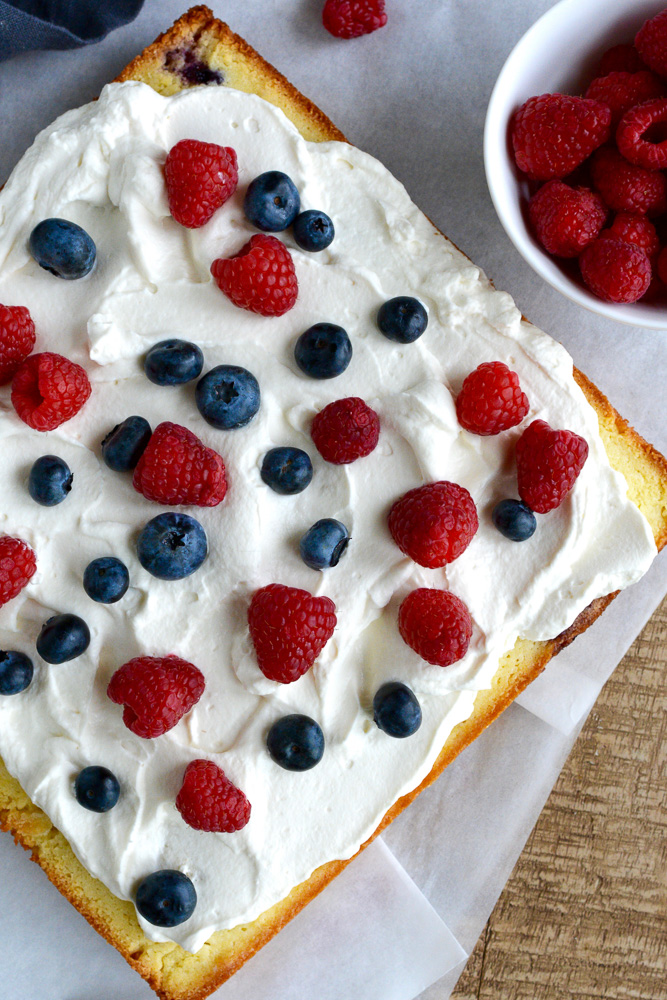
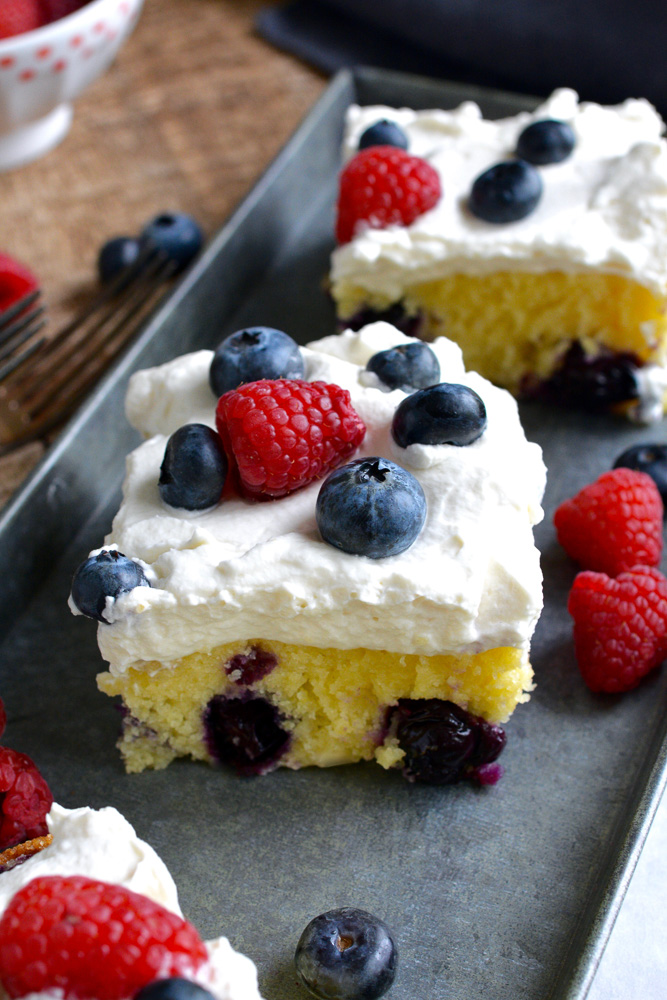
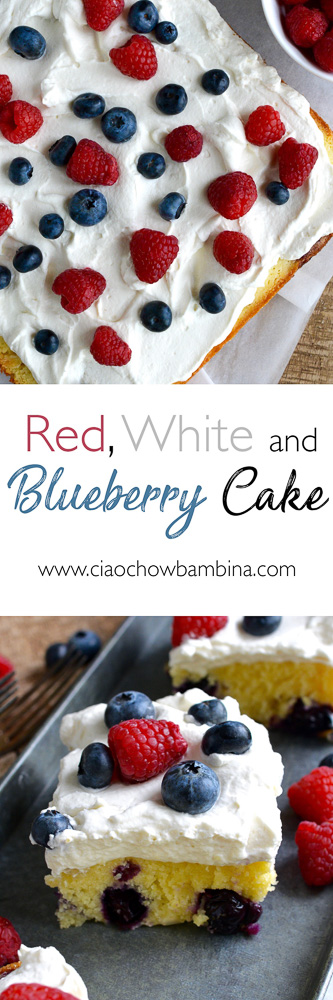
Red, White & Blueberry Cake
Isn’t it true that sometimes life calls for Red, White & Blueberry Cake?
When is it called for? Why is it called for?
-
- Company’s dropping by
- Game night
- Need a homemade dessert you can whip up in no time
- Season finale of your favorite show
- Study break
- Spring cleaning break
- Memorial Day, Fourth of July, Labor Day…
- Just because
Sweet and simple Red, White & Blueberry cake is the answer!
This recipe hails from Dom’s Aunt Betty.
I was going through some old recipes when a tiny slip of paper, not even the size of an index card, came floating out of a book. The title on the paper stated: Cherry or Blueberry Cake – Aunt Betty.
I know for a fact that I’ve held onto this recipe for years (and years), but tucked it away until it could only be found by accident. I hide things too well. 😉 But, today is our lucky day!
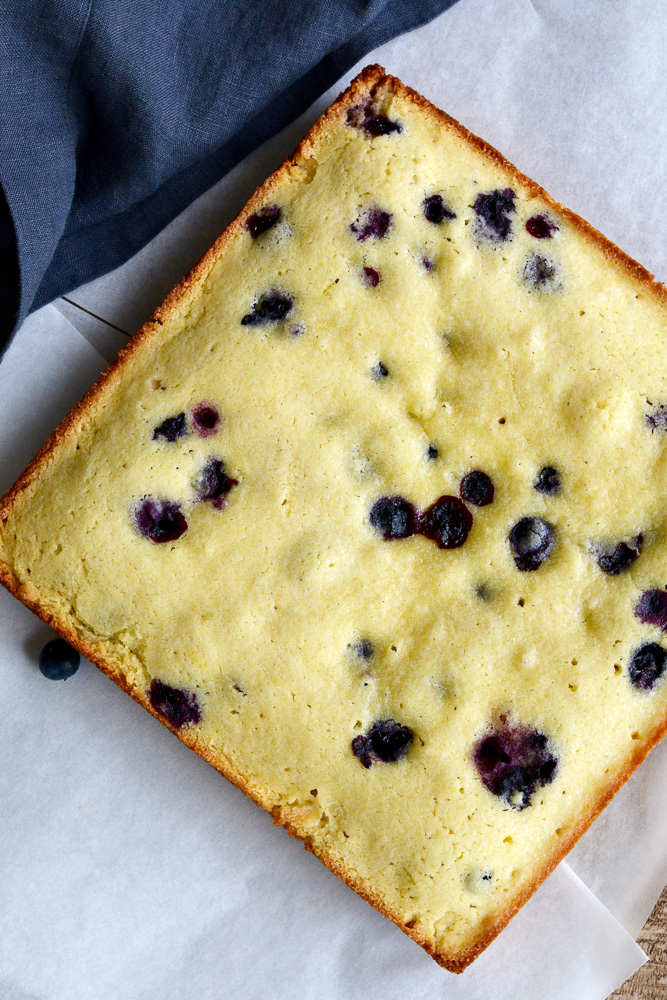
I modified the recipe slightly – rather than using blueberry pie filling, I used fresh blueberries in the batter and opted for a smaller sized pan.
This fabulous Red, White & Blueberry Cake deserves a special occasion like Memorial Day! With juicy blueberries baked right in, sweet and dreamy homemade whipped cream topping and fresh berries to decorate – it’s guaranteed to please!
So here’s my recommendation – make the cake, throw it in the fridge, fire up the barbecue, light the sparklers and invite the neighbors…
Memorial Day weekend is underway!!
Buon Appetito!
Print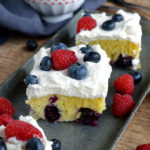
Red, White & Blueberry Cake
- Category: Dessert
Description
Isn’t it true that sometimes life calls for Red, White & Blueberry Cake?
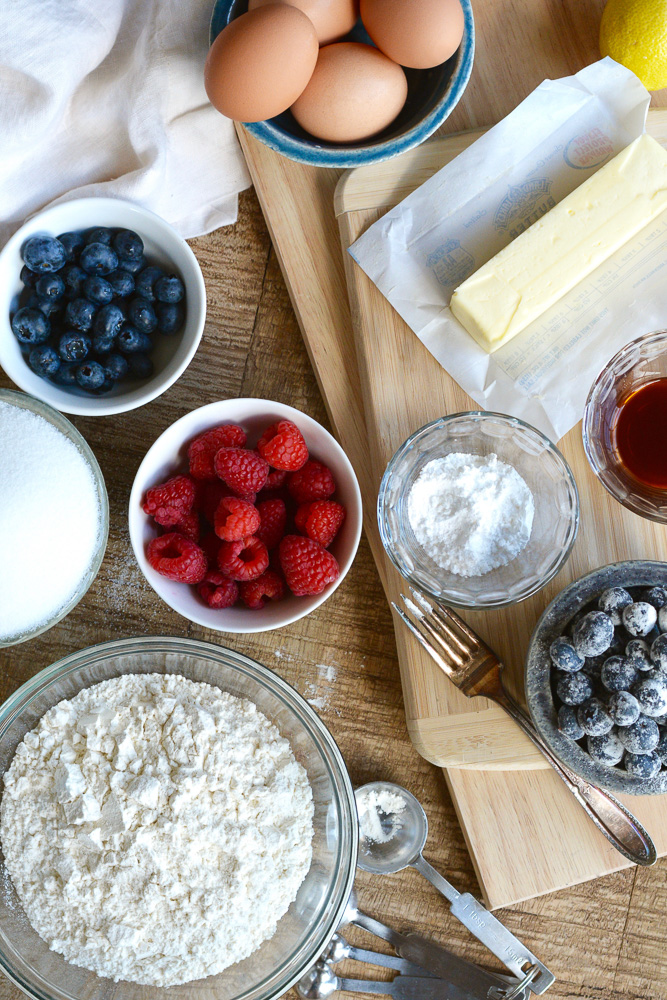
Ingredients
- 1 cup fresh blueberries
- 1 cup butter, softened
- 1 1/2 cups sugar
- 2 cups flour plus 1 Tbsp.
- 4 eggs
- Juice from 1/2 lemon
- 1 tsp. vanilla
- Topping
- 1 cup heavy whipping cream
- 2 Tbsp. powdered sugar
- 1 tsp. vanilla extract
- 1/2 cup raspberries
- 1/2 cup blueberries
Instructions
- Preheat oven to 350 F.
- Grease a 9 x 9-inch pan. Set aside.
- Place 1 cup blueberries in a small bowl and stir them gently with 1 Tbsp. of flour. Set aside.
- For the cake, in a large bowl, beat butter and sugar until fluffy.
- Add 2 cups flour, 4 eggs, lemon juice and vanilla.
- Mix until fully combined.
- Next, gently fold the blueberries into the batter.
- Pour into prepared pan.
- Bake for 30-35 minutes, or until a wooden pick comes out clean.
- To make the topping, in a large bowl, using a hand mixer on medium-high speed, beat the cream, powdered sugar, and vanilla until firm peaks form.
- Once the cake is completely cooled spread the whipped cream evenly over the cake and top with raspberries and blueberries.
- Refrigerate and serve cold.
Have a happy & safe weekend, my friends!
Ciao!
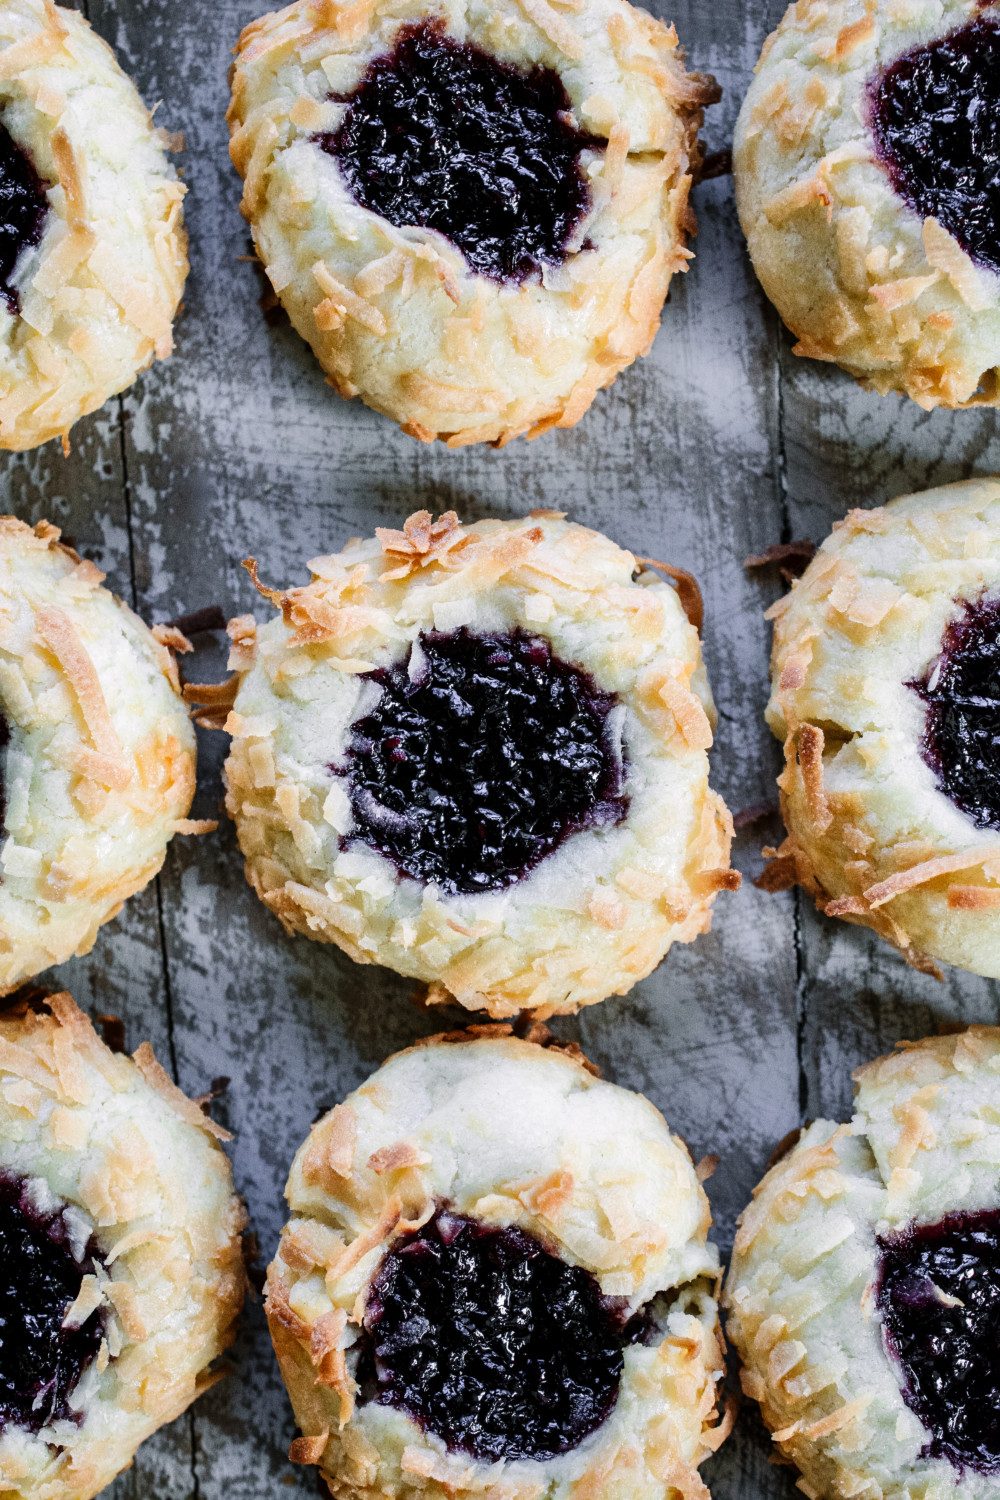
Jam Thumbprint Cookies
Who doesn’t love a good butter cookie? Am I right? A rich shortbread? These Jam Thumbprint Cookies deliver the decadence of a shortbread with the sweet complement of a tasty jam.
As I was editing these pictures, I was reminded of a daily ritual we had when the kids were very young – elementary-age young.
…

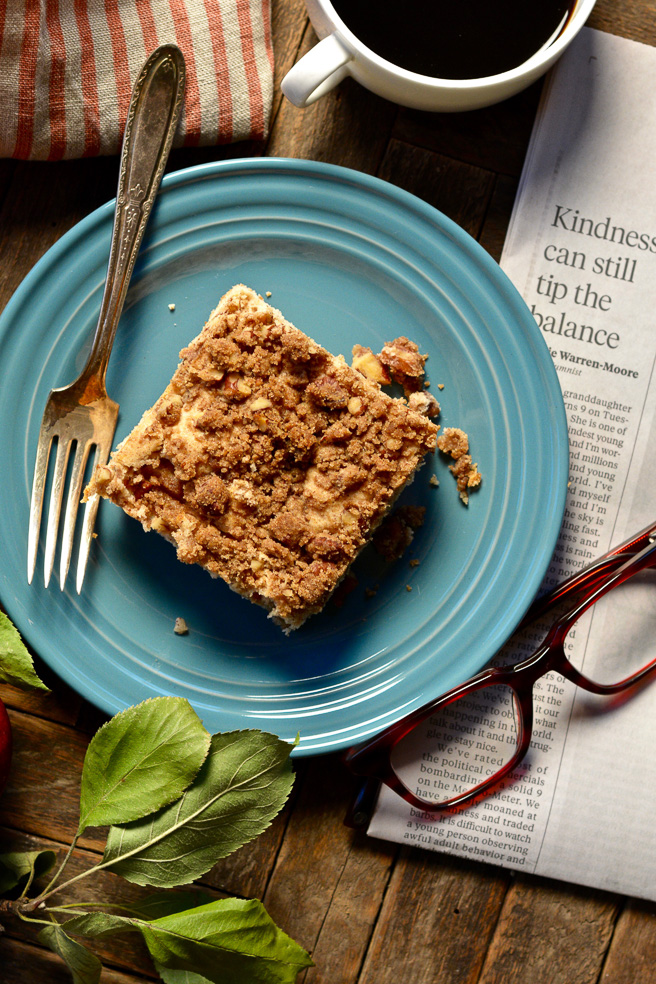
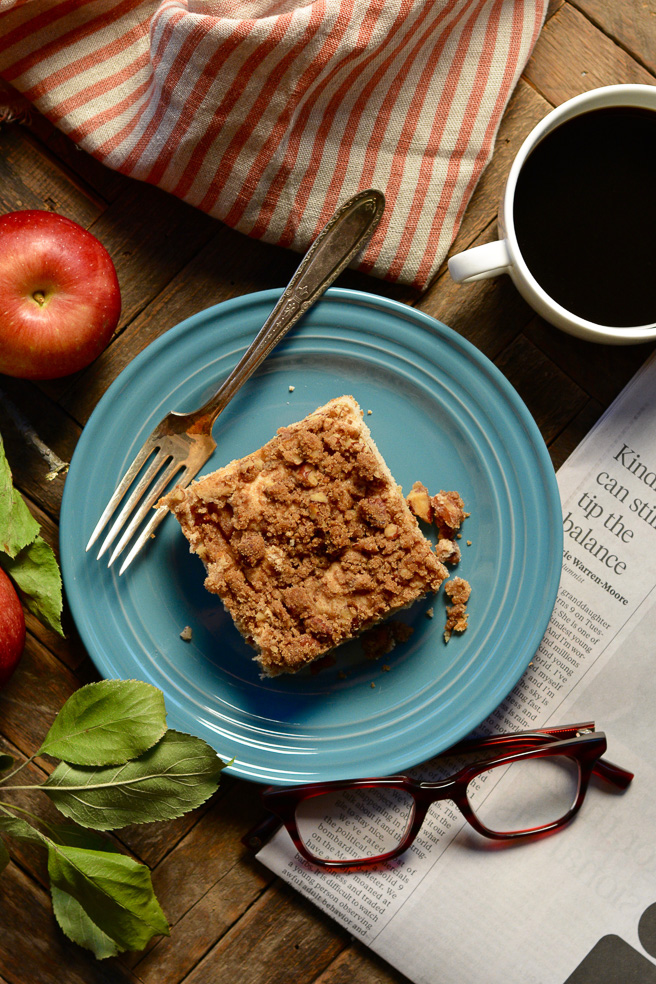
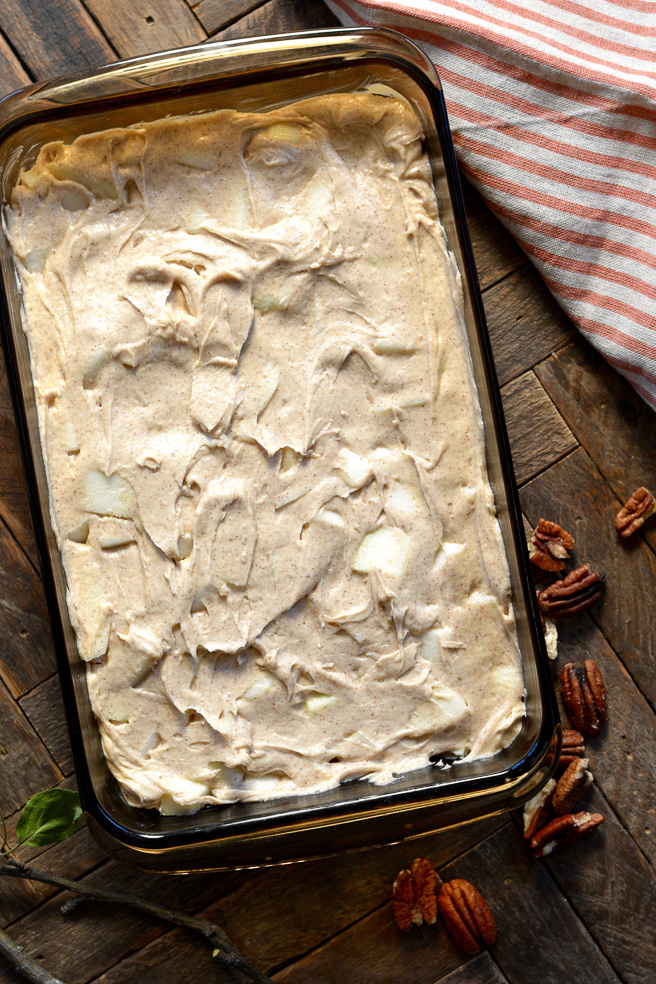
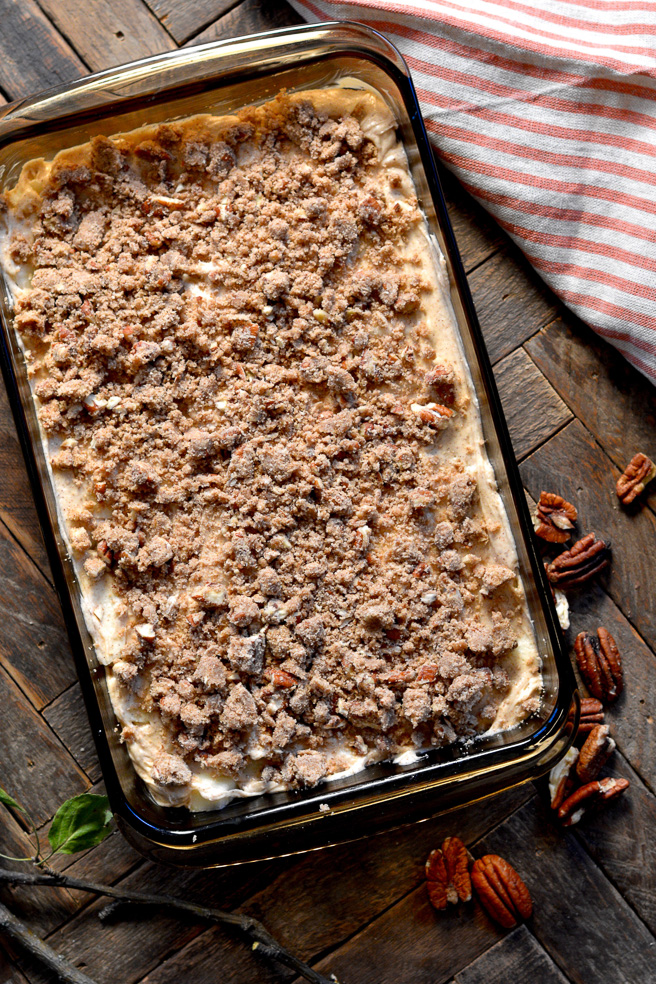
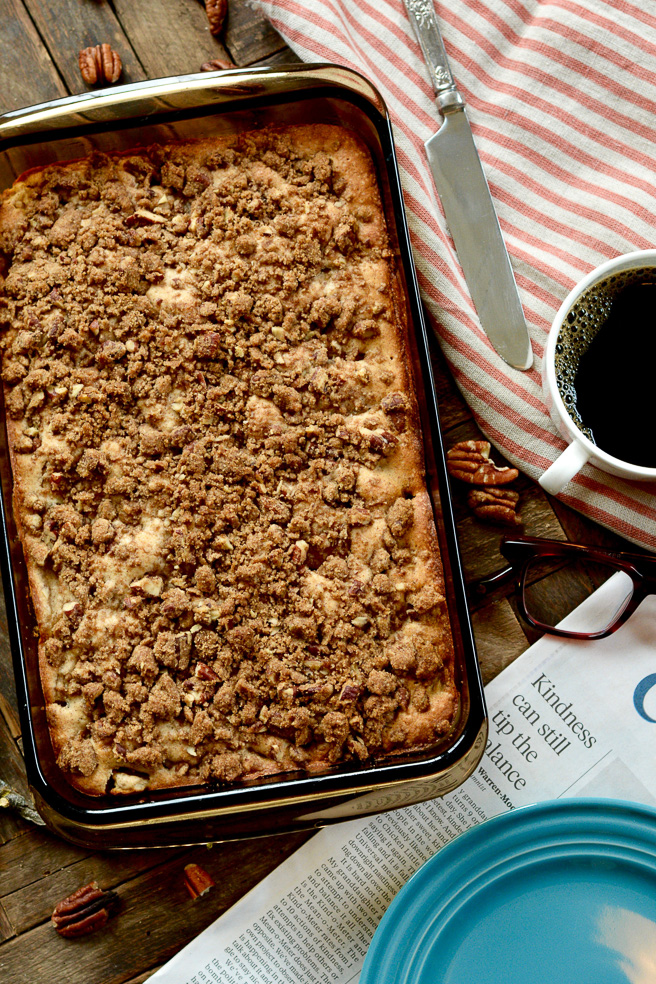
Cinnamon Apple Cake with Pecan Crumble
Cinnamon Apple Cake with Pecan Crumble makes for a great accompaniment to your morning coffee or afternoon tea.
I woke to the sound of pouring rain. Some days this is not a welcomed noise, however, on this day, it was. It was the kind of morning where apple cake with pecan crumble made sense.
I had tossed and turned the night before pondering the fact that I’ve yet to share an apple recipe this fall. (Do things like that keep you up at night, too? I’d love to know!)
Anyway, we’ve been apple picking, I have sacks and crispers full of Empires and Galas to prove it, but they’ve done nothing more than serve as my my mid-morning snack. Not that a crispy cold apple can’t be the star of the 11am hour, I was craving more.
I needed brown sugar and cinnamon to come together in the name of apple cake. I needed to squeeze a cold lemon in my hand and dribble its juice over a big bowl of diced apples. I needed to watch soft butter and white sugar swirl. I needed to mix and stir and pour and wait…
Wait for the moment I could slice into my cinnamon apple cake and know that all is right. That the aroma of coffee co-mingling with cinnamon will be enough to start the day on a stunning note.
Cinnamon apple cake with pecan crumble is to a cup of coffee what a warm and fuzzy sweater is to a chilly fall morning. They complement. They balance. They fit.
Apple cake at daybreak is:
- gratifying
- fragrant
- buttery
- mouth-watering
- pleasing
Nothing but good, here…
So whether you’re enjoying a square of this delectable cake in solitude joined only by a cup of your favorite steaming beverage, or sharing a piece with a special person over stimulating conversation, Cinnamon Apple Cake with Pecan Crumble will set the tone right!
Buon Appetito!
Print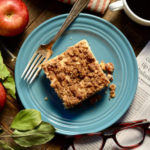
Cinnamon Apple Cake with Pecan Crumble
- Prep Time: 15 mins
- Cook Time: 50 mins
- Total Time: 1 hour 5 mins
- Yield: 12 1x
- Category: Dessert
Description
Cinnamon Apple Cake with Pecan Crumble makes for a great accompaniment to your morning coffee or afternoon tea.
Ingredients
- Apple Cake
- 1/2 cup softened butter
- 3 large baking apples, peeled, cored & diced
- Juice of 1 lemon
- 2/3 cup sugar
- 1 tsp. vanilla extract
- 2 large eggs, beaten
- 1 1/2 tsp. ground cinnamon
- 1 1/4 cups All-Purpose Flour
- Pecan Crumble
- 1/3 cup chopped pecans
- 1/4 cup All-Purpose Flour
- 1/4 cup light brown sugar
- 1/2 tsp. cinnamon
- 2 1/ Tbsp. softened butter
Instructions
- Preheat oven to 350 F.
- With soft butter, lightly grease an 11×7-inch bar pan
- In a medium bowl, mix lemon juice with diced apples. Set aside.
- In a large bowl, beat the butter with sugar until light.
- Add the vanilla and eggs and beat until smooth.
- Add the cinnamon and flour and mix until the ingredients are just blended.
- Add the apples and stir into the batter.
- Spread the batter into your prepared pan and use a rubber spatula to smooth the top.
- Mix together the pecan crumble ingredients with your fingers until the mixture is crumbly.
- Evenly spread the crumble onto the batter and bake for 45 – 50 minutes or until golden brown.
- Cool to room temperature before serving.
{Recipe adapted from Emeril Lagasse.}

CIAO!
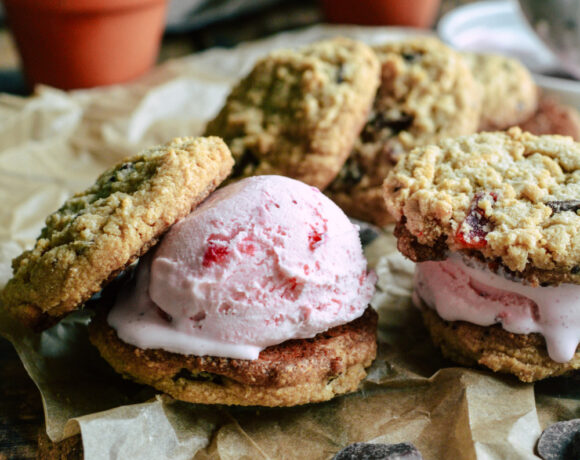
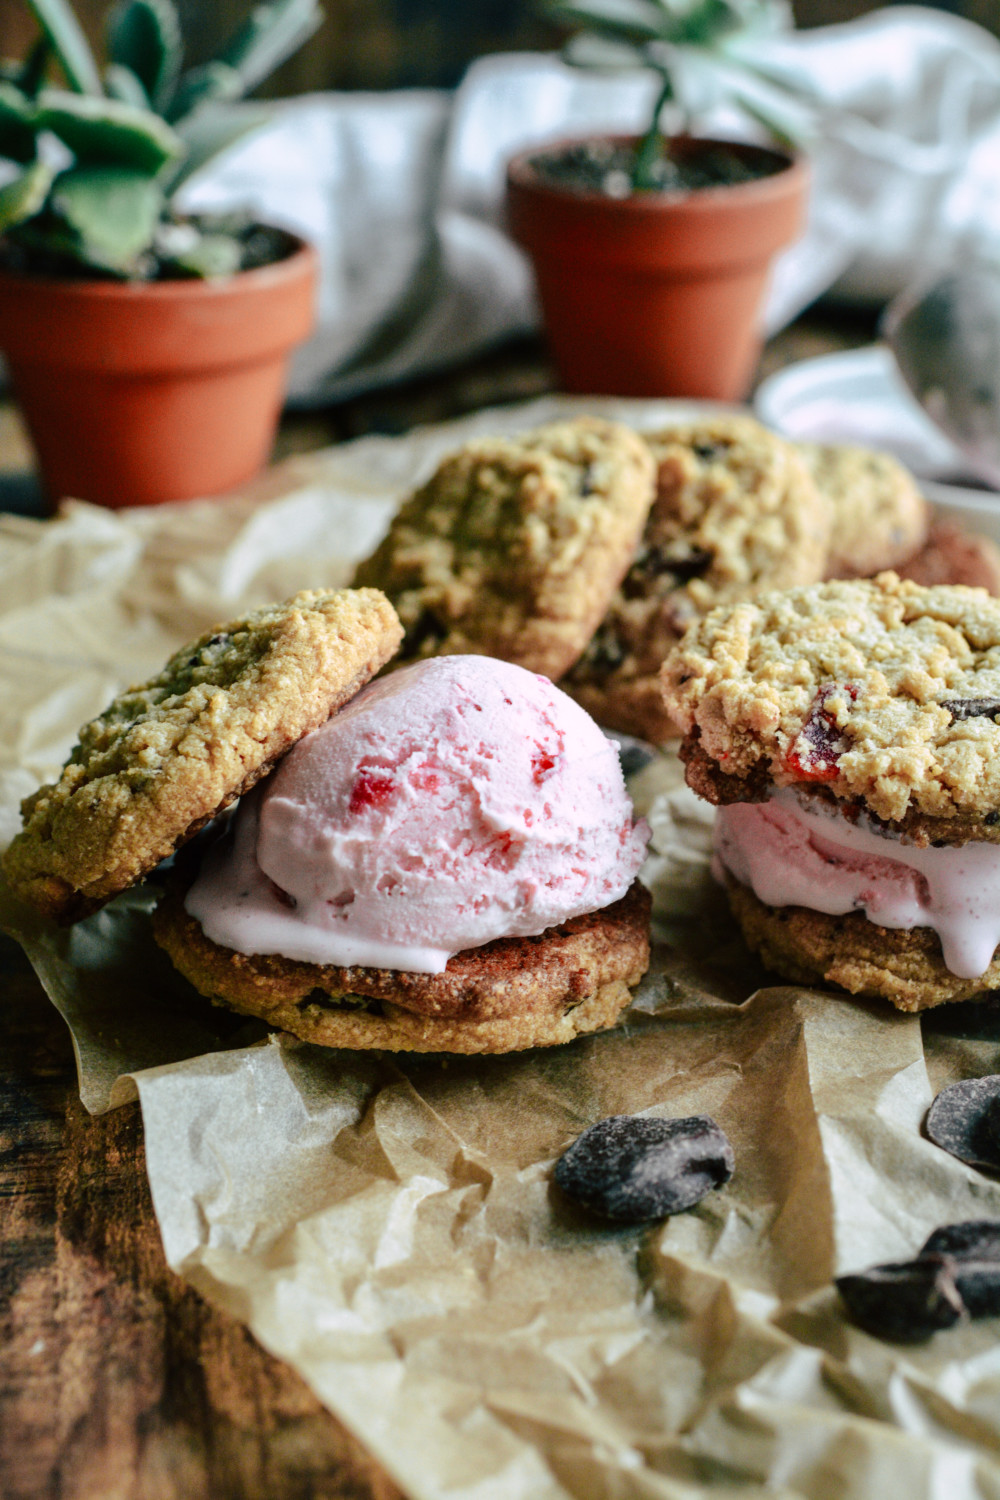
Chocolate Chunk Strawberry Ice Cream Sandwiches
These Chocolate Chunk Strawberry Ice Cream Sandwiches are easy to make, scrumptious to eat, and perfect for sweet celebrations!
Hi friends! I’m coming at you today to celebrate a highly momentous occasion! A Virtual Baby Shower for my friend Erin from The Speckled Palate!
…
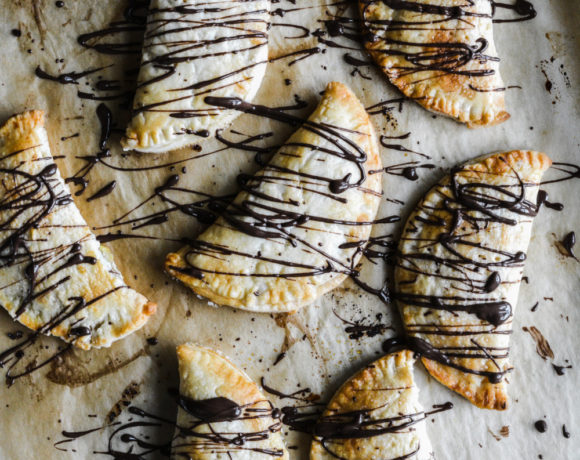
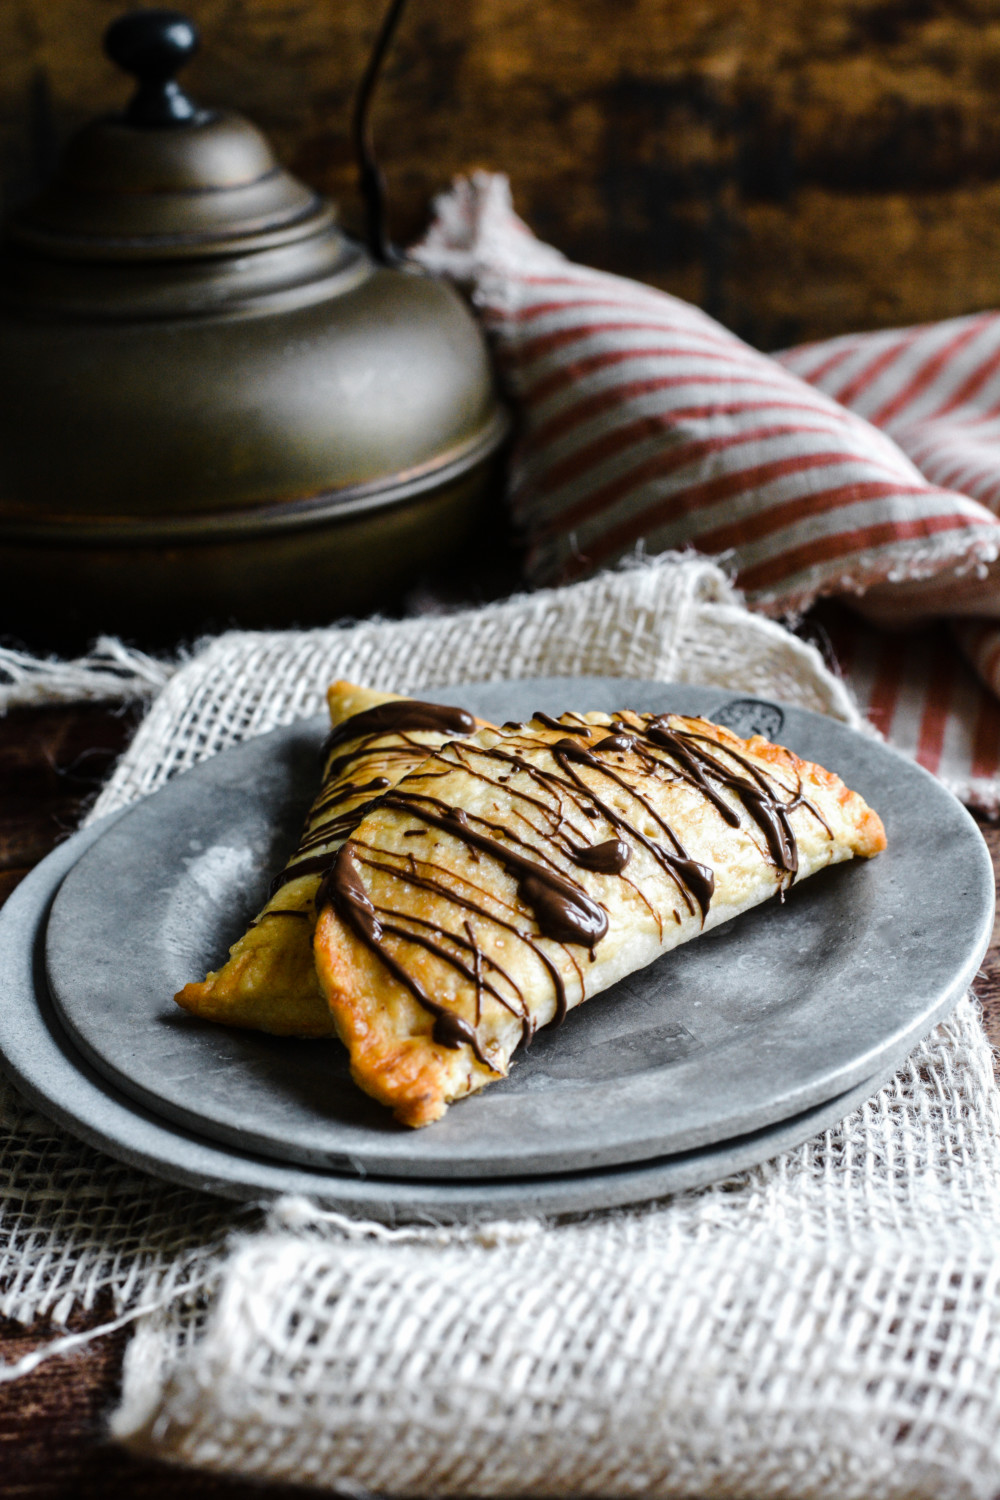
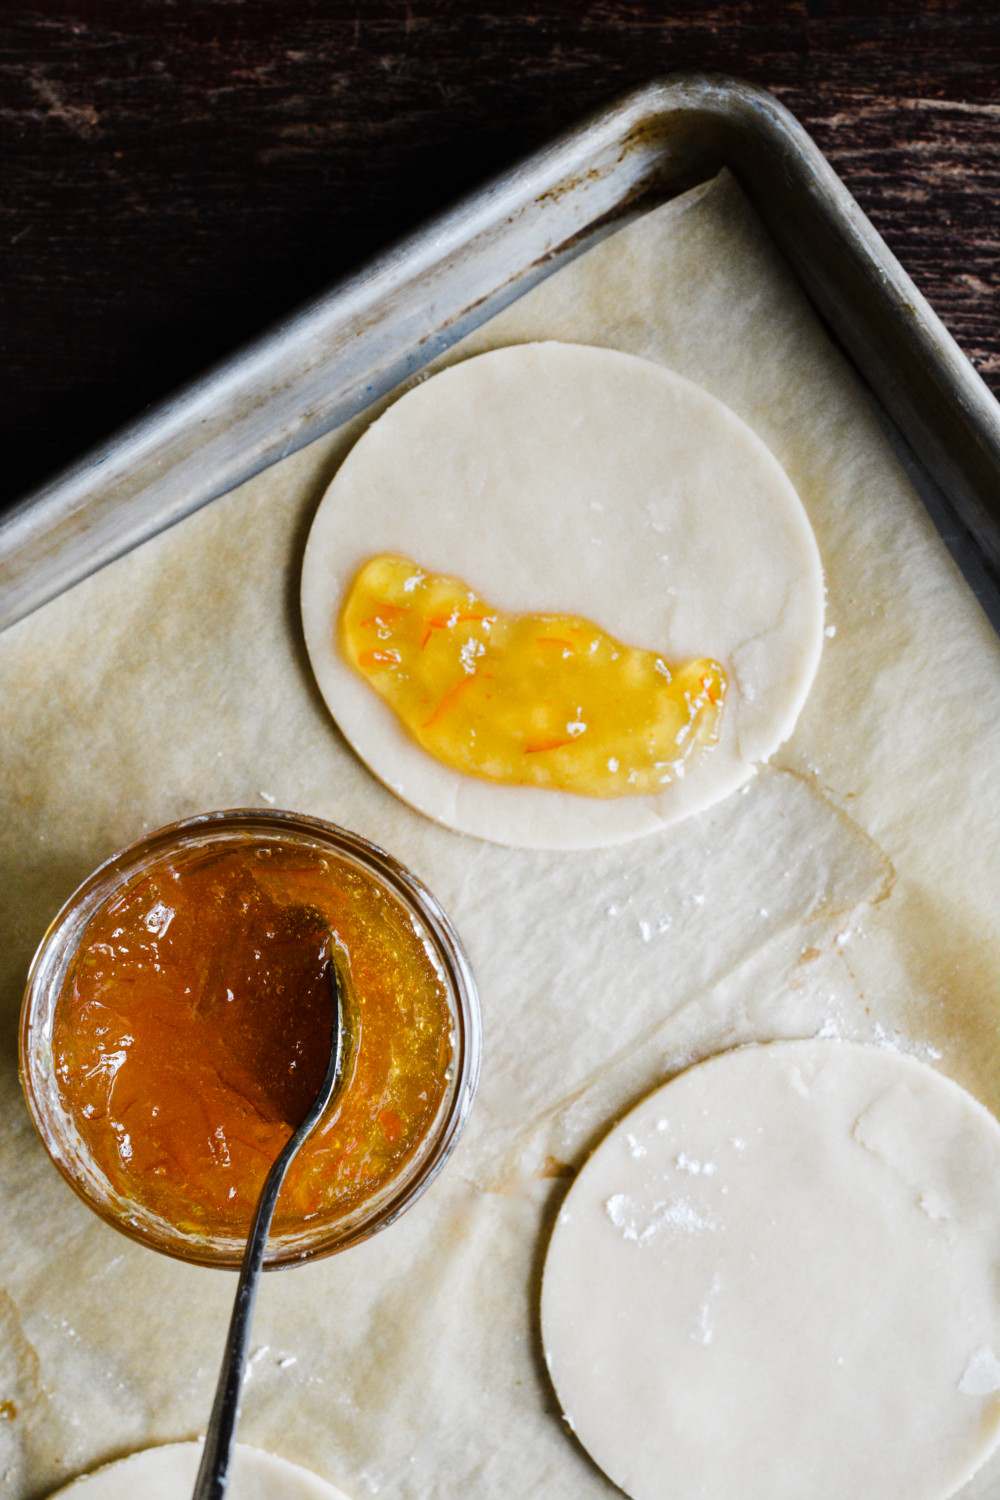
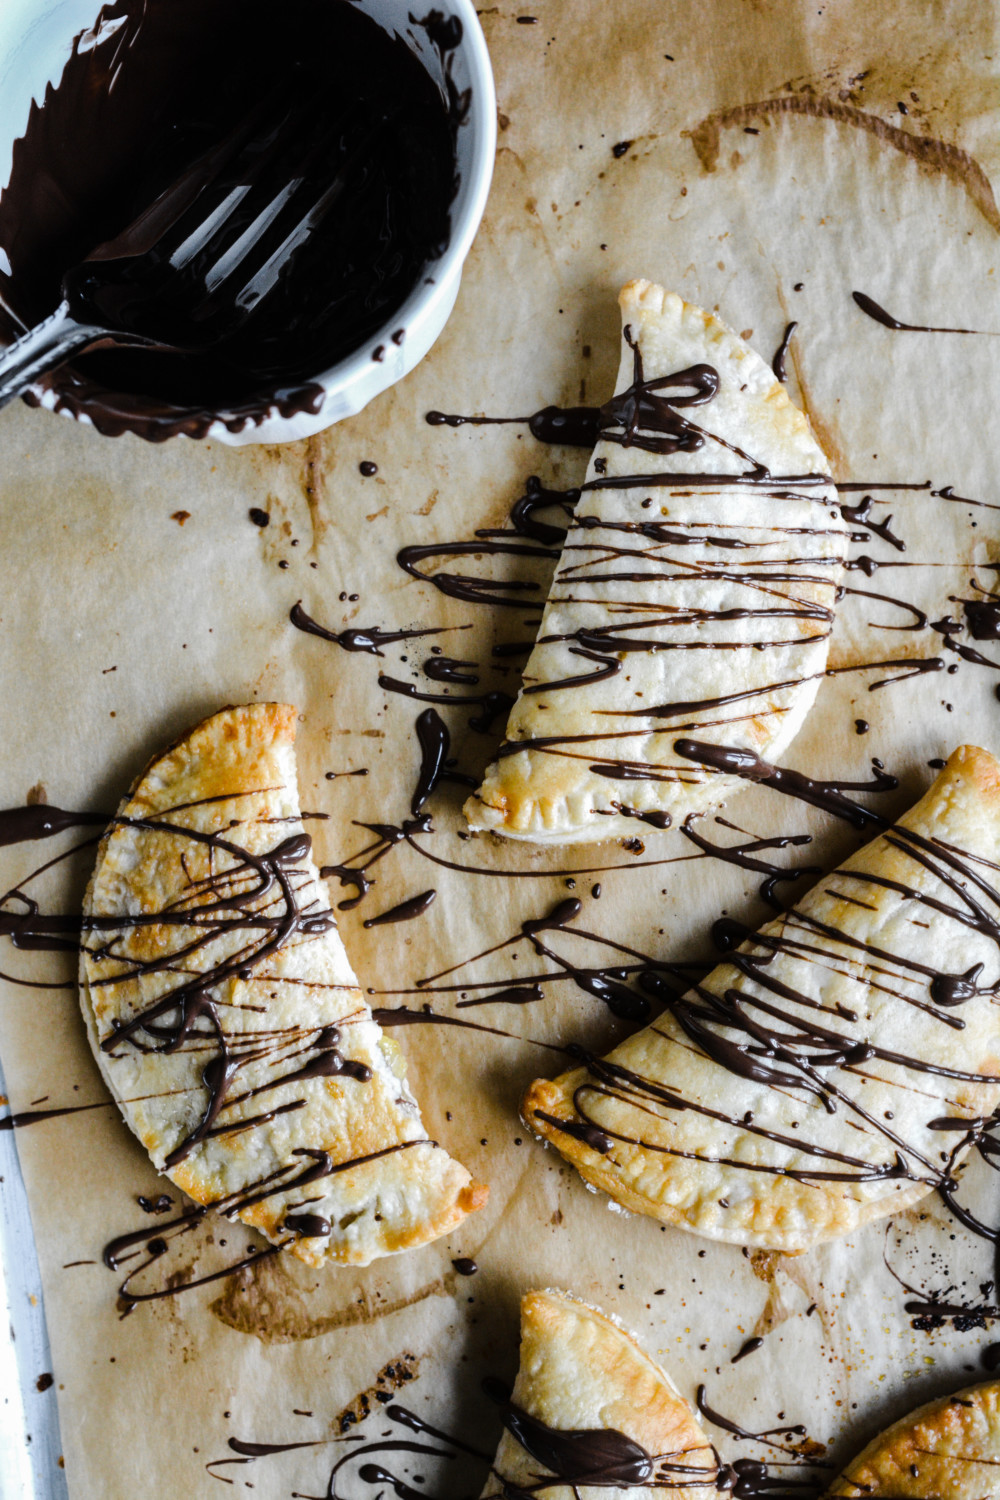
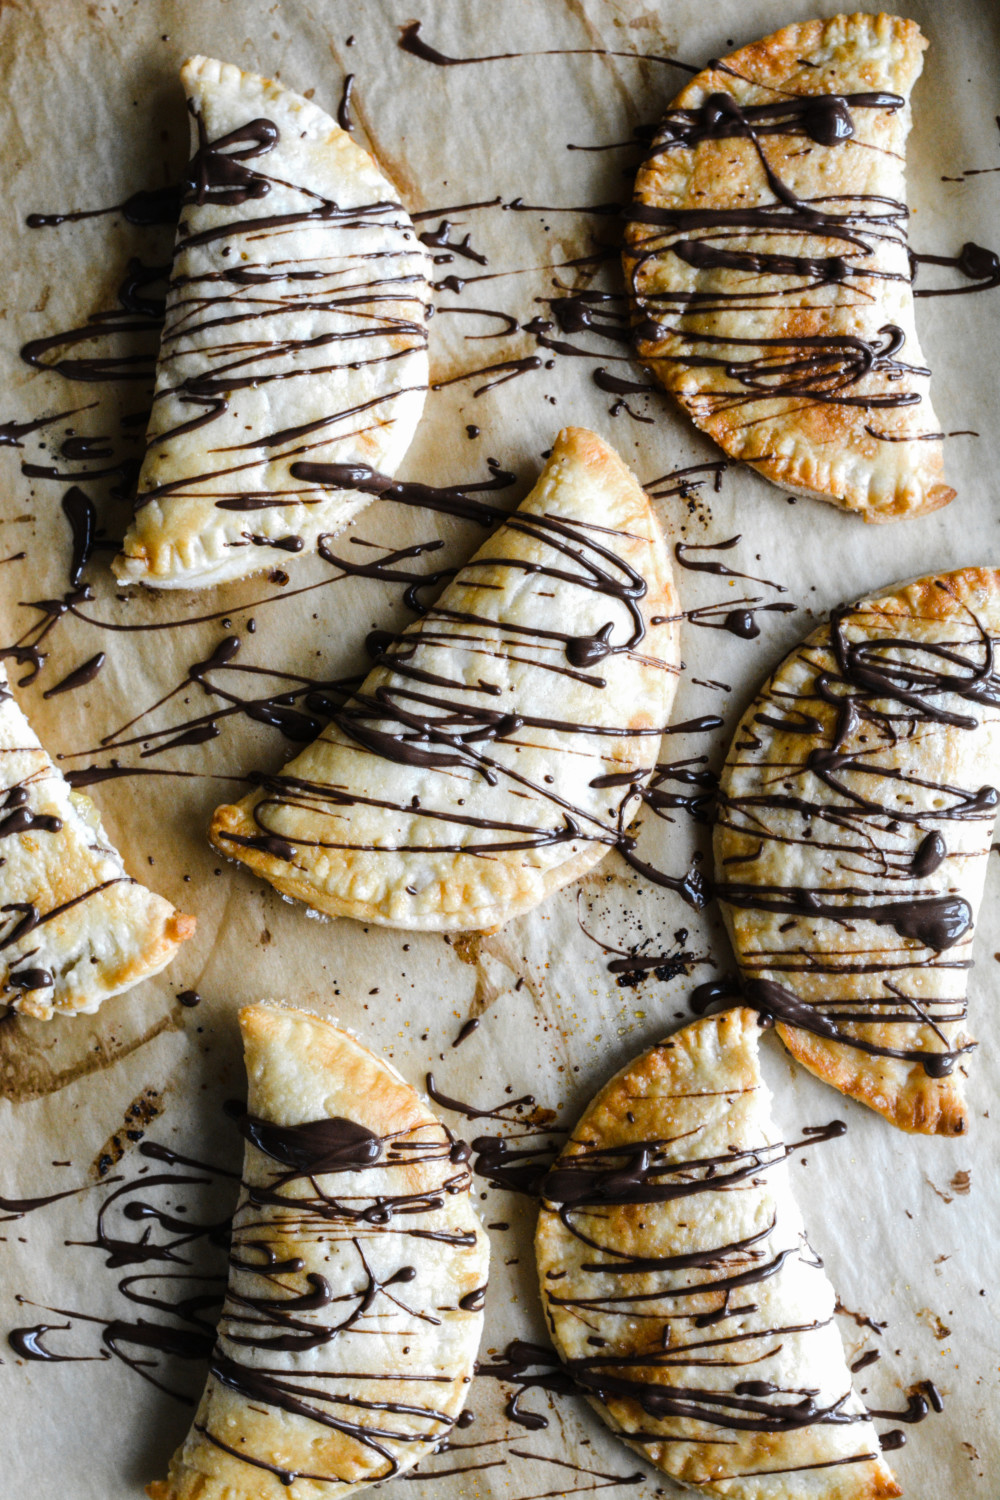
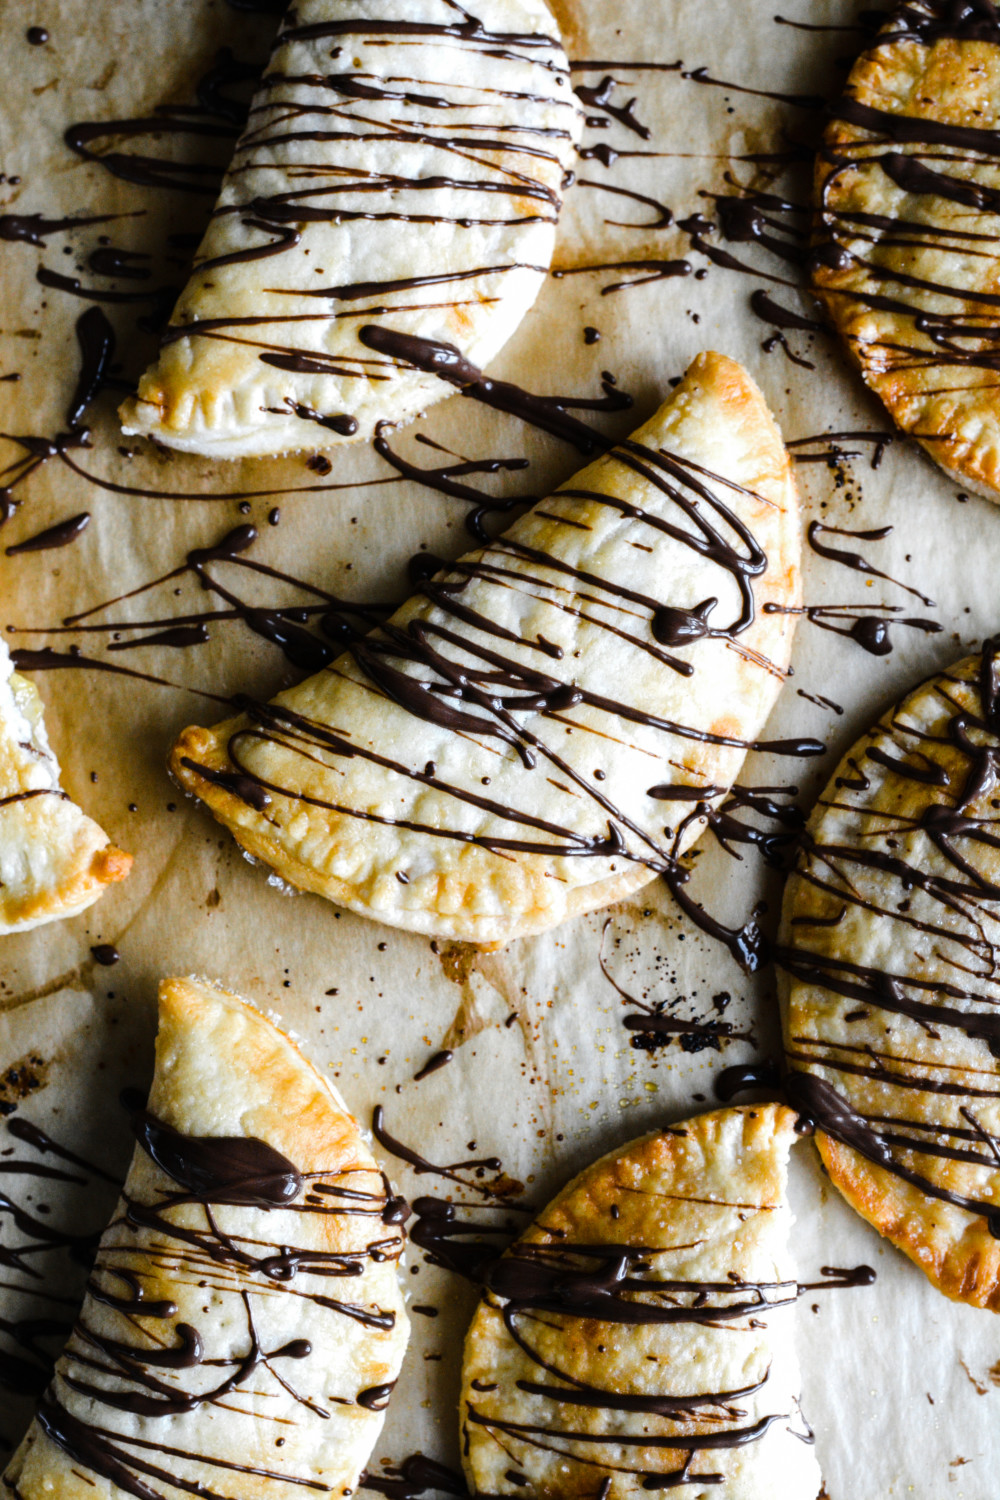
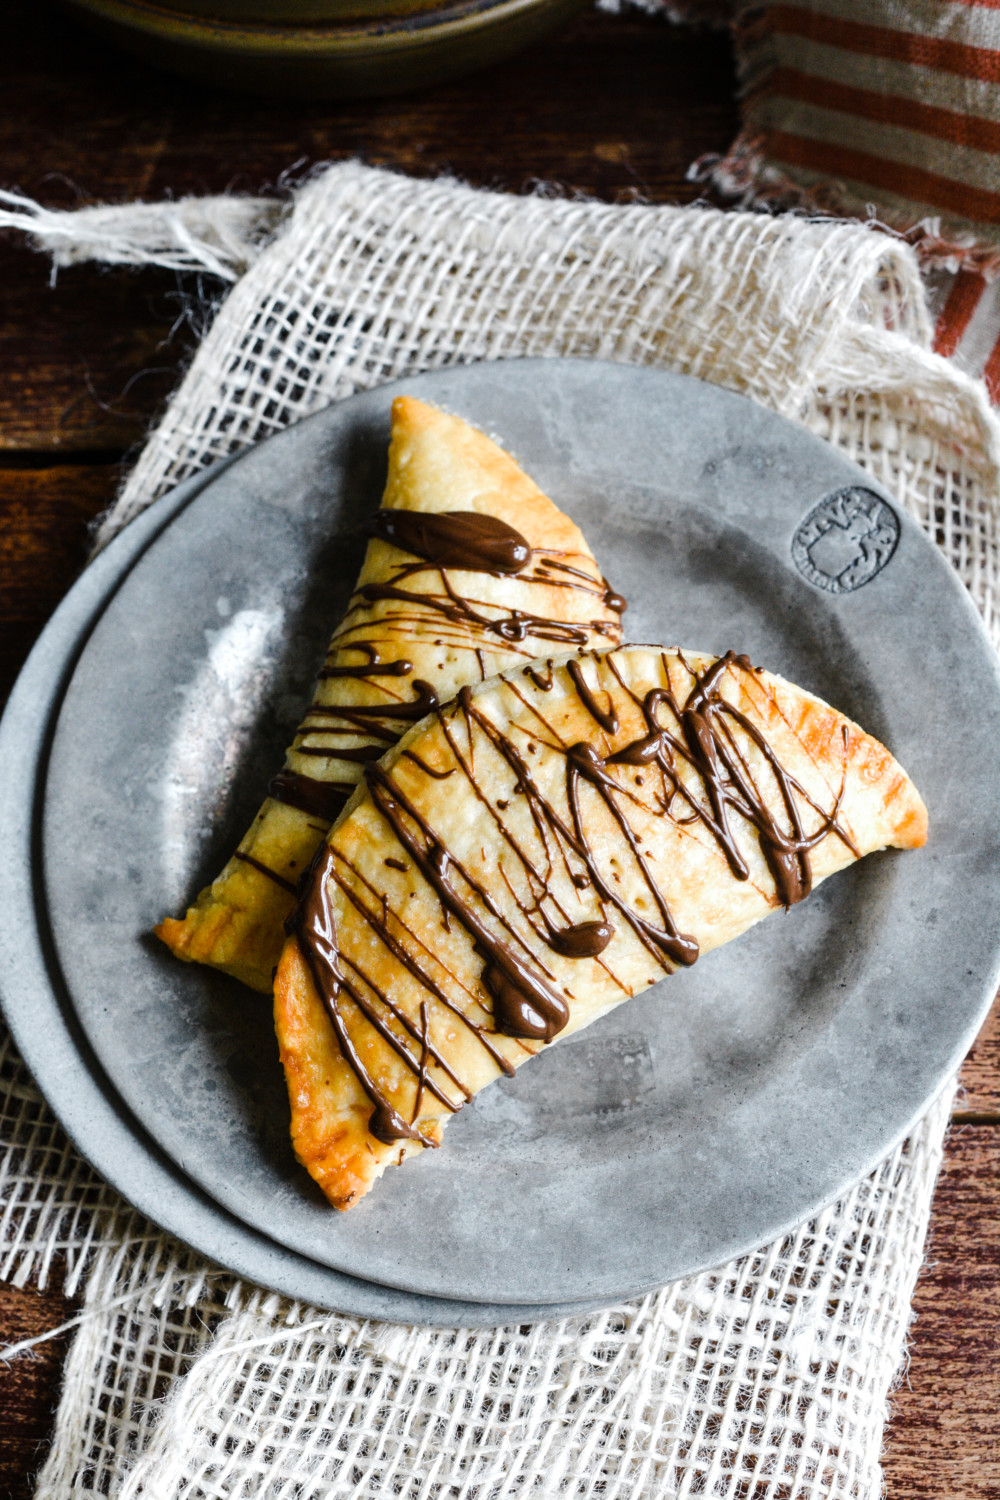
Orange Marmalade Hand Pies with Dark Chocolate Drizzle
These Orange Marmalade Hand Pies with Dark Chocolate Drizzle are flaky and luscious and bursting at the seams with flavor that is melt-in-your mouth good!
So here’s the deal – I ate more than I needed to…but less than I wanted to…so I guess it all balances out. Am I right?

Have you ever had an Orange Marmalade Hand Pie with Dark Chocolate Drizzle?
Or any flavor hand pie for that matter?
Hand Pie: flaky, warm, fruity, comforting, tiny, portable pie.
Hand pies are one of those delicacies (not an overstatement), that calls for a copper tea kettle, soft cloth napkins, and meaningful conversation with your best girlfriend.
That being said….I don’t recommend you hesitate to make them if, say, your tea kettle is made of glass, your cloth napkins are in the wash, and your bestie is unavailable. And although always best when shared, I promise you’ll do just fine suffering through a few cherished nibbles on your own. 😉
These hand pies are 100% a necessity of life.
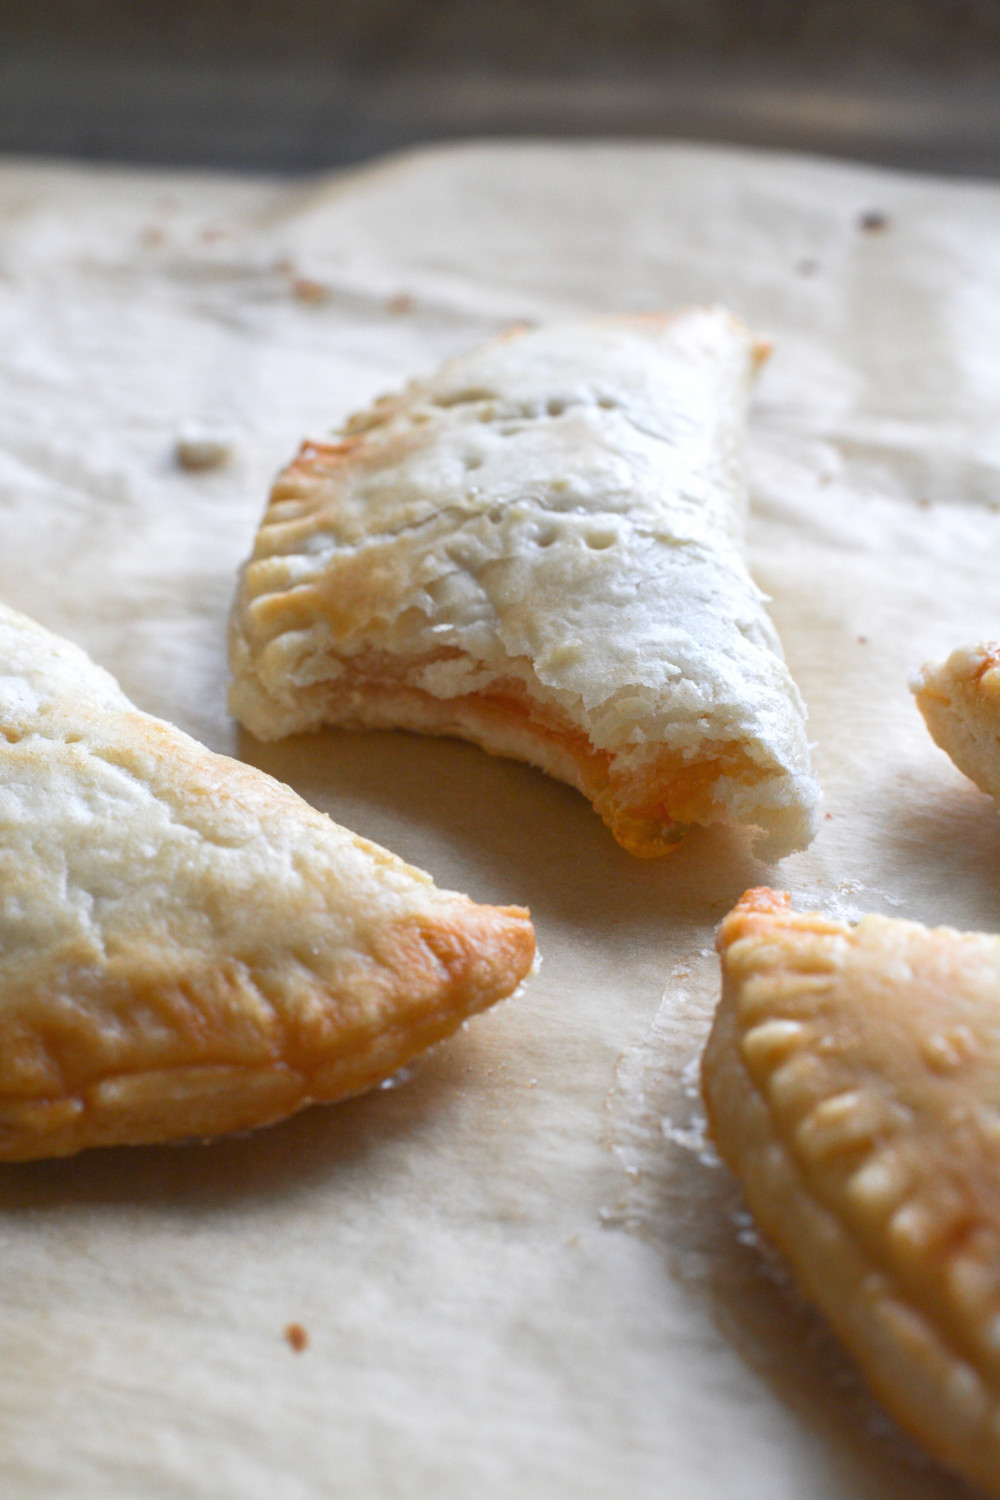
Yes, I said it. Necessity.
These bakery-style compact pies are:
- Irresistible
- Sweet
- Light as air
- Dark chocolate-draped
- Marmalady
- Oven-fresh
- Old-fashioned
- Comforting
Now grab that rolling pin and get baking!
Buon Appetito!
Print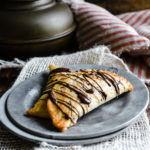
Orange Marmalade Hand Pies with Dark Chocolate Drizzle
- Category: Dessert
Description
These Orange Marmalade Hand Pies with Dark Chocolate Drizzle are flaky and luscious and bursting at the seams with flavor that is melt-in-your mouth good!
Ingredients
- 2½ cups all-purpose flour (plus more for rolling)
- Pinch of salt
- 1 cup cold unsalted butter, cubed
- ½ cup ice water
- 13 oz. jar of orange marmalade
- 1 egg, fork beaten for egg wash
- Granulated sugar for sprinkling
- 1/2 cup dark chocolate discs, melted
Instructions
- In a large mixing bowl, place the first three ingredients.
- With clean hands, quickly combine the ingredients until they look like cracker crumbs with pea-sized lumps.
- Sprinkle the ice water over the mixture and stir lightly with a fork.
- Squeeze a handful of dough to see if it sticks together. (Mix in more water by the teaspoon, as needed, until it sticks together.)
- Divide the dough into two discs, wrap the dough in plastic wrap, and chill for an hour.
- In the meantime, preheat the oven to 400 F, and prep two baking sheets with parchment paper.
- Remove dough from refrigerator, and roll out each half on the parchment.
- Using a 4-inch round biscuit cutter, cut out as many circles as dough will allow.
- Put a teaspoon of orange marmalade on one half of the dough.
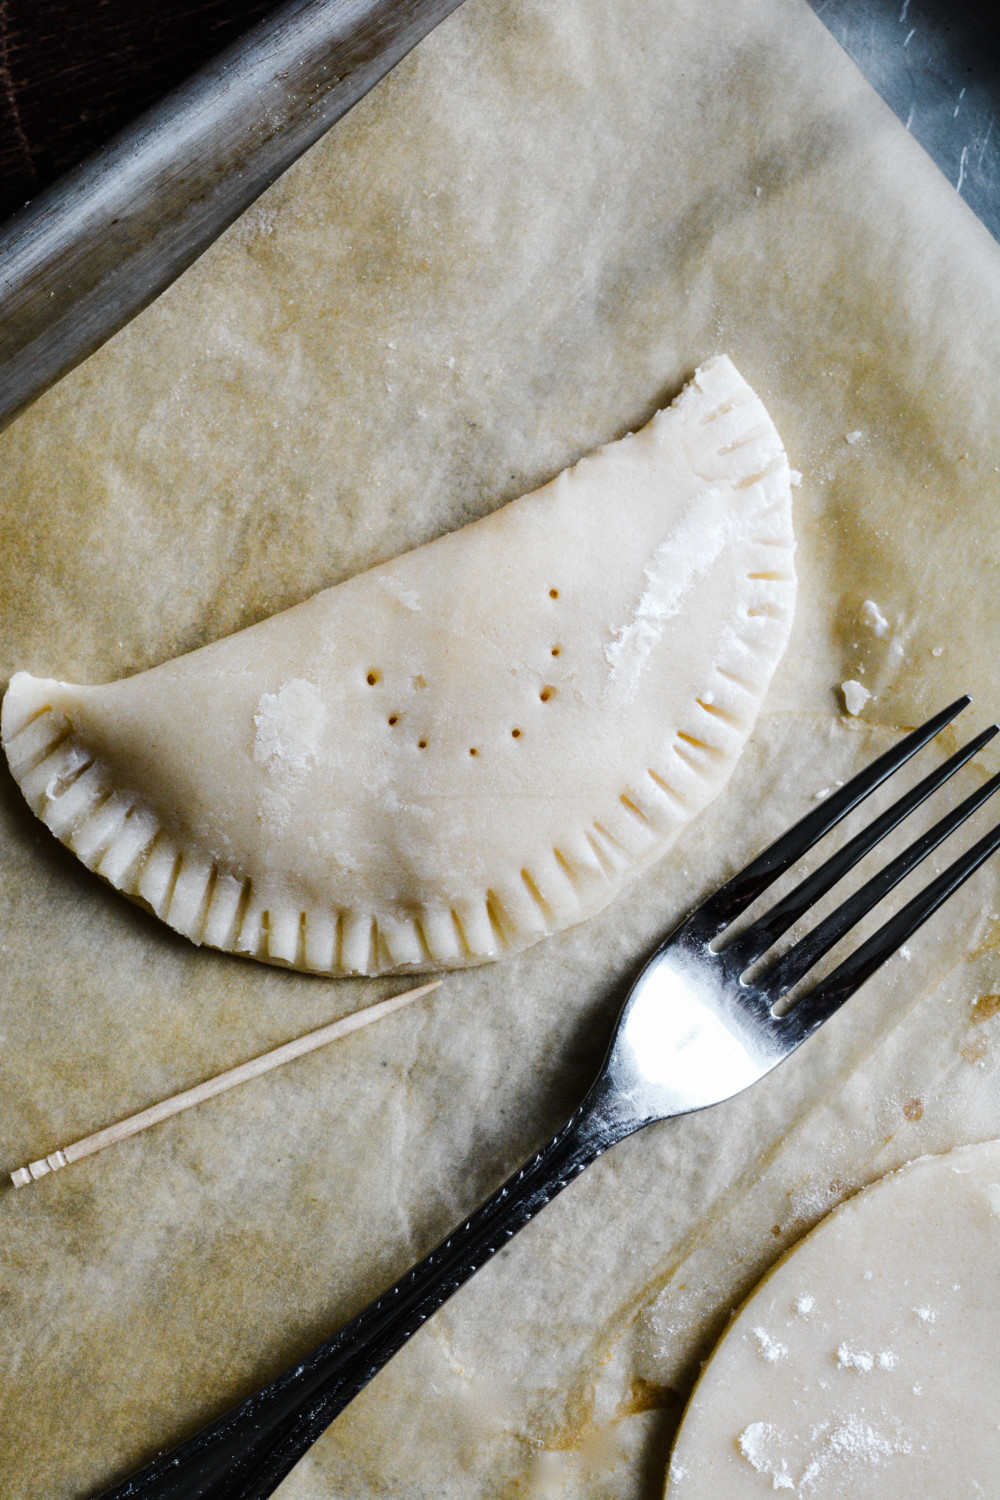
- Brush all around the edge with water, fold in half, and press firmly to seal. Using fork tines, crimp the rounded edge for extra sealing.
- Using a toothpick, poke small vent holes in the top.
- Cover and chill for a few minutes.
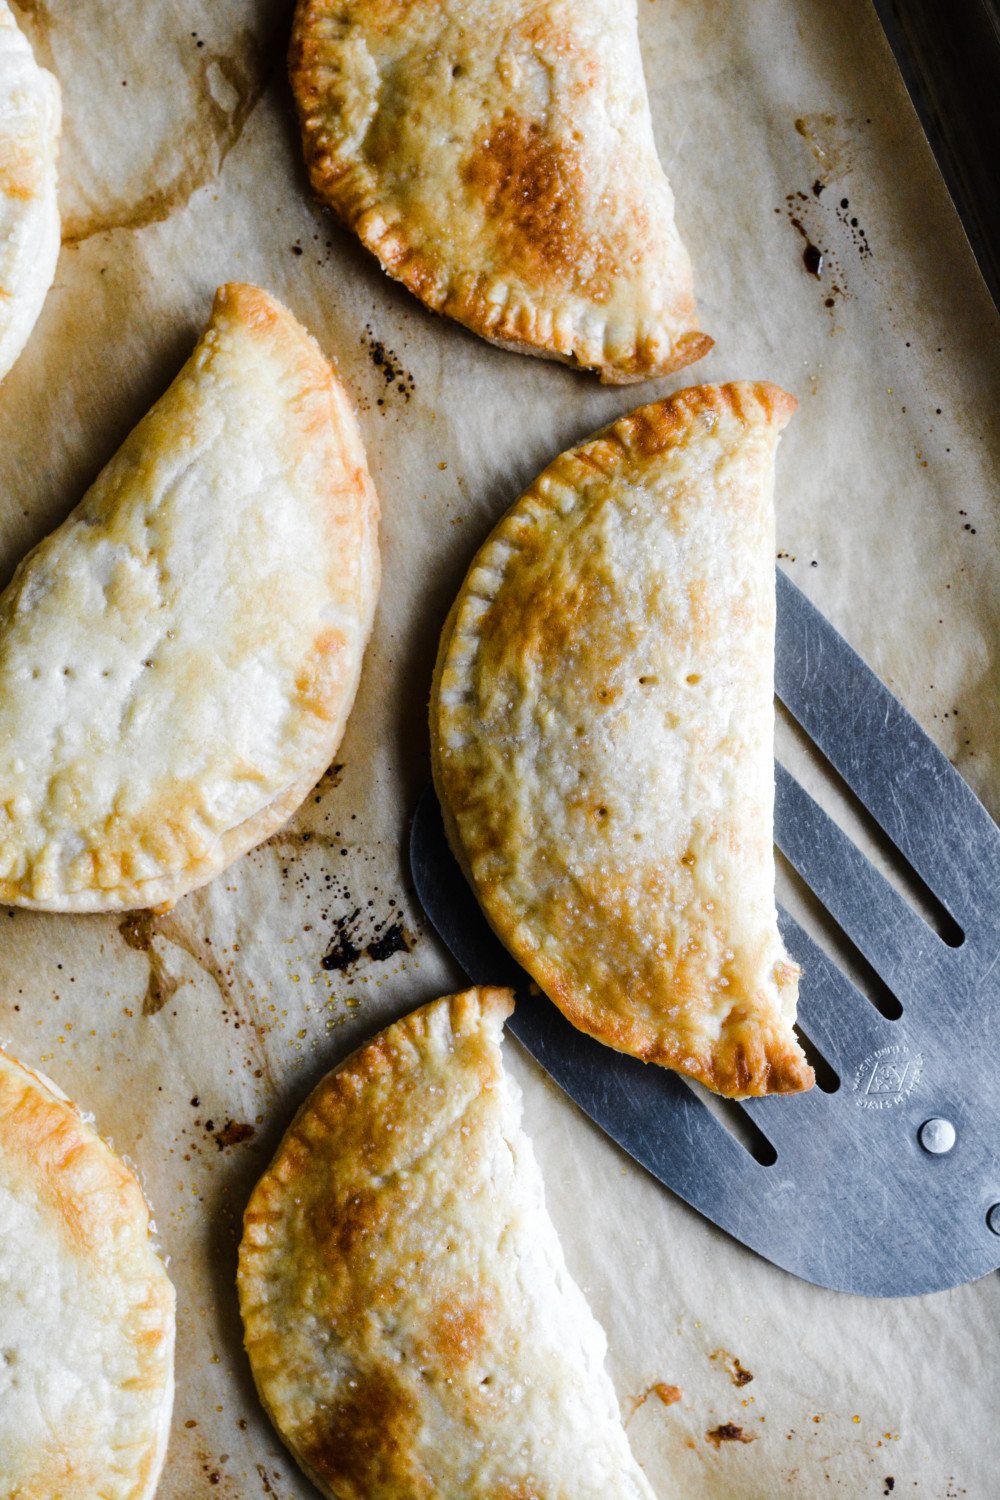
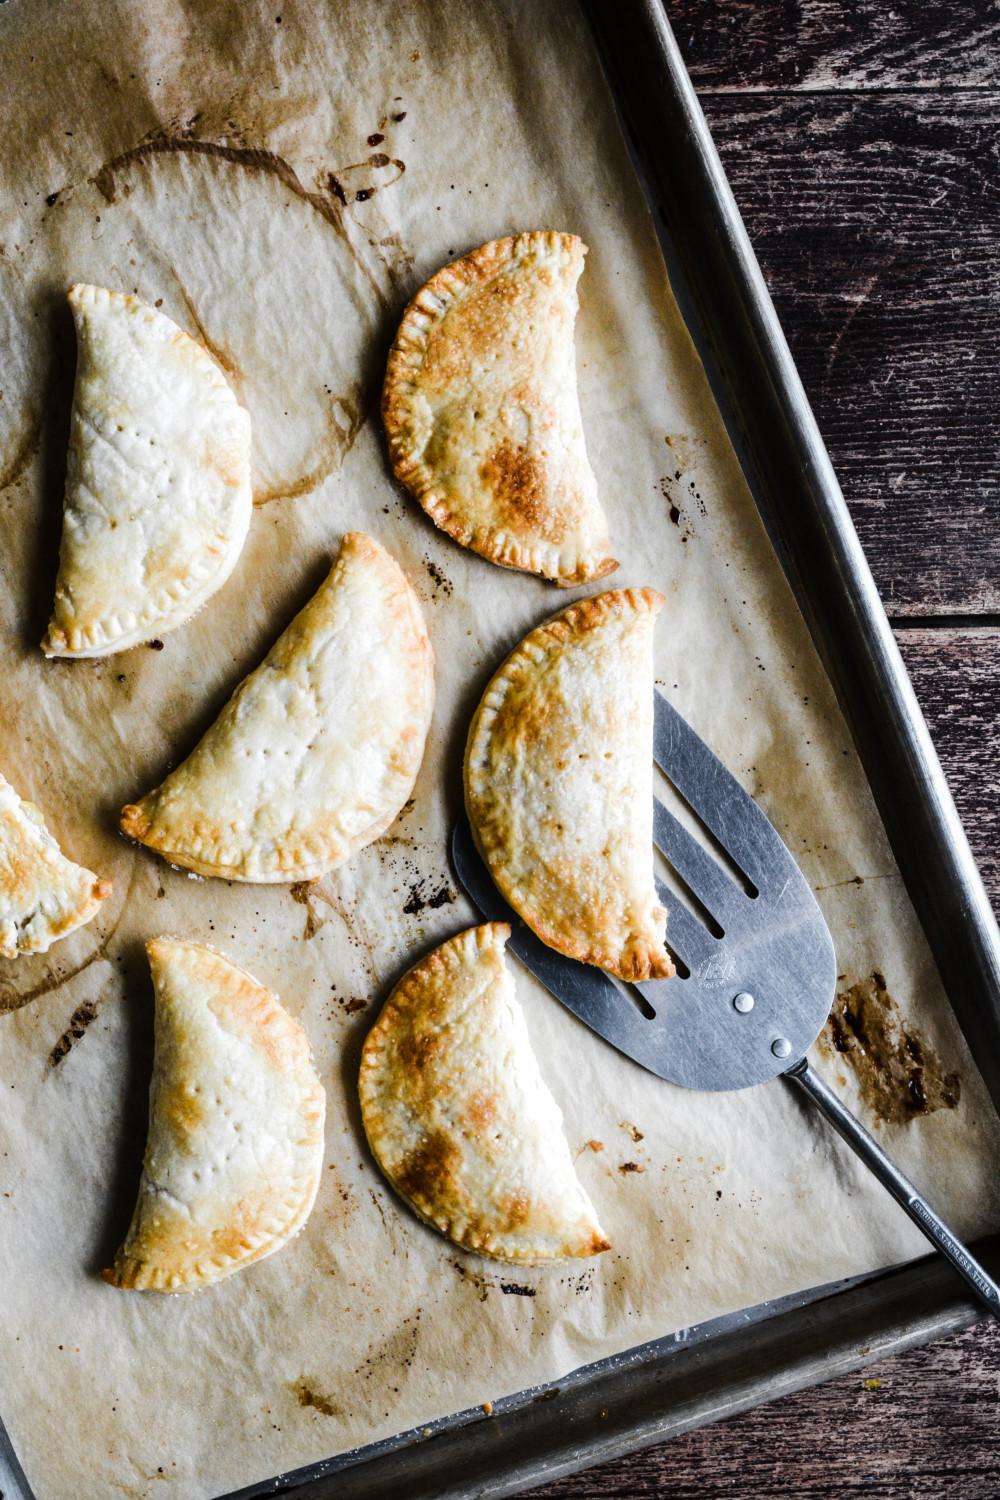
- When you’re ready to bake, brush them lightly with egg wash and sprinkle with a bit of sugar.
- Bake for 10 – 15 minutes, then let them cool.
- Drizzle pies with melted chocolate before serving.
CIAO!

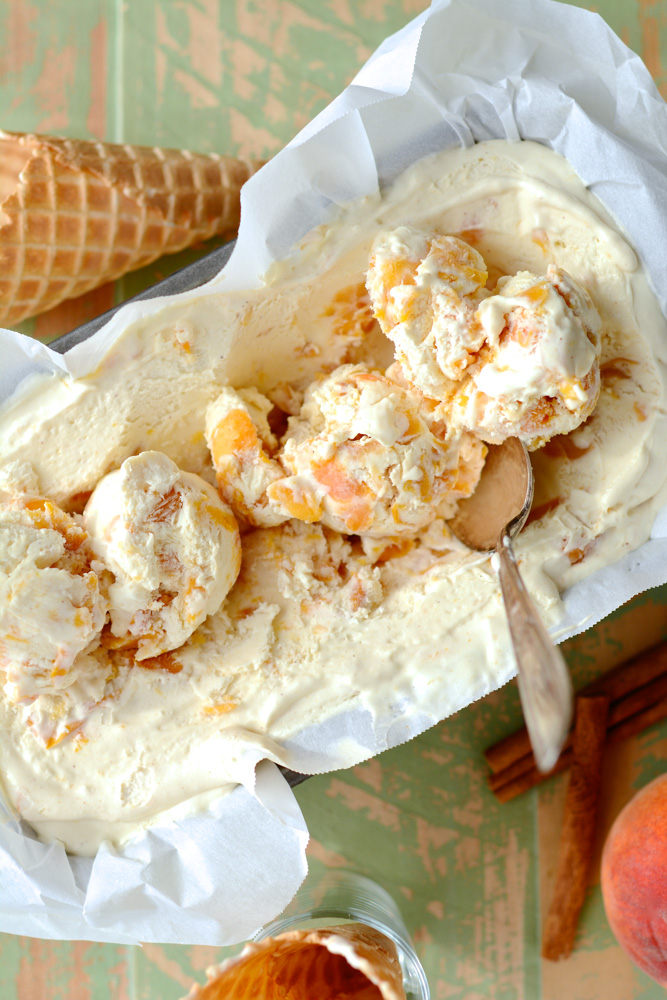
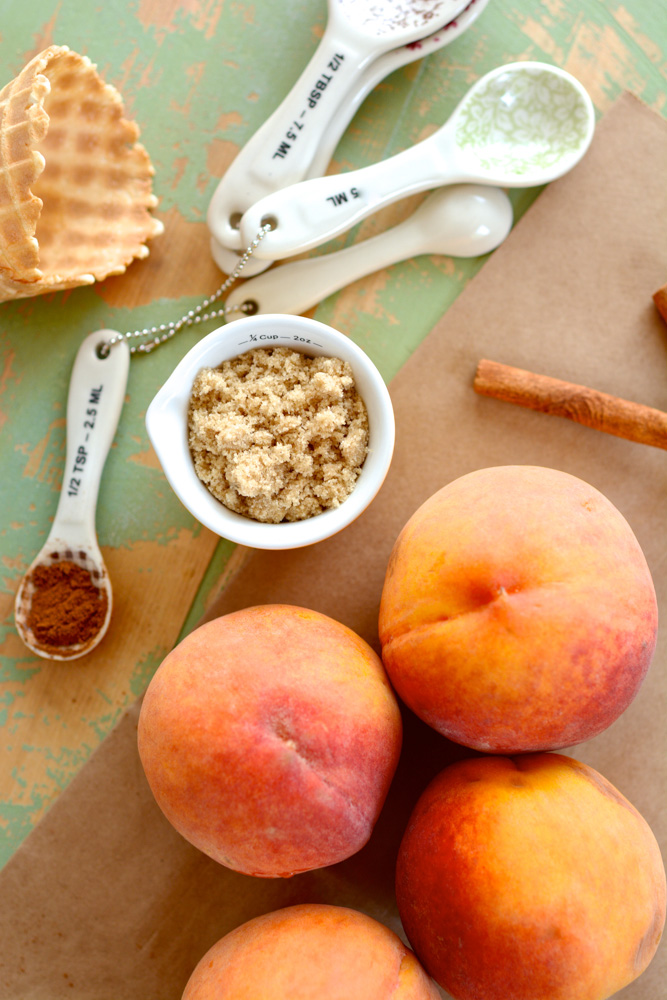
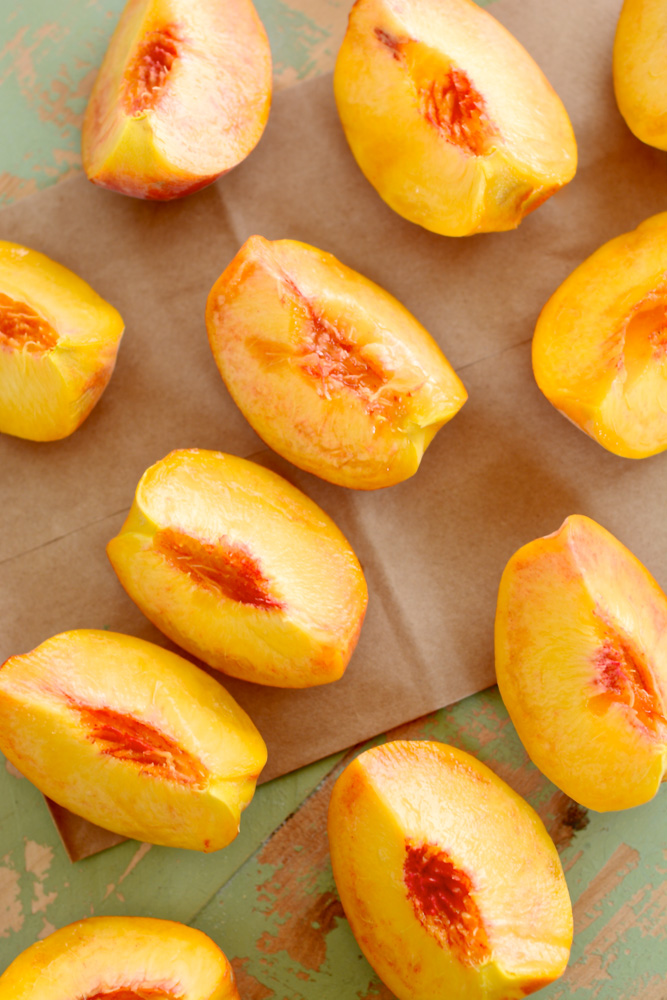
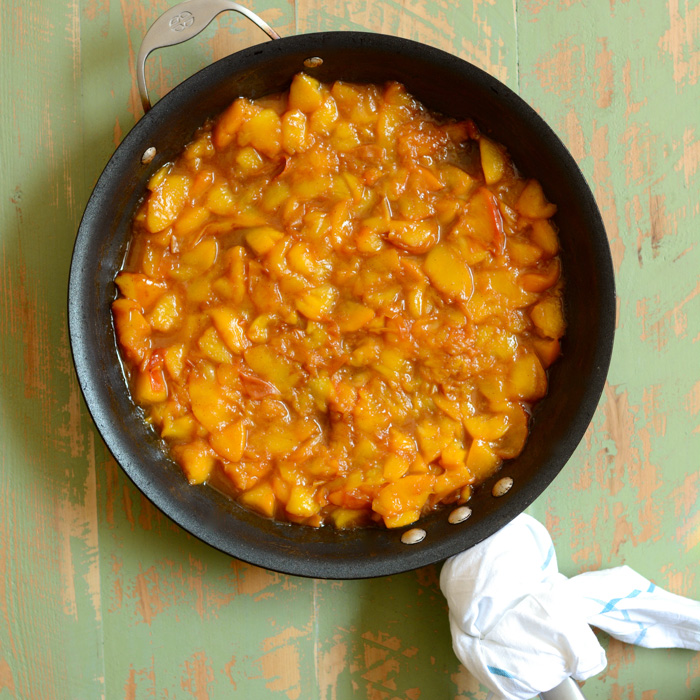
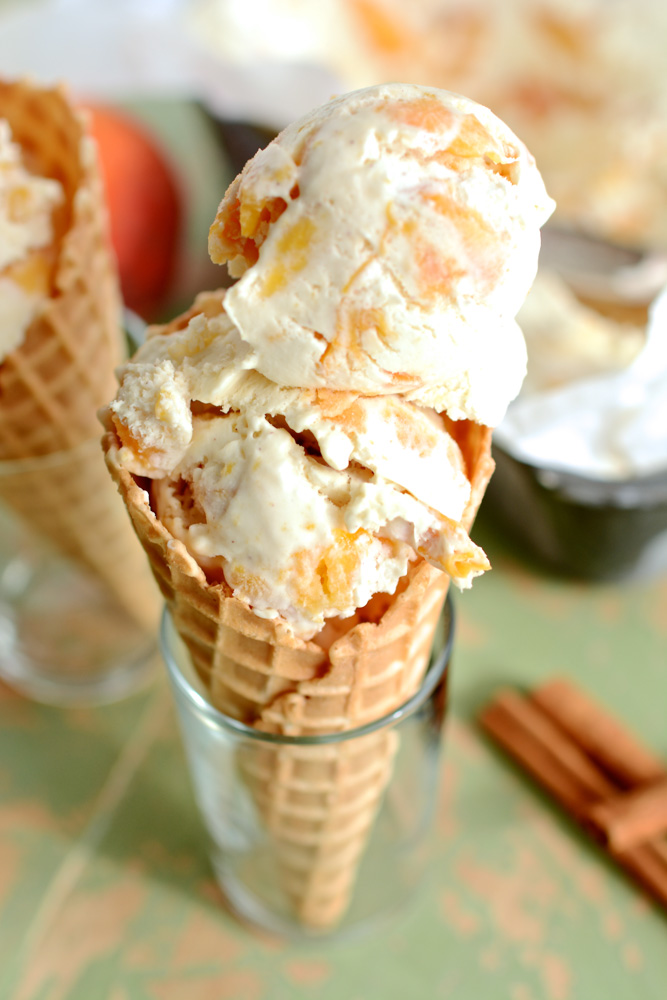
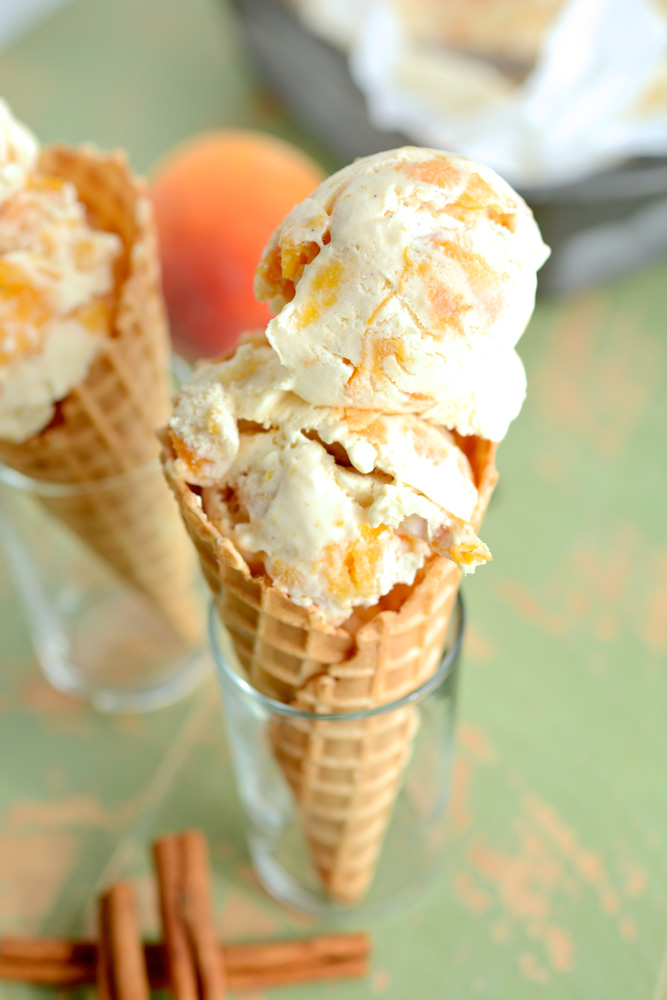
Caramelized Peaches with Brown Sugar & Cinnamon No-Churn Ice Cream
Caramelized Peaches with Brown Sugar & Cinnamon No-Churn Ice Cream has all the richness and fruity flavor you could ever want in your ice cream!
Plus, it’s easy! And it’s the law. Do you recall the law? Back in 1984, President Reagan designated July as National Ice Cream Month. We must eat ice cream in July!
Just doing my part.
Yes, another national food holiday. Peach Ice Cream. Okay, so the official holiday was the 17th.
Did I have all intentions of posting this recipe on the 17th? Yep.
Did the ice cream cooperate with my plans? Nope.
What I hoped would take 4 hours to freeze, ended up taking overnight. I couldn’t get the shots.
So here we are…
Anyway – I don’t know what it is with me lately…I am digging these foodie holidays.
Can you imagine if we decorated and bought gifts for each of our favorite food holidays?
I’d be in big trouble.
I love how sweet and summery this dessert is.
I can’t get enough of my fresh and delicious juicy peaches this summer and creamy homemade ice cream is definitely taking center stage.
I am hooked.
If only I could convince my family that ice cream is acceptable for dinner.
There are a couple steps involved with the making of this flavor but I promise it’s nothing you can’t handle.
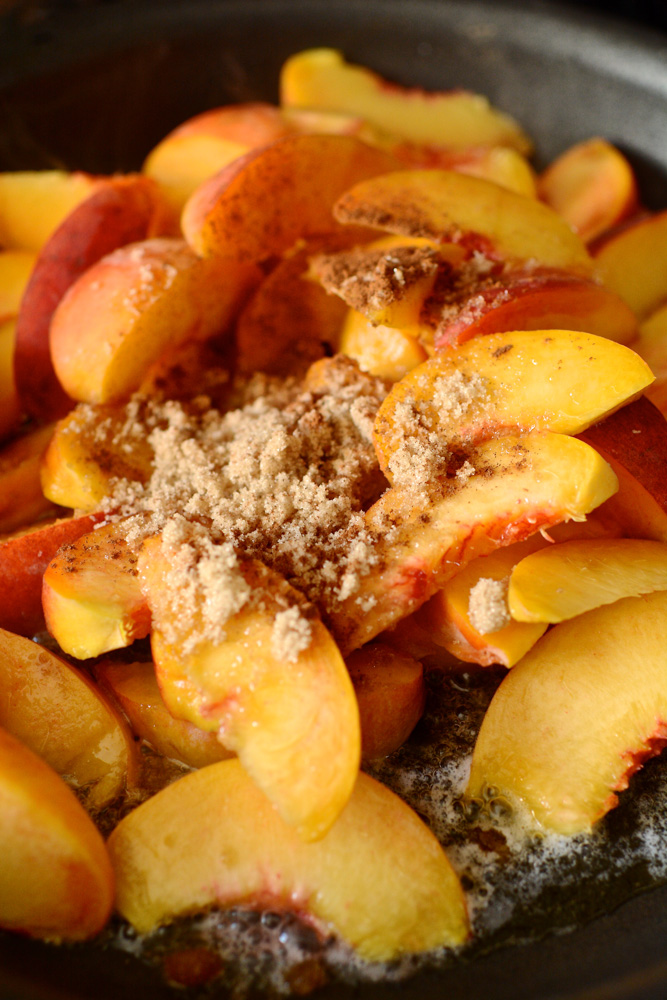
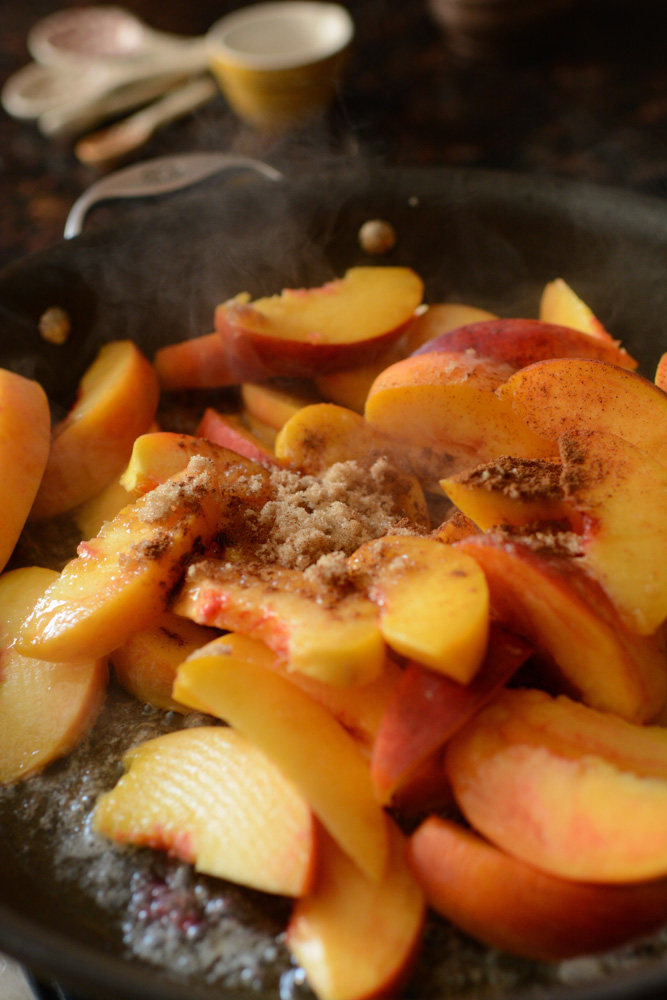
First, fry, I mean, caramelize the peaches in butter, brown sugar and cinnamon before folding them into your whipped cream and sweetened condensed milk mixture.
Then, it’s all about the wait.
But it’s a wait that is worth it, my friends.
Peach Paradise.

Just be sure you allow the peaches to cool completely before combining them with your ice cream base.
I may have gotten overzealous with that step.
Hey – it can happen! This no-churn has me doing crazy things!
Buon Appetito!
Print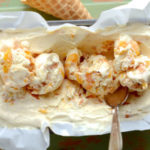
Caramelized Peaches with Brown Sugar & Cinnamon No-Churn Ice Cream
- Category: Dessert
Ingredients
- 2 Tbsp. butter
- 4 firm peaches, rinsed and sliced
- 1/4 cup light brown sugar
- 1/2 tsp. ground cinnamon
- 1 pint heavy whipping cream
- 14 oz. sweetened condensed milk
Instructions
- In a large sauté pan, melt the butter.
- Add the sliced peaches, brown sugar and cinnamon.
- Stir and cook down until the peaches are soft and bubbly.
- Remove from heat and cool thoroughly then place in the refrigerator to chill.
- In a large mixing bowl add the heavy cream and sweetened condensed milk.
- Using a hand mixer with a whisk attachment, whip until stiff peaks form.
- Fold in cooled peaches.
- Spoon ice cream into a parchment lined loaf pan and freeze overnight.
Ciao!
Blueberry Pie
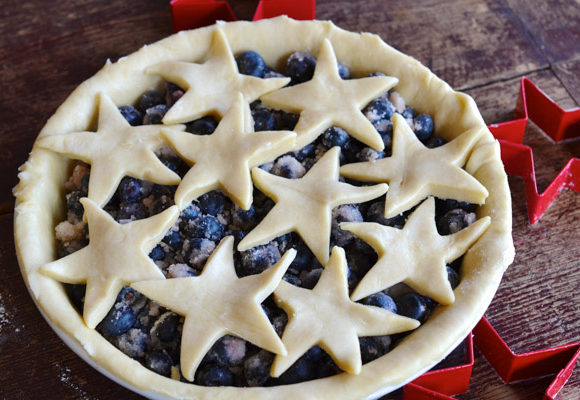
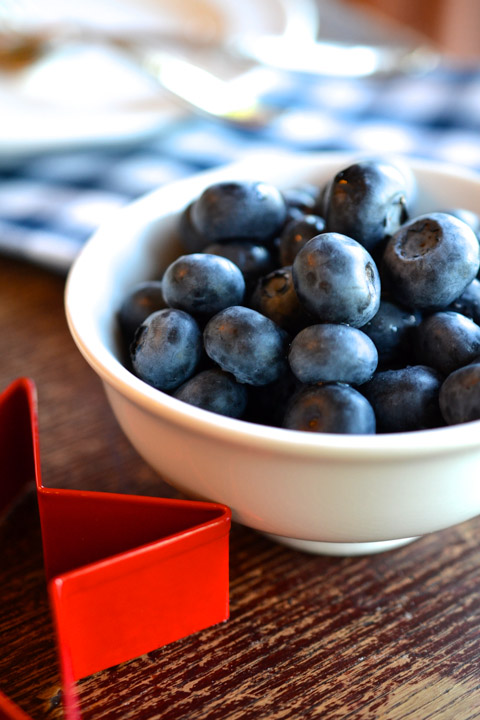
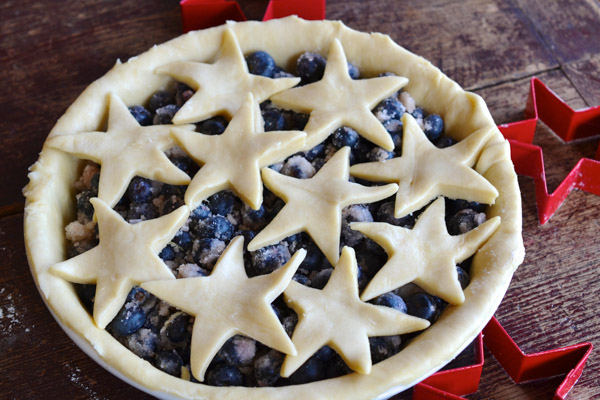
I’ve been racking my brain to come up with the perfect recipe for 4th of July and I think I found it…. Blueberry Pie!

As soon as I walked into the market – these sweet plump blueberries were calling my name. Of course pie is as American as it gets – but there’s something about the blue berry that makes me want to sing Yankee Doodle. I picture stars and stripes, feathers and caps, pies on windowsills, sparklers and fireworks.
Wouldn’t you agree that there’s a pie for every season? Every holiday? Apple for autumn, Peach for Labor Day, Pumpkin for Thanksgiving, Banana Cream for Christmas, Chocolate for Valentine’s, Coconut Cream for Easter, Cherry for Memorial Day, Lemon-Meringue for Summer Solstice and Blueberry for Independence Day. Yes!
Did I miss any? What are your favorites?
I am loving this! I now have a ‘Pie Plan’! Believe it or not, I just came up with it!
Ooooh – my year just got better!
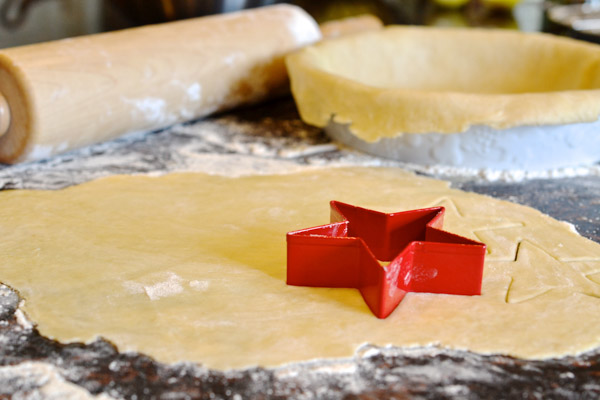
Today’s recipe includes my pie dough that you can find here and the filling is a wonderfully bright, lemony, sweet-tart recipe that I’ve adapted from Williams-Sonoma.
For the dough – combine the flour, shortening, salt, and ice water in a large mixing bowl.
Mix the dough with your hands then pat it into a ball and wrap in plastic wrap.
Place it in the refrigerator for 30-60 minutes; just long enough to prepare your filling.
For the filling – place the berries in a large bowl, sprinkle with lemon juice, then add the sugar, cornstarch, lemon zest, salt and cinnamon, then toss to evenly distribute everything.
Immediately transfer the blueberry mixture to your dough-lined pie dish.
Then place the top crust over your blueberries.
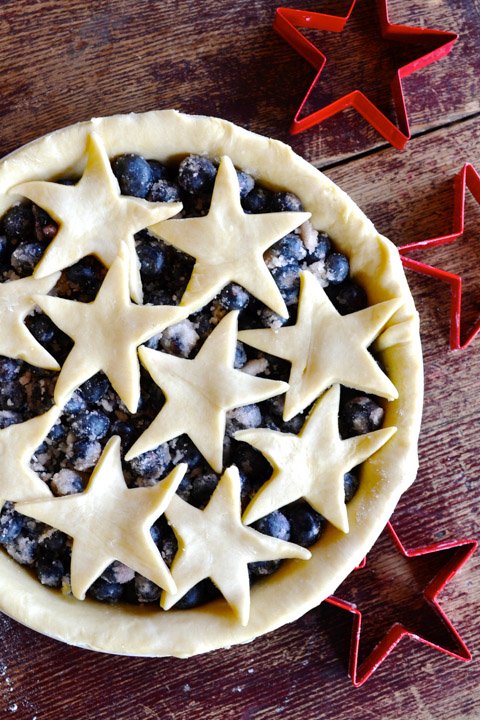
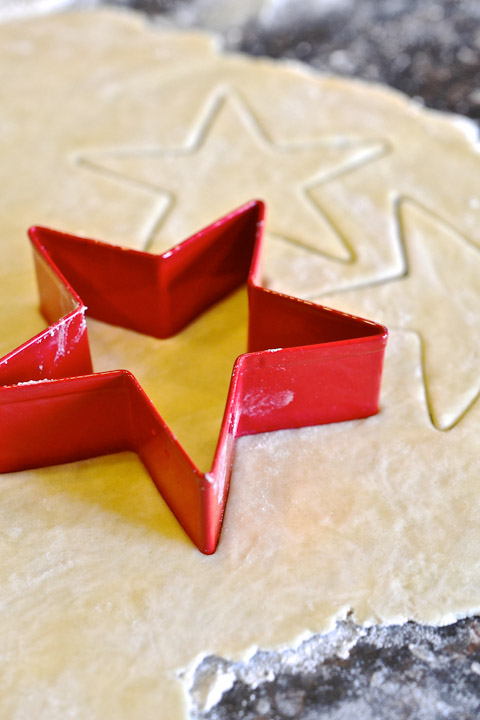
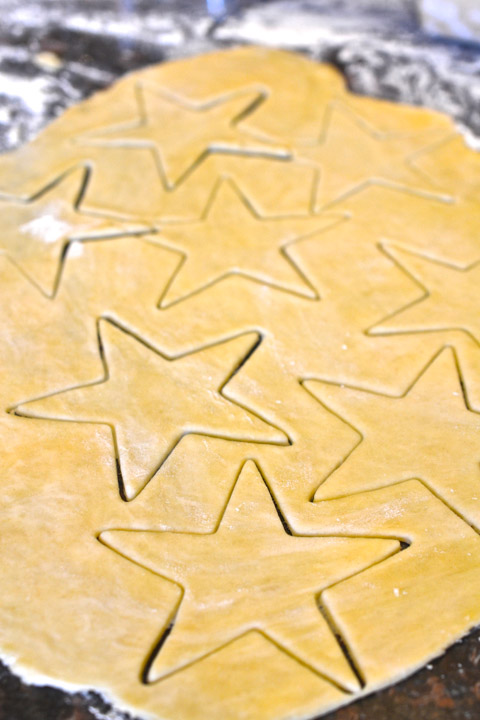
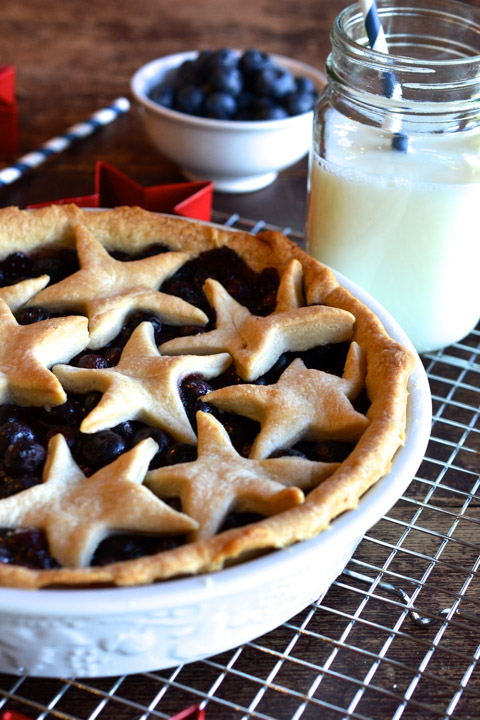
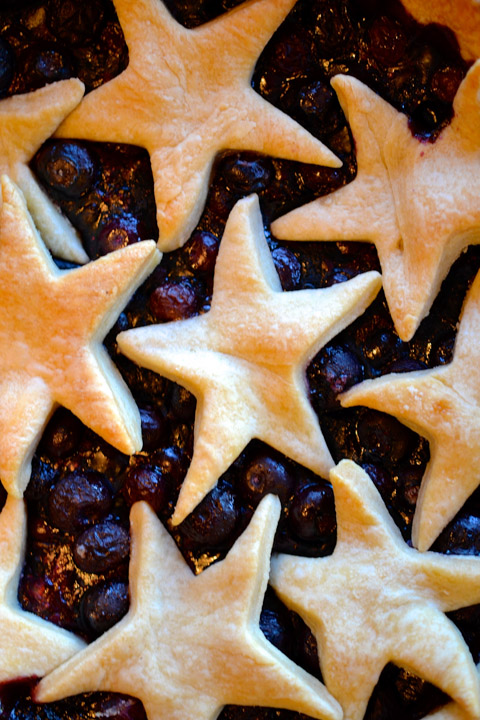
I had fun cutting stars as a cute topper for our 4th of July themed pie.
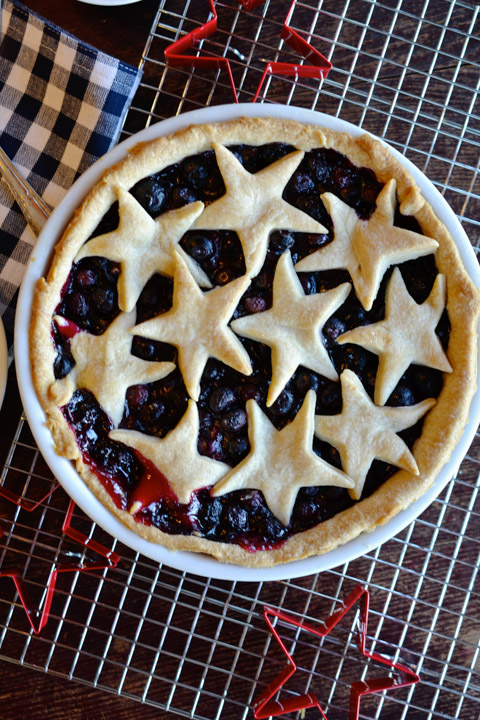
Bake on 375 degrees for 50 – 60 minutes… And voila!
I used a deep-dish pie dish for today’s dessert but you could also use a regular 9″ pie plate.
This pie tastes like summer!
Fun fact – Dom liked the stars so much, he said he’d eat them like cookies!
Wishing you a sunny, safe and fun 4th of July!
Buon Appetito!
Blueberry Pie
- Category: Dessert
Description
I’ve been racking my brain to come up with the perfect recipe for 4th of July and I think I found it…. Blueberry Pie!
Ingredients
- 2 cups all-purpose flour
- 3/4 cup butter-flavored shortening
- pinch of salt
- 1/2 cup ice water
- 4 cups blueberries
- 1 Tbsp. lemon juice (1/2 lemon)
- 3/4 cup sugar
- 3 Tbsp. cornstarch
- 1/2 tsp. lemon zest
- 1/4 tsp. salt
- 1/4 tsp. cinnamon
Instructions
- Preheat oven to 375 degrees.
- To make dough, combine flour, shortening, salt and water in a large mixing bowl.
- Mix with your hands until all ingredients are well combined.
- Pat dough into a ball and wrap in plastic wrap.
- Place in refrigerator for the time it takes to make filling. (30-60 min.)
- In a large bowl combine blueberries, lemon juice, sugar, cornstarch, lemon zest, salt and cinnamon.
- Toss to evenly distribute ingredients.
- Remove dough from the refrigerator and cut in half.
- Roll out each half to use as the bottom and top crusts.
- Place first dough in pie plate.
- Fill with blueberry mixture.
- Cut remaining dough into stars to use as top crust.
- Place stars on top.
- Bake for 50-60 minutes.
- Remove when golden.
- Let cool before sharing.

Ciao!
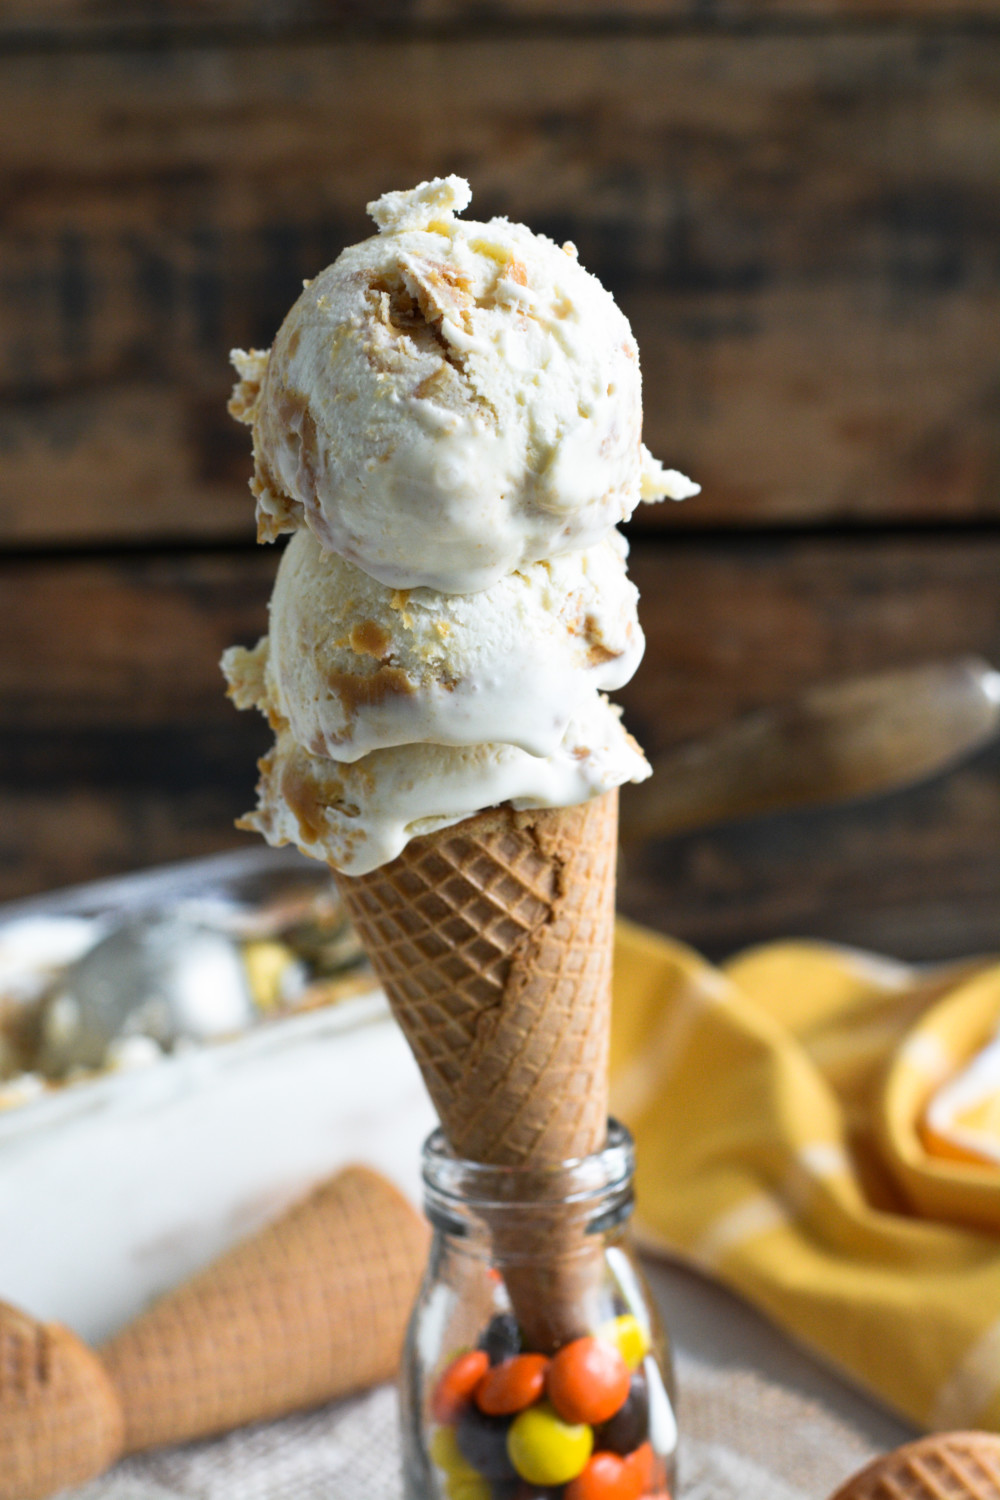
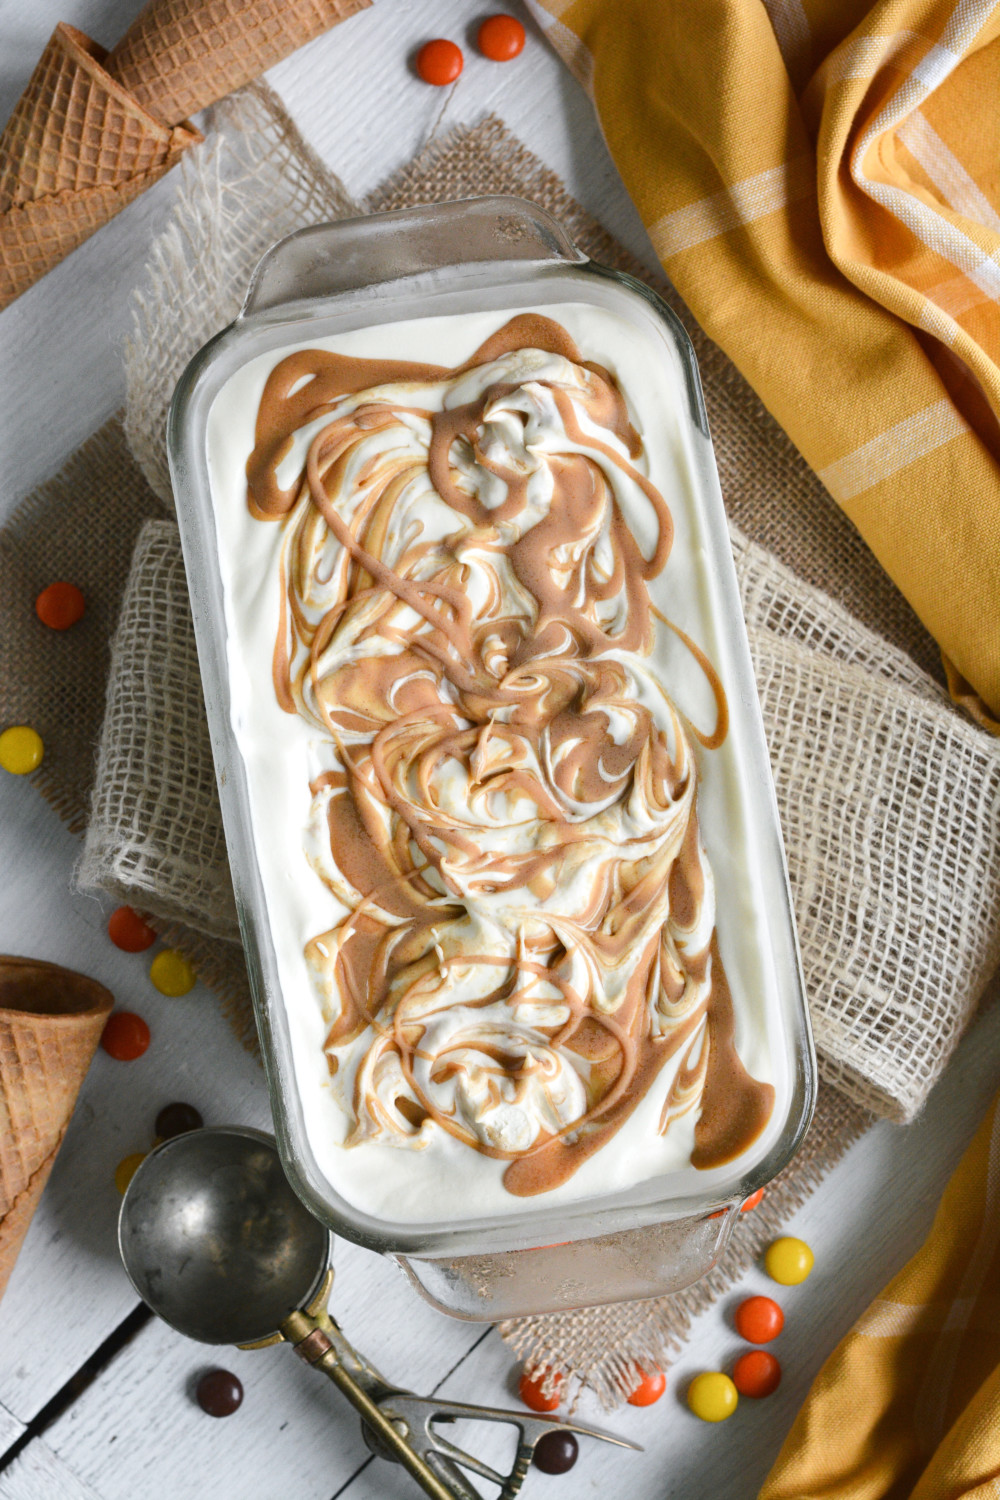
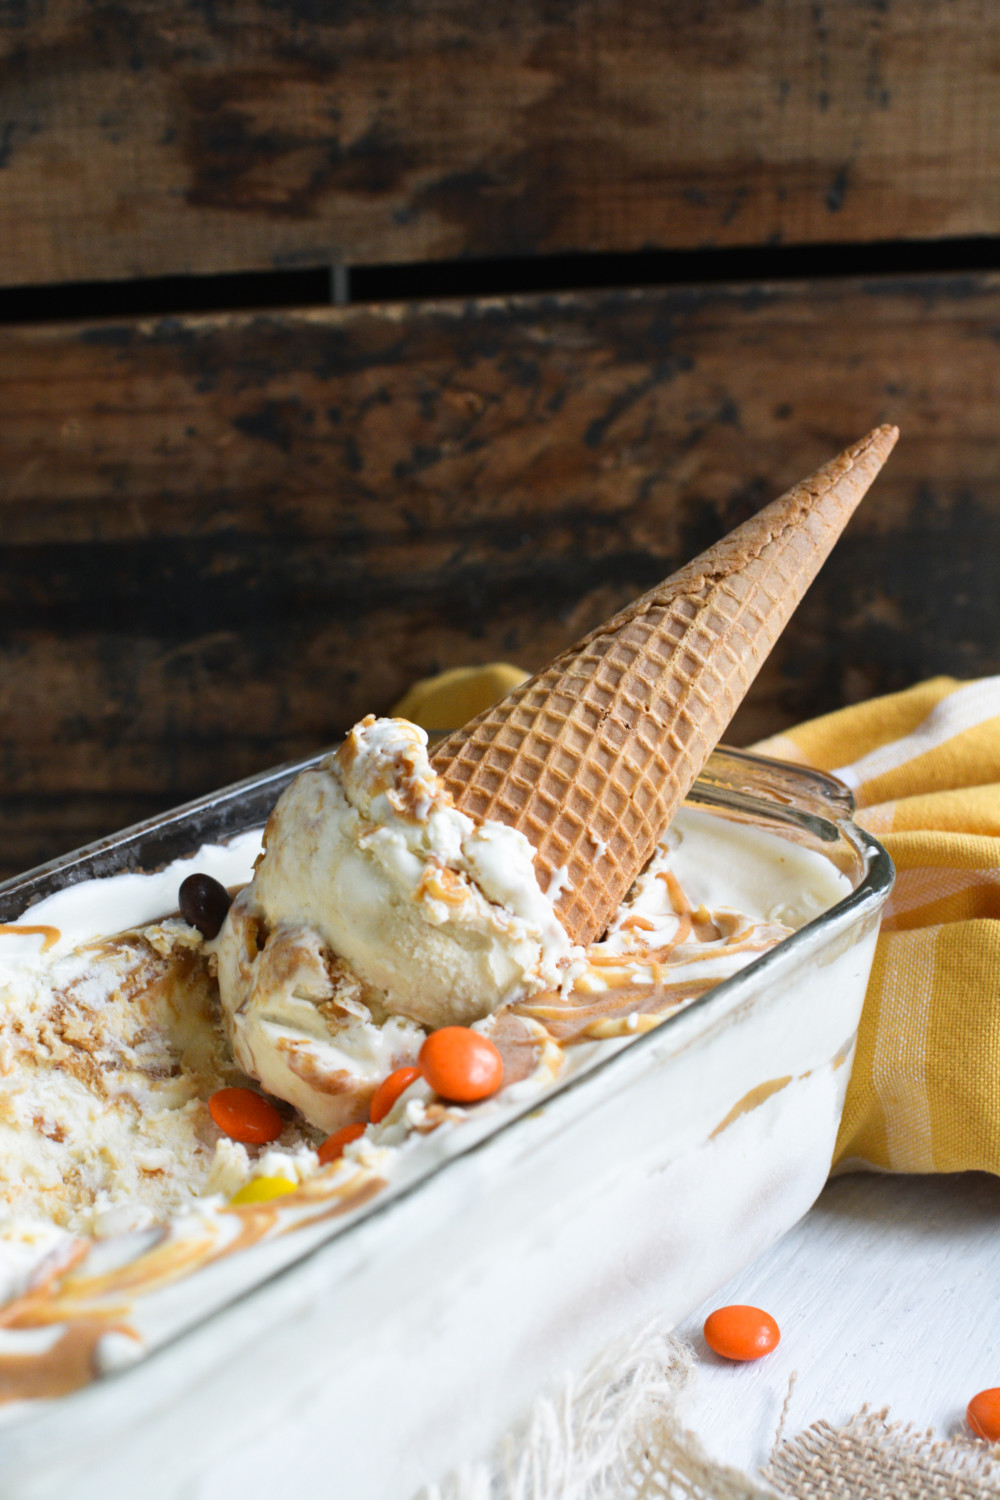
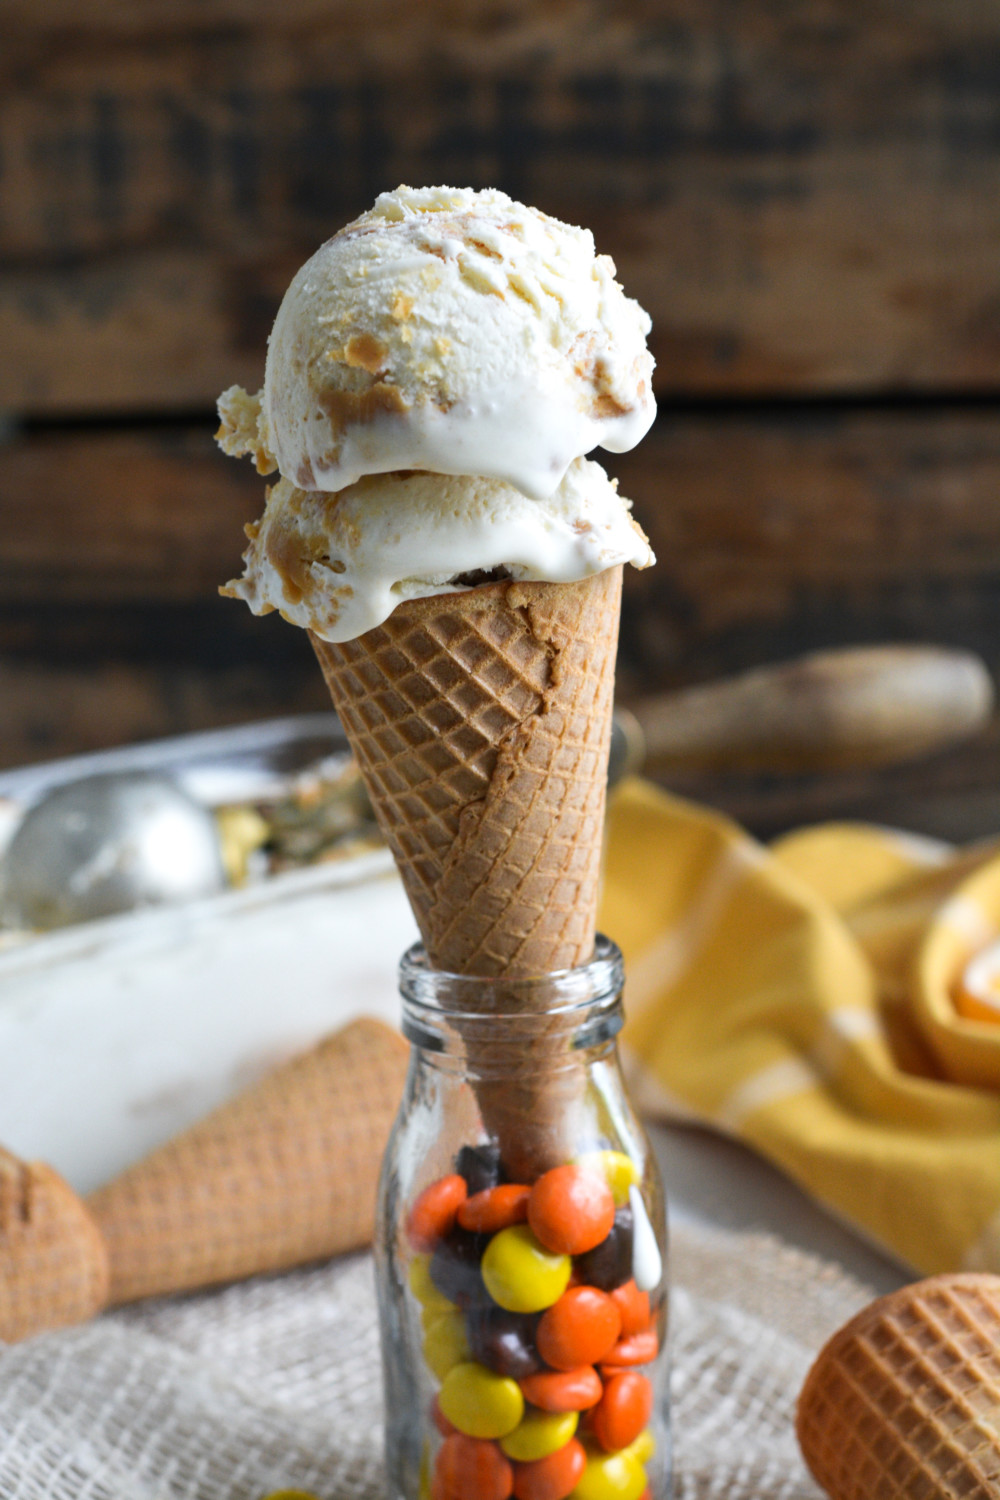
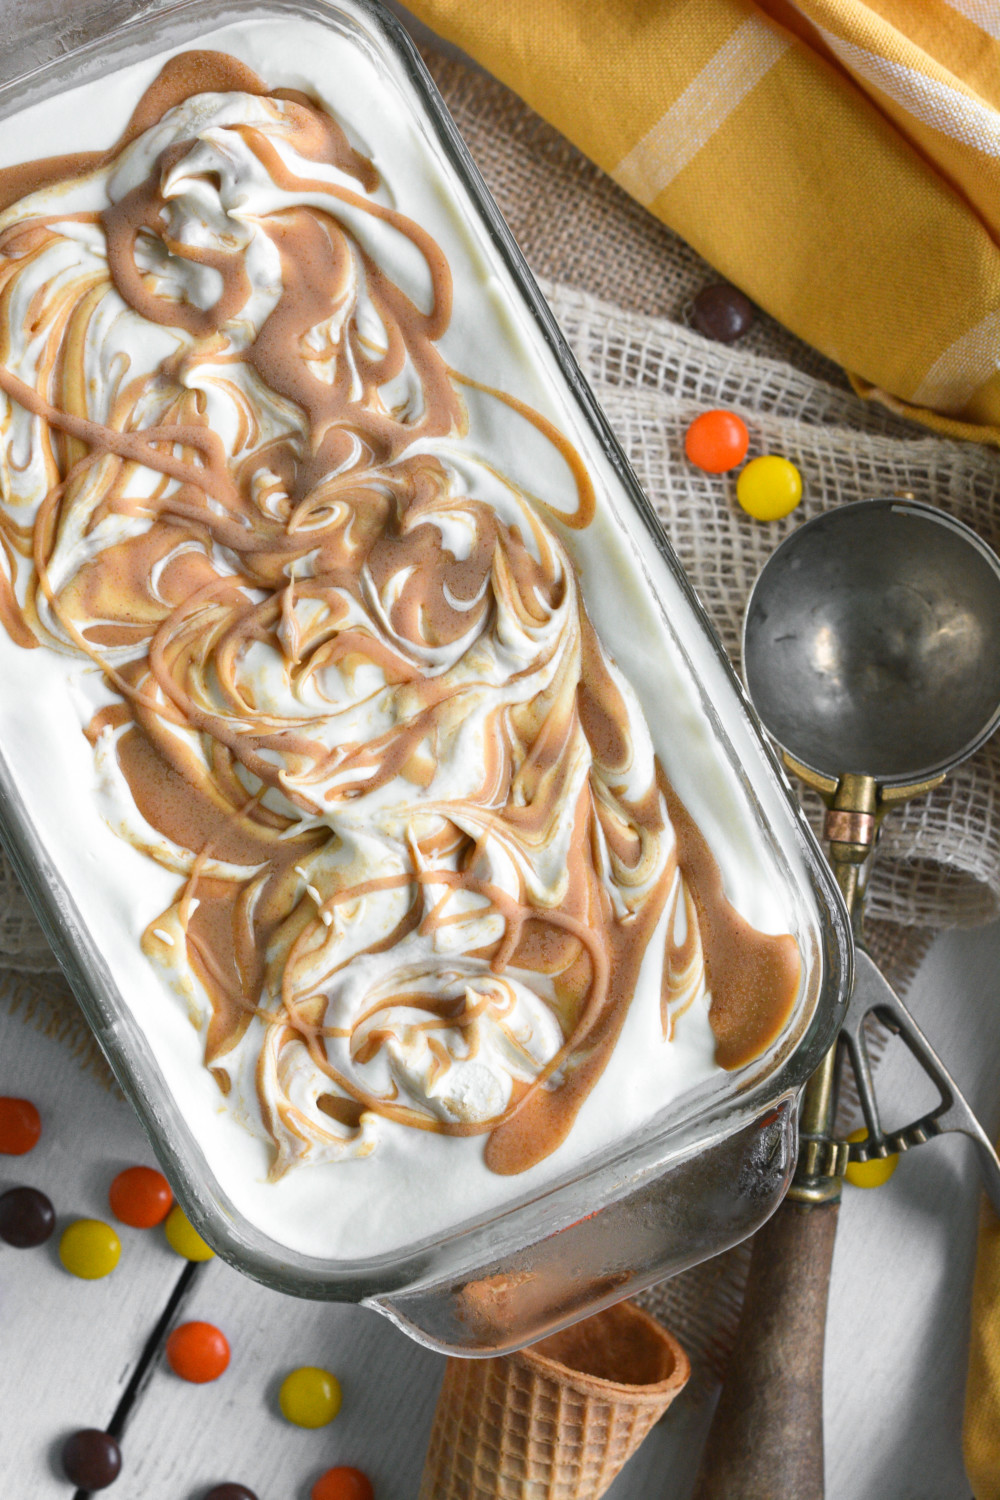
Creamy Peanut Butter No-Churn Ice Cream
You don’t need an ice cream maker to make this Creamy Peanut Butter No-Churn Ice Cream!
So here’s the story….
I went to the cupboard. I went to the cupboard with the intent to meet my need for peanut butter.
You know, my favorite peanut butter toast, my weekly ritual (yeah right, weekly!), but much to my surprise – NO PEANUT BUTTER! Whaaaaa?
So I started moving things and throwing things – spices, powdered sugar, vanilla beans, extracts, brown sugar…you get the picture. There was no peanut butter to be found. No Jif hiding in the corner.
It took a minute, but once I came to terms with this sad fact and cleaned the mess and wiped the tears – all I could think about was peanut butter. The mind can be cruel. Though it was a beautiful daydream, and once I got beyond my desire for peanut butter toast, toast made with every kind of bread – whole wheat, white, Italian, rye, raisin cinnamon, pita, bagel, English muffin…
My mind landed on ice cream….
Creamy Peanut Butter No-Churn Ice Cream.
And here we are.
The first time I discovered the ingredients for the base of no-churn I just about fell off my chair. Two ingredients. Two. Heavy whipping cream and sweetened condensed milk. I mean – seriously? And then it’s about the mix-ins and the wait time. There is a basic method for making no-churn that requires as little as a hand mixer and a rubber spatula. Can you mix whipping cream until stiff peaks form? Sure you can. Can you fold sweetened condensed milk in said whipping cream using a rubber spatula? Absolutely you can!
You’re 90% done. Mix-ins, toppings, cones….
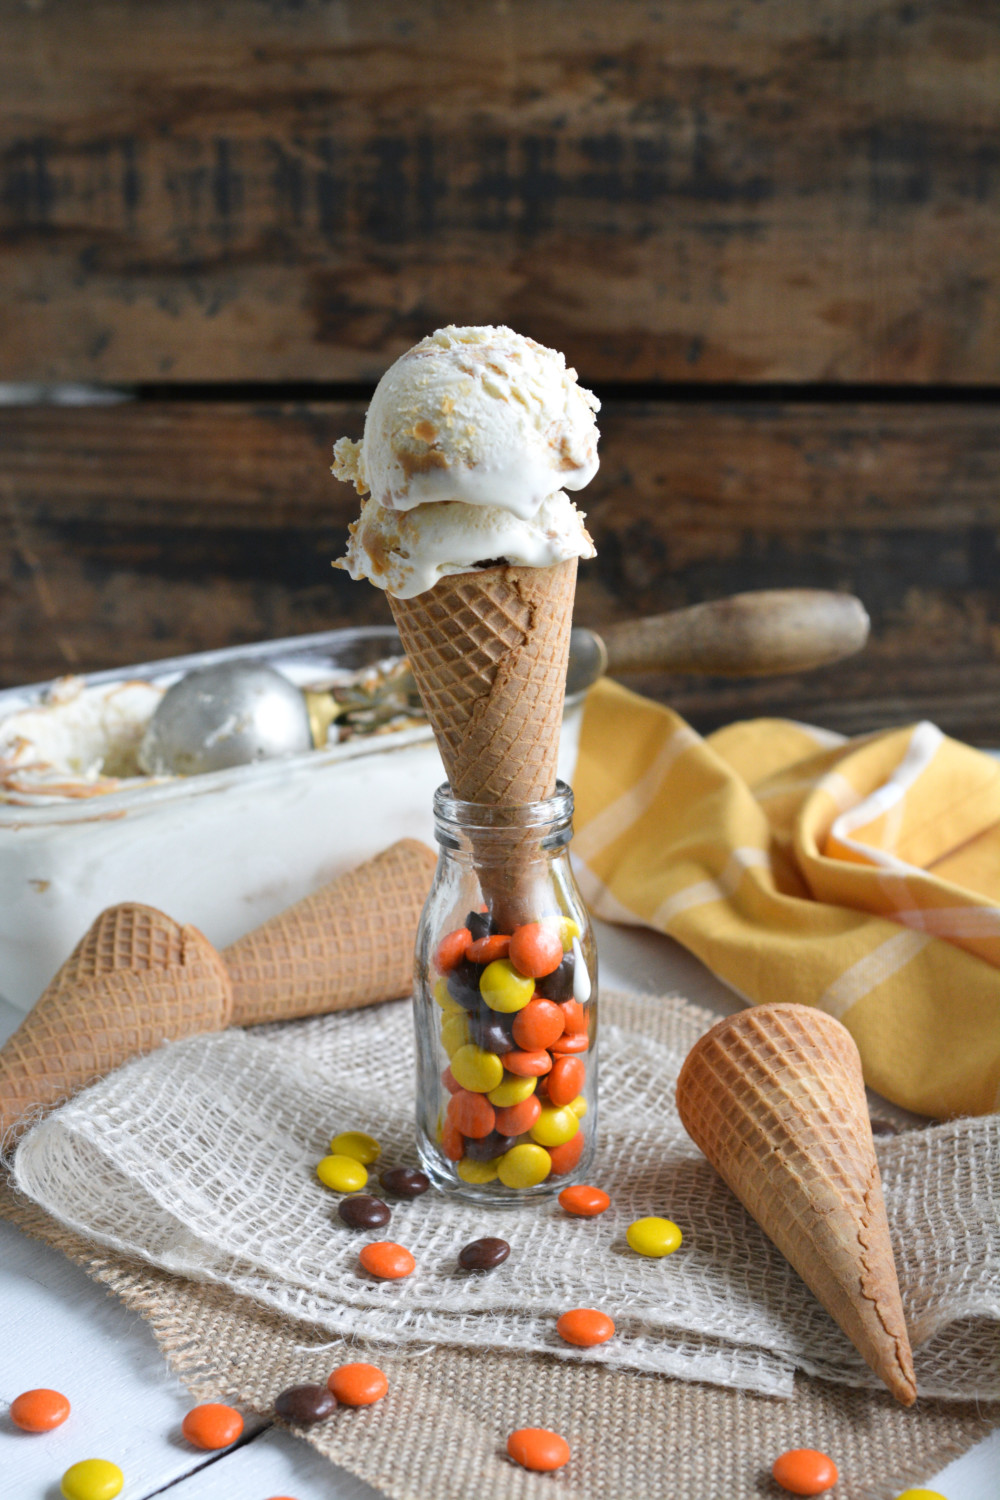
You get the picture. This is one delicious ice cream.
And in case you were concerned – I am now the proud owner of two very large containers of creamy peanut butter! 😉
Buon Appetito!
Print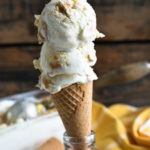
Creamy Peanut Butter No-Churn Ice Cream
- Category: Dessert
Description
You don’t need an ice cream maker to make this Creamy Peanut Butter No-Churn Ice Cream!
Ingredients
- 3/4 cup of your favorite creamy peanut butter
- 1 pt. heavy whipping cream
- 1 Tbsp. vanilla extract
- 1 can (14 oz.) sweetened condensed milk
- Peanut butter candies, chocolate bits, sprinkles (optional)
Instructions
- Place peanut butter in a small microwave safe bowl and heat on high for 45 seconds until melty.
- Remove from microwave, stir and allow to cool.
- For the ice cream, in a large mixing bowl, using a hand held mixer, whip the heavy whipping cream and vanilla extract until stiff peaks form.
- Using a rubber spatula, gently fold in the sweetened condensed milk.
- Pour 1/3 of the ice cream mixture into a 9×5 loaf pan, then drizzle 1/3 of the melted peanut butter on top. Repeat two more times, then using a skewer, gently swirl the peanut butter.
- Freeze for 6 hours or overnight.
- Scoop and enjoy!
Since it is absolutely ice cream weather, I though you might like a few other flavors to choose from:
Caramelized Peaches with Brown Sugar & Cinnamon
Honey Vanilla & Butterfinger Crunch
Vanilla Bean with Cherry & Pistachio
CIAO!
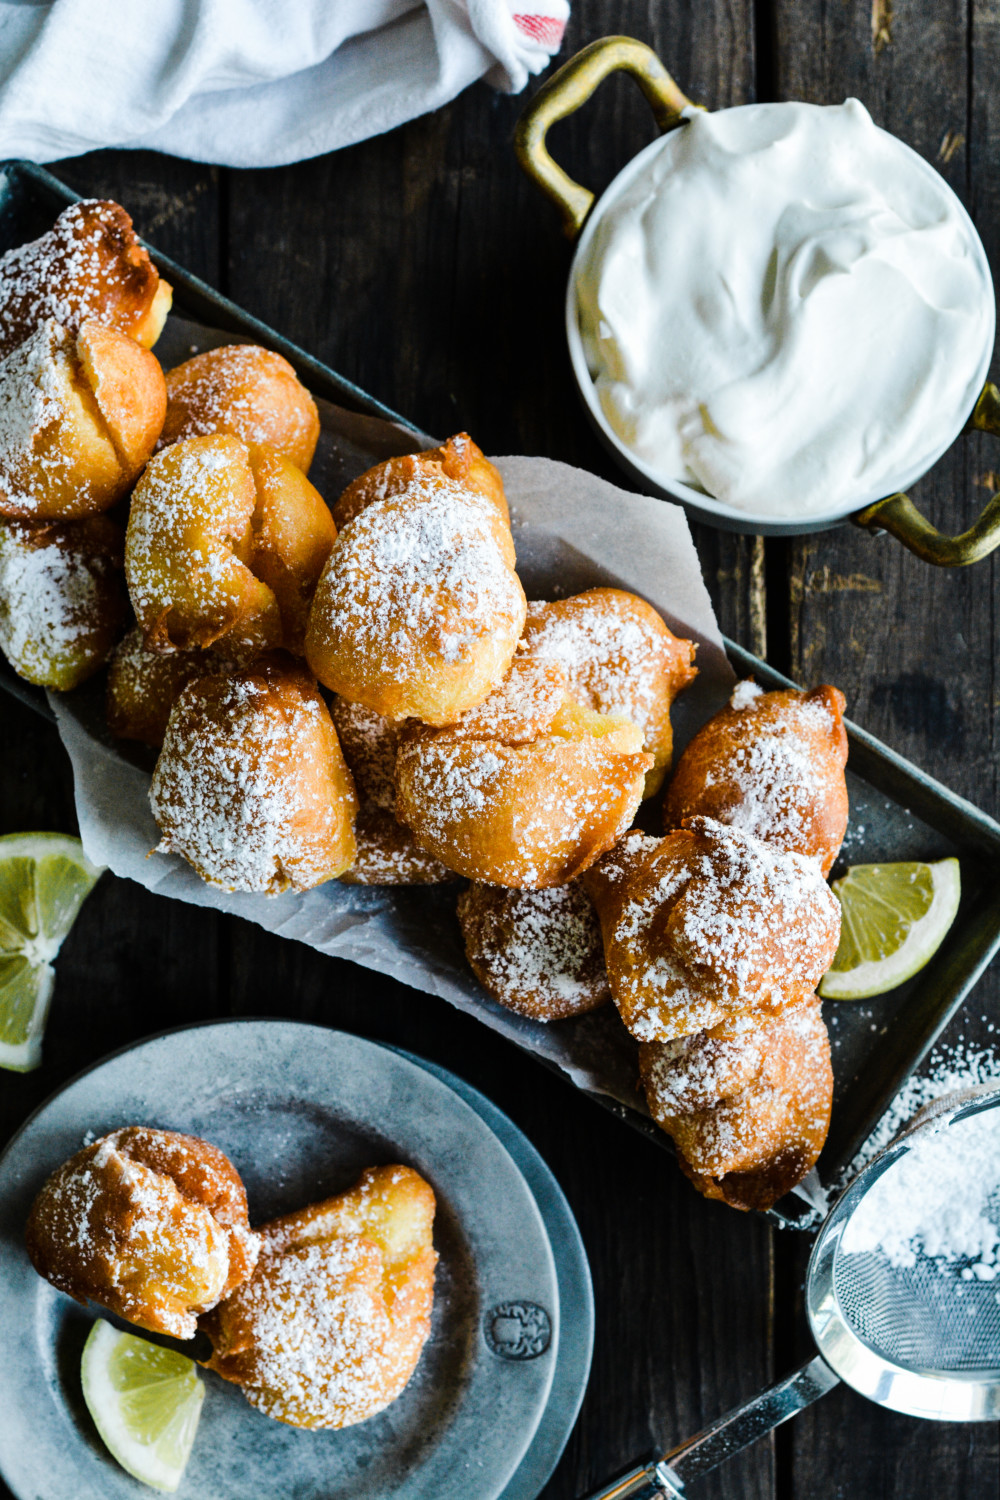
Lemon Zeppole with Homemade Whipped Cream
We can’t celebrate National Doughnut Day without Lemon Zeppole with Homemade Whipped Cream now, can we?
Nope.
Tomorrow is National Doughnut Day and we’re bringing out the big guns!
Lemon Zeppole with Homemade Whipped Cream! BAM!
…
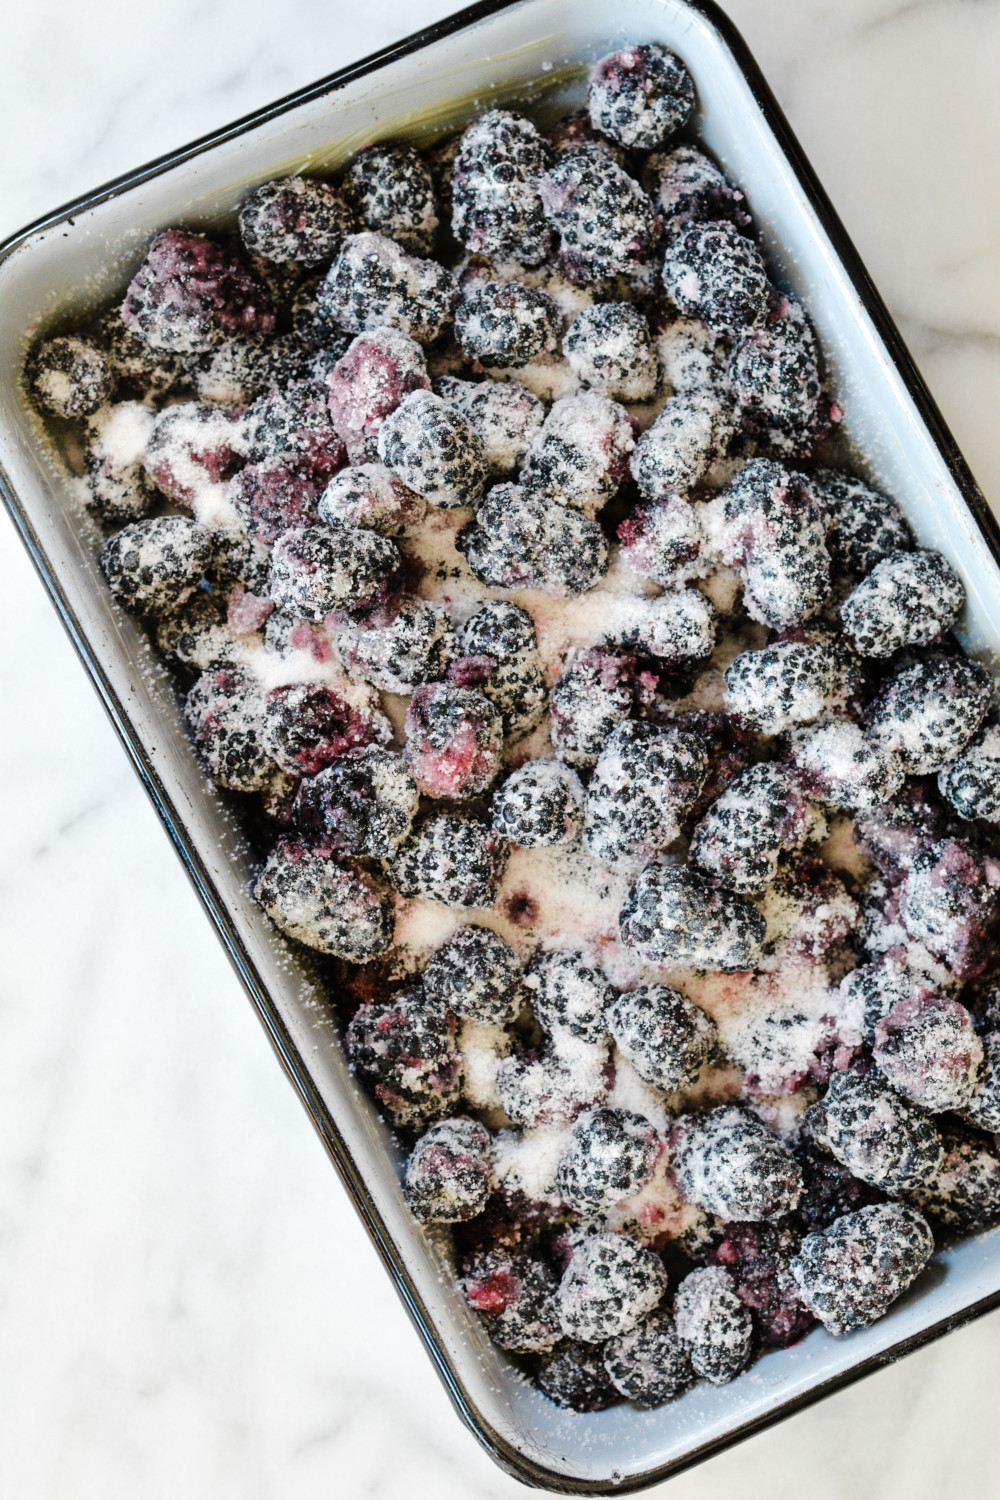
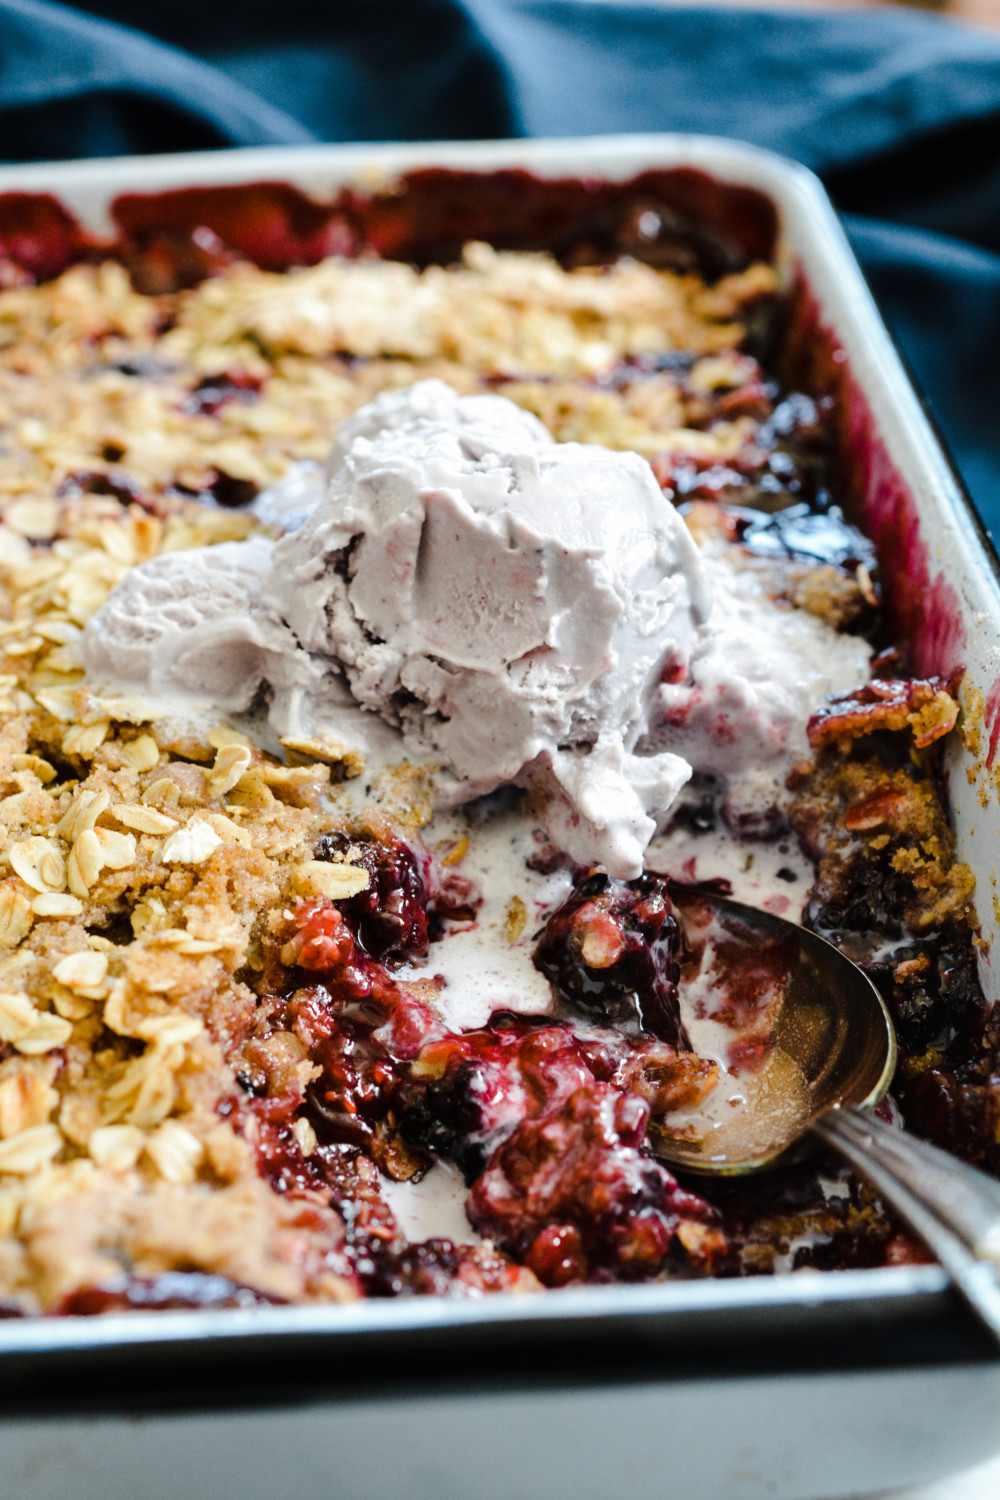
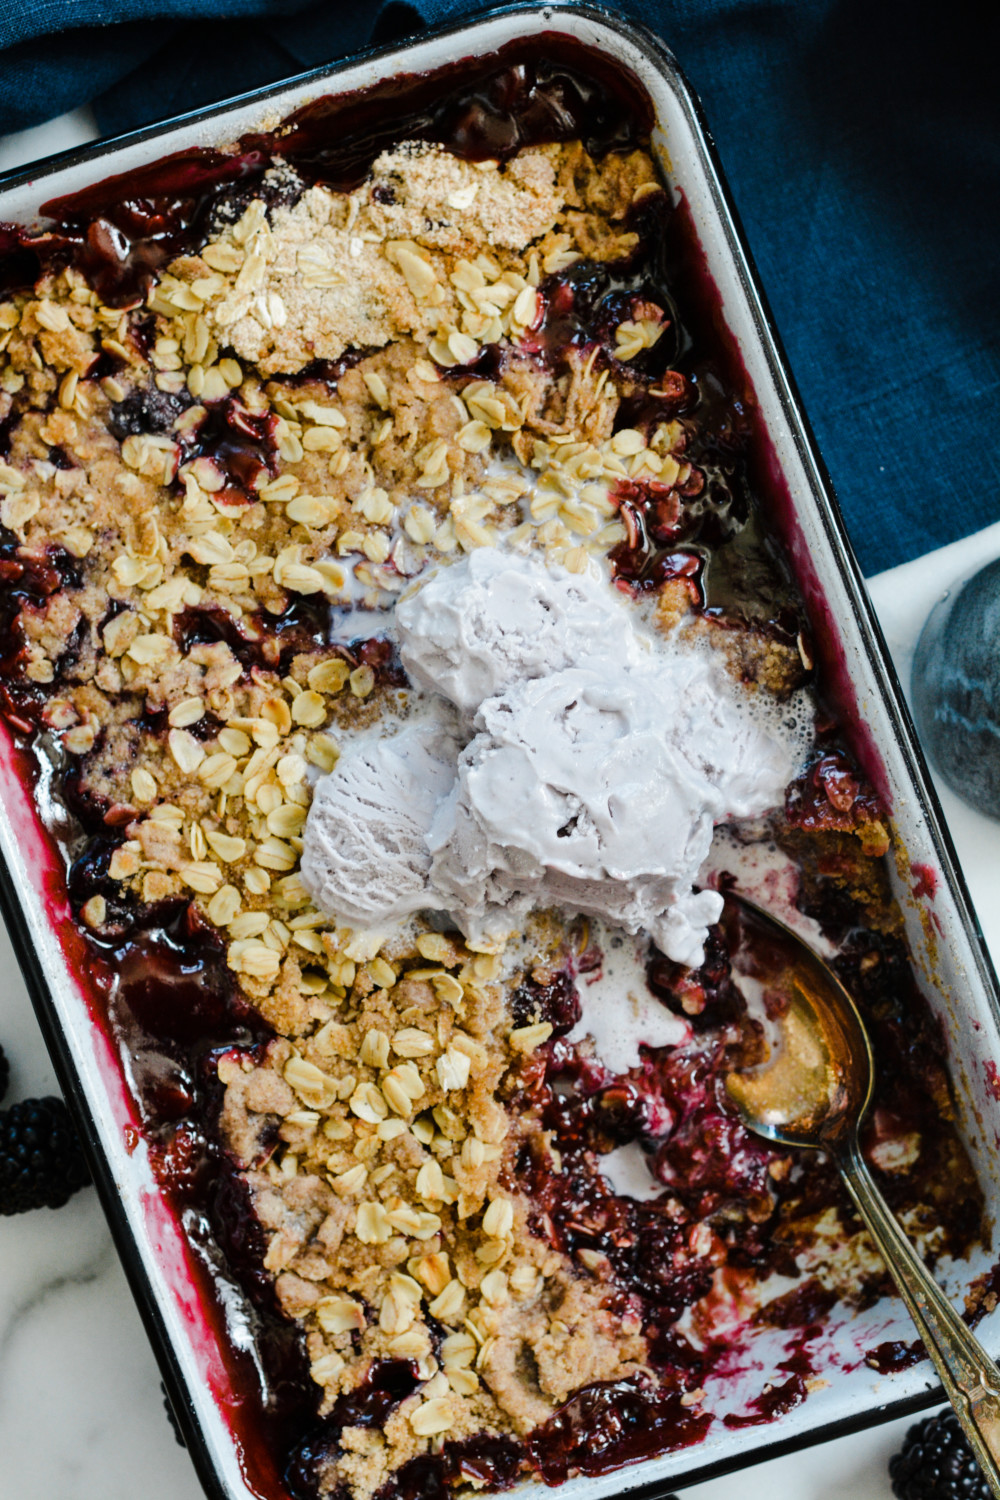
Blackberry Crisp
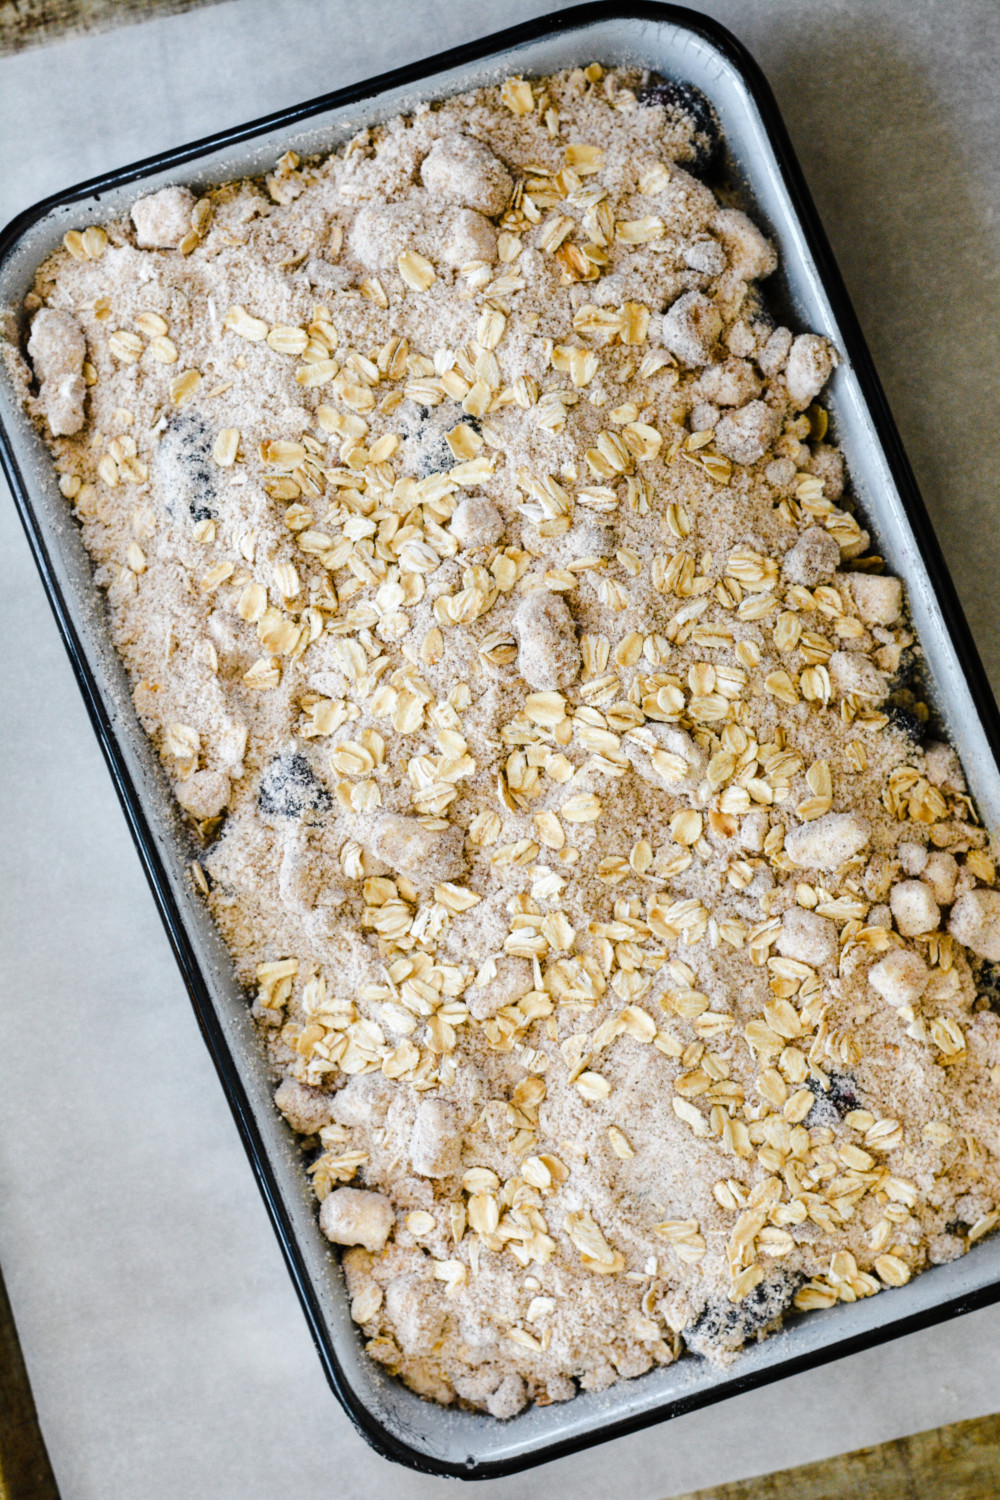
Sweet blackberries topped with a buttery oat crumble comes together pretty quickly to make a Blackberry Crisp that is sure to please a crowd!
If you’re anything like I am then you like crispy food. Of course soft food has its place too, like – mashed potatoes, puddings, milkshakes and ice creams.
But if push comes to shove, I am all about the crunch! And the crunch of this crisp has my name, and hopefully yours, written all over it!
It’s as simple as this:
- In one bowl you’ll combine blackberries, sugar, flour and cornstarch.
- Stir to coat, then pour into a buttered 7 X 11-inch baking pan.
- In another bowl, stir together flour, brown sugar, rolled oats, cinnamon, salt, butter and canola oil.
- Pour the mixture overtop the berries, rest pan on a parchment lined cookie sheet, and bake.
- Remove from the oven when the fruit is bubbling up over the sides and the top is crispy.
- Allow it to cool.
- Add your favorite ice cream.
- Enjoy!
Nothing like a fruity crisp on a hot summer’s day.
I decided to go with blackberries simply because Dom brought home a bunch, but you can substitute any berry you’d like.

This blackberry crisp comes together quickly and clean-up’s a snap.
Before you know it you’ll be sitting outside on your quiet patio in your favorite Adirondack chair taking in the sun and hearing nothing but the gentle sounds of your very own crunching.
Not a bad day!
Buon Appetito!
Print
Blackberry Crisp
- Category: dessert
Description
Sweet blackberries topped with a buttery oat crumble comes together pretty quickly to make a Blackberry Crisp that is sure to please a crowd!
Ingredients
- 1 cup all-purpose flour
- 1/2 cup packed light brown sugar
- 3/4 cup old-fashioned rolled oats
- 2 tsp. ground cinnamon
- 1/4 tsp. salt
- 8 Tbsp. cold unsalted butter, cut into 1/2-inch cubes
- 1 Tbsp. Canola oil
- 6 cups blackberries
- 1 1/4 cups granulated sugar
- 3 Tbsp. all-purpose flour
- 1 Tbsp. cornstarch
Instructions
- Position a rack in the lower third of the oven and preheat to 350 F. Butter a 7 x 11-inch baking pan and line a baking sheet with parchment.
- For the topping, in a medium bowl, stir together the flour, brown sugar, rolled oats, cinnamon, salt, butter and oil with a fork. Set aside.
- For the filling, in another medium bowl, combine the blackberries with the sugar, flour and cornstarch, stirring to coat the fruit.
- Pour the mixture into the prepared baking pan.
- Sprinkle the topping over the fruit.
- Place the baking pan on the prepared baking sheet.
- Bake for 50 – 60 minutes, until the fruit is bubbling around the edges and the top is golden brown and crispy. Let cool slightly.
- Serve the crisp warm.
- A scoop of ice cream is a lovely addition!
CIAO!
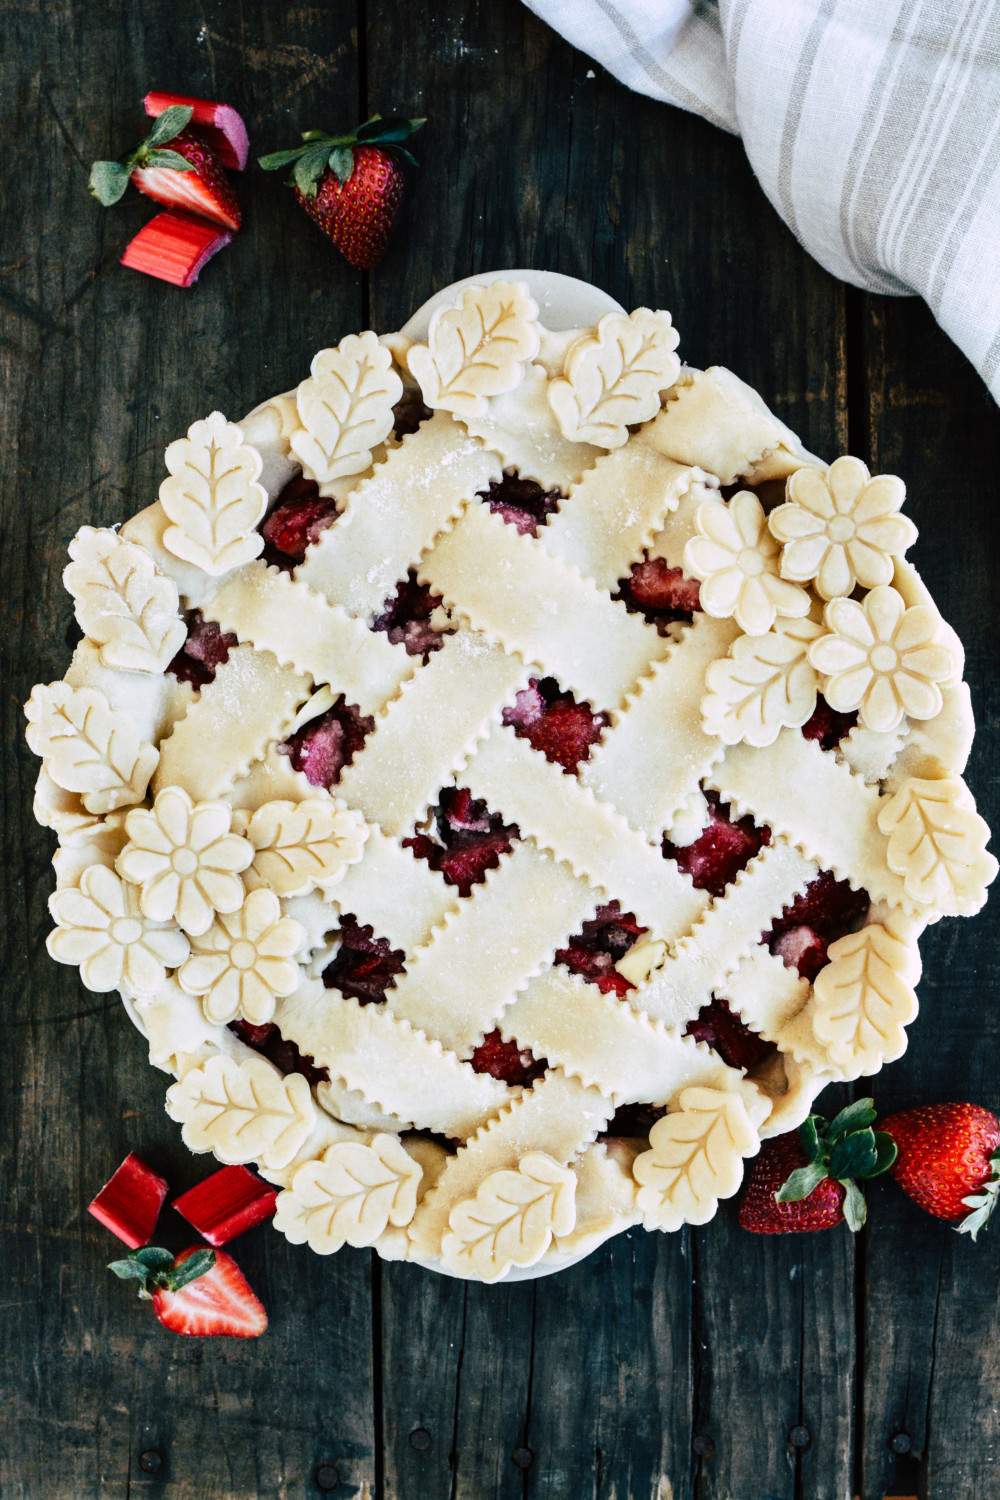
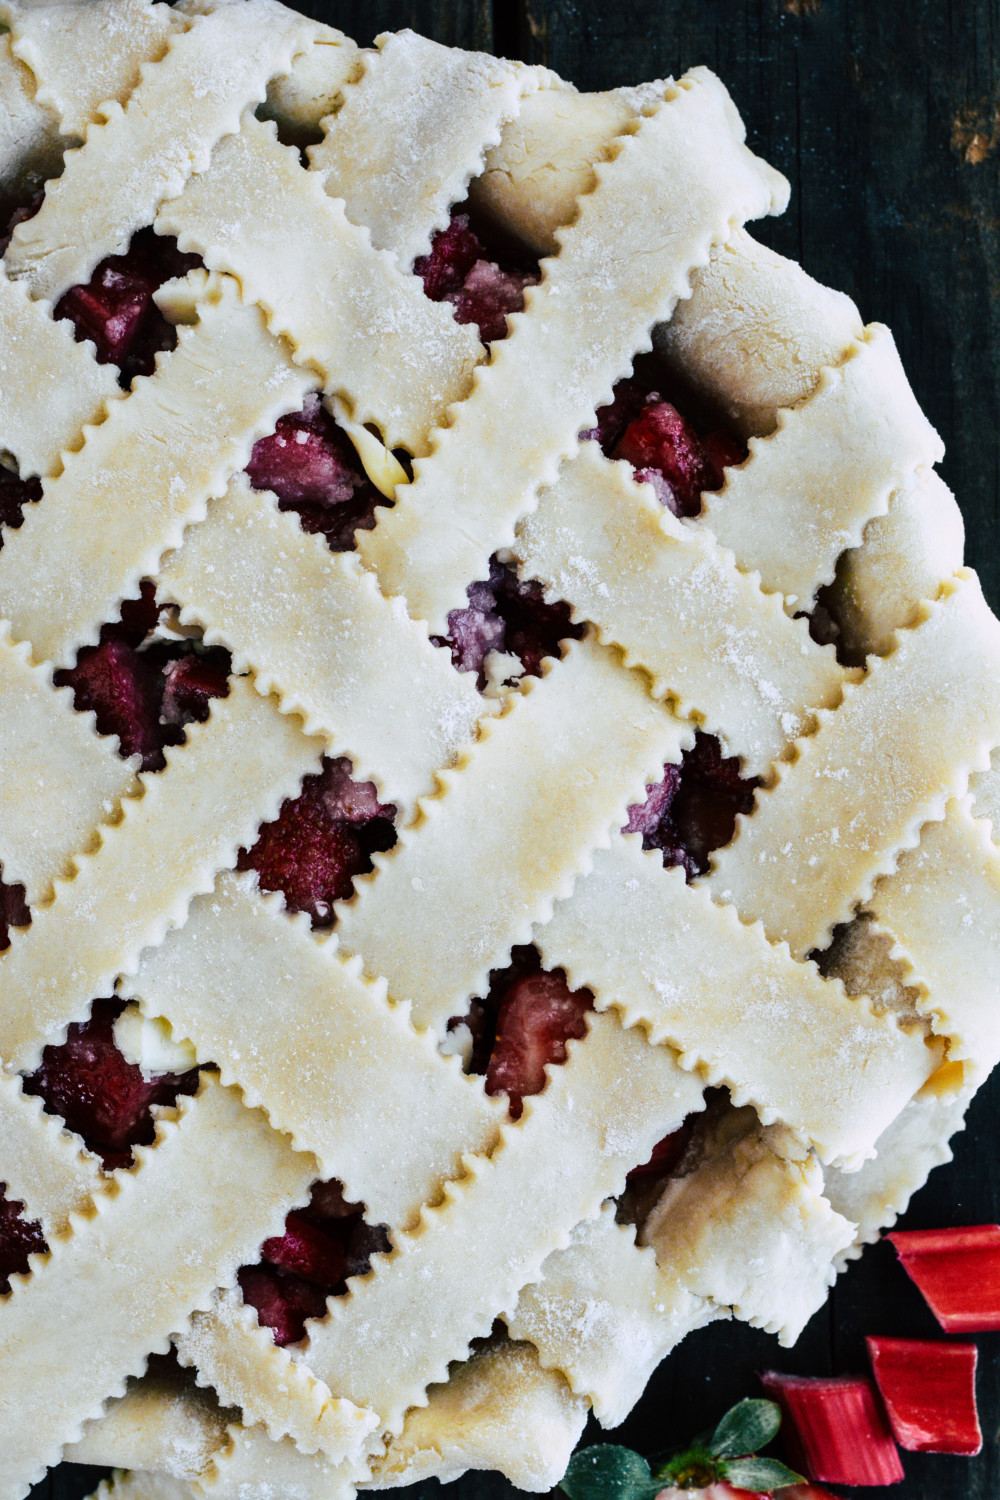
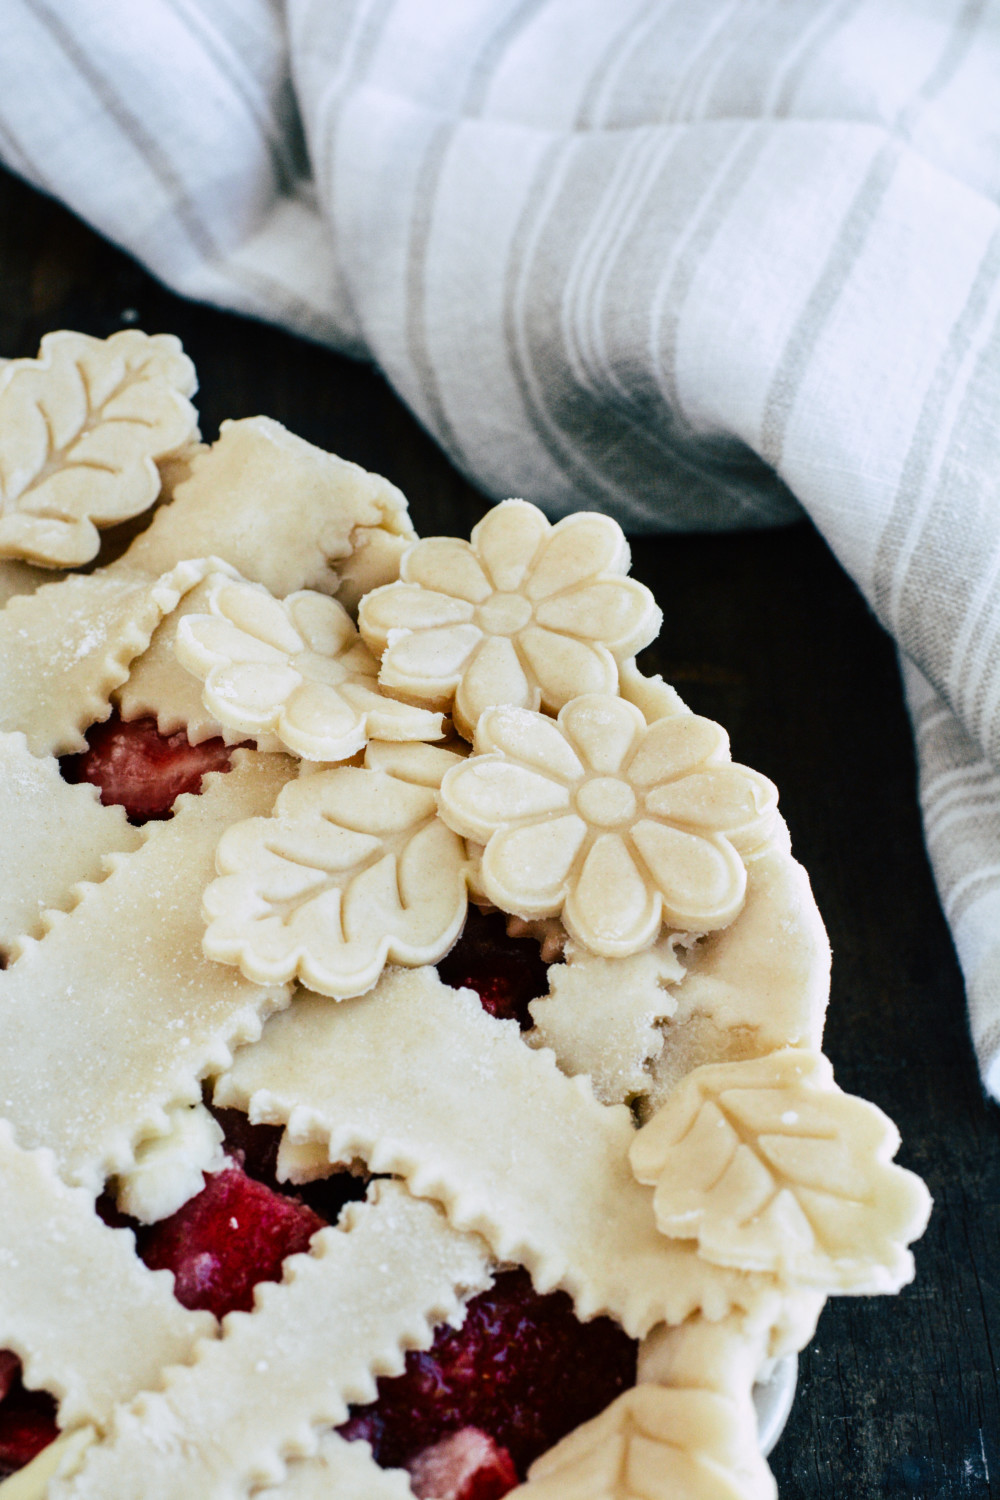
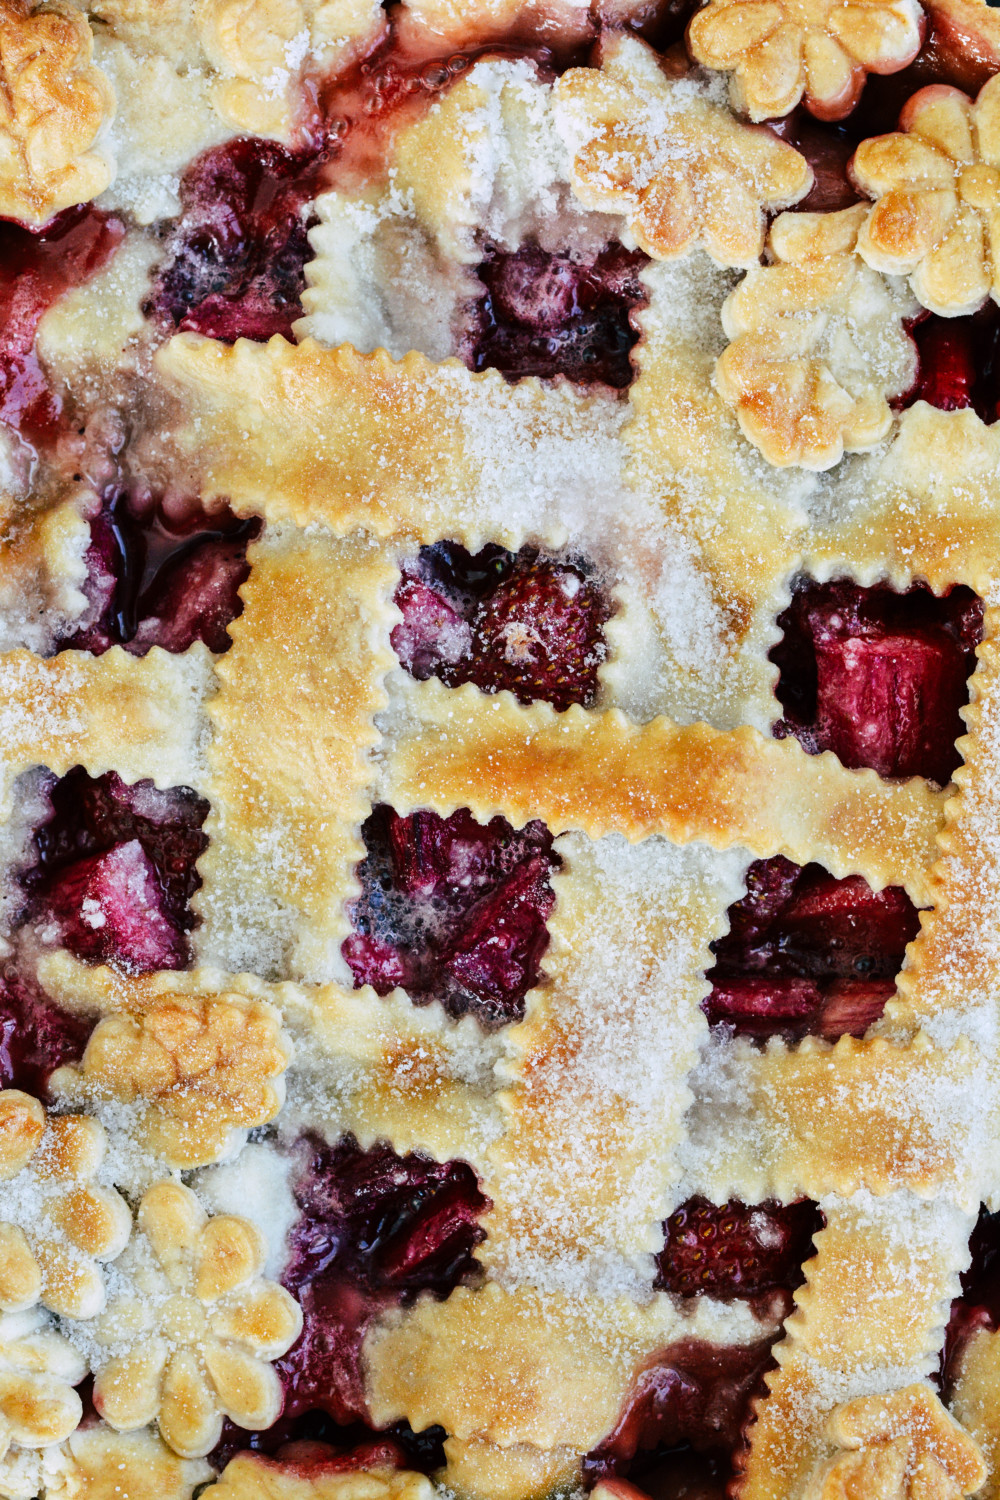
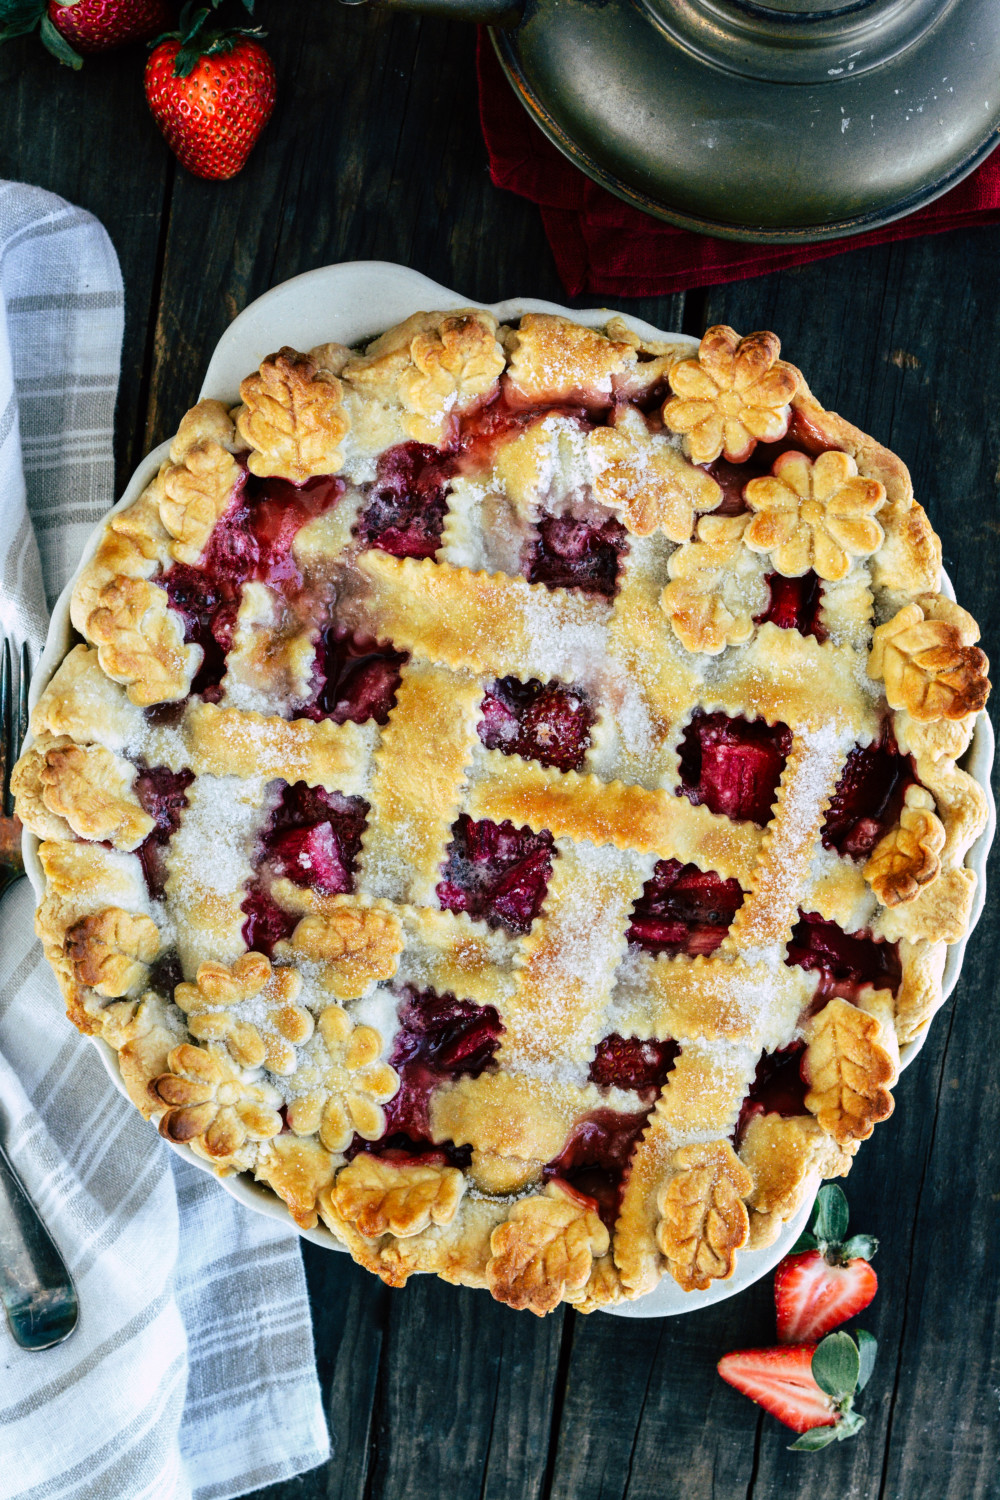
Classic Strawberry Rhubarb Pie
Classic Strawberry Rhubarb Pie is a springtime favorite!
I woke up one sparkling yet arctic morning in early January and thought to myself, ‘We’re not going anywhere, let’s play with dough.’
And so it began…
Since that prophetic day, I filled two extra-large glass canisters, those that I normally use to warehouse my homemade limoncello, with unbleached all-purpose flour and granulated sugar, and got to work.
You may recall my Simple No-Knead Bread and my Handmade Fettuccine, two recipes that came together pretty easily, but I took to the books for a pie dough recipe that would elevate the dough that I’ve been cranking out for years.
So much of what I read pointed to using both butter and shortening. While butter makes its mark on flavor, shortening takes care of texture…texture that renders a tender melt-in-your-mouth experience.
I had to do it.
I had to learn the techniques that would enhance my age-old recipe.
So what do we do when we want to go the distance? We look to the experts.
Found one!
Are you familiar with Kate McDermott and her book, Art of the Pie?
Oh my. Oh my. Oh my.
It’s like being in the kitchen with an old friend or a sweet auntie who has taken years and years to know. the. deal. about. pie.
I purchased her gorgeous book and proceeded to gobble up everything she had to offer. It makes for good bedtime reading, I might add.
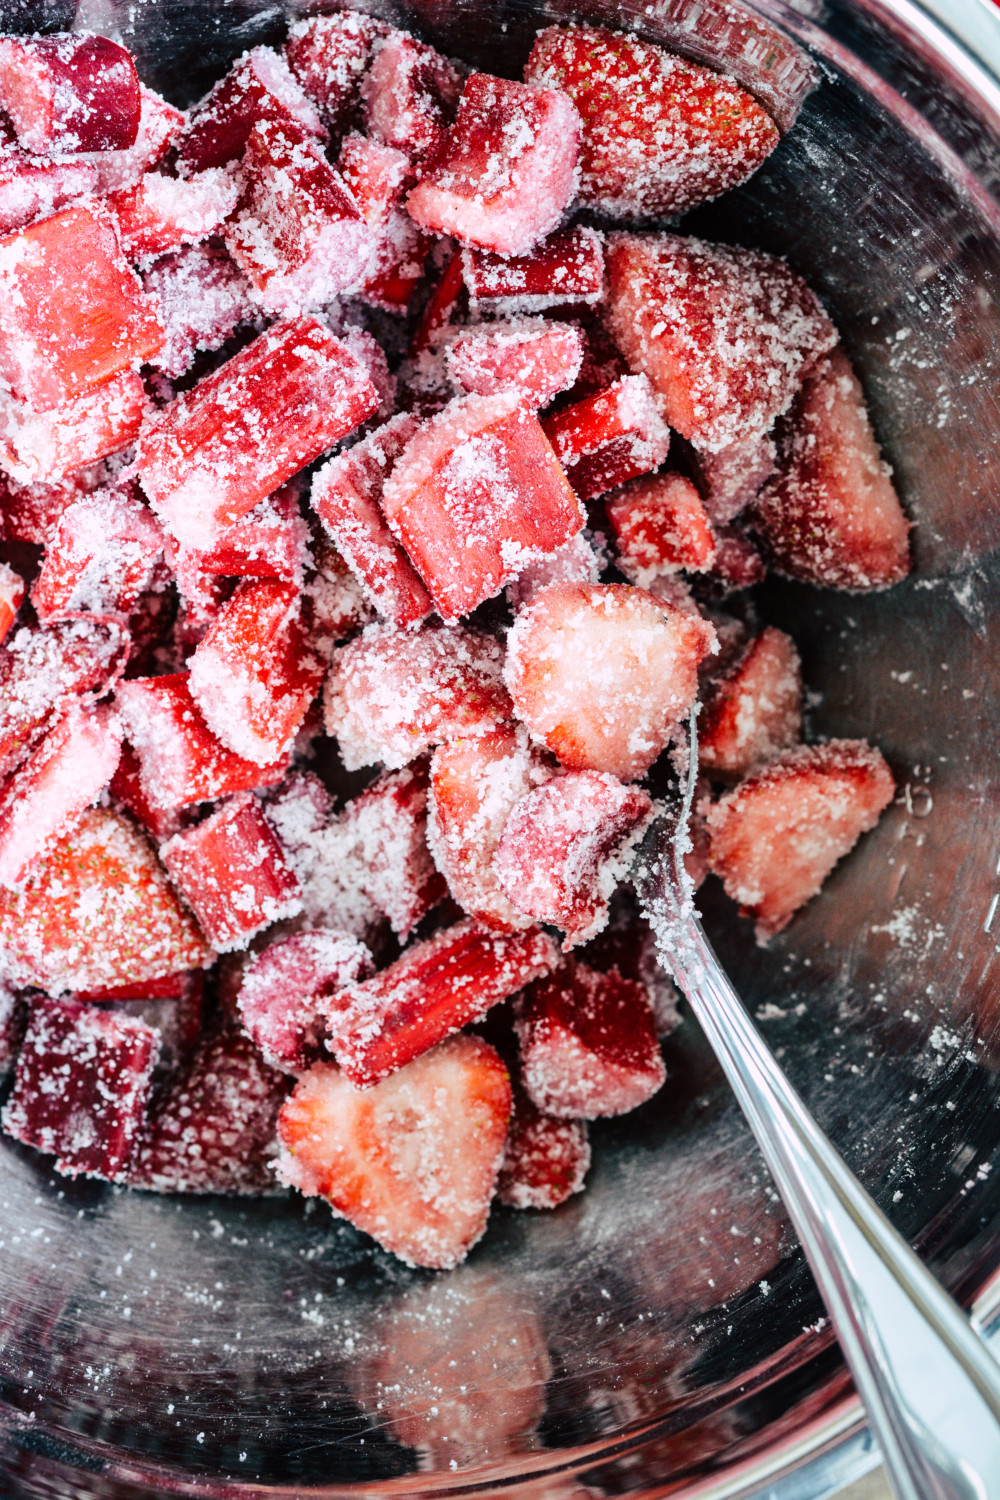
When I decided it was ‘time’, I asked Luc to pick a pie, any pie…and without hesitation she went with the strawberry rhubarb…and I’m so glad she did.
This was my first time cooking with rhubarb, can you believe it?
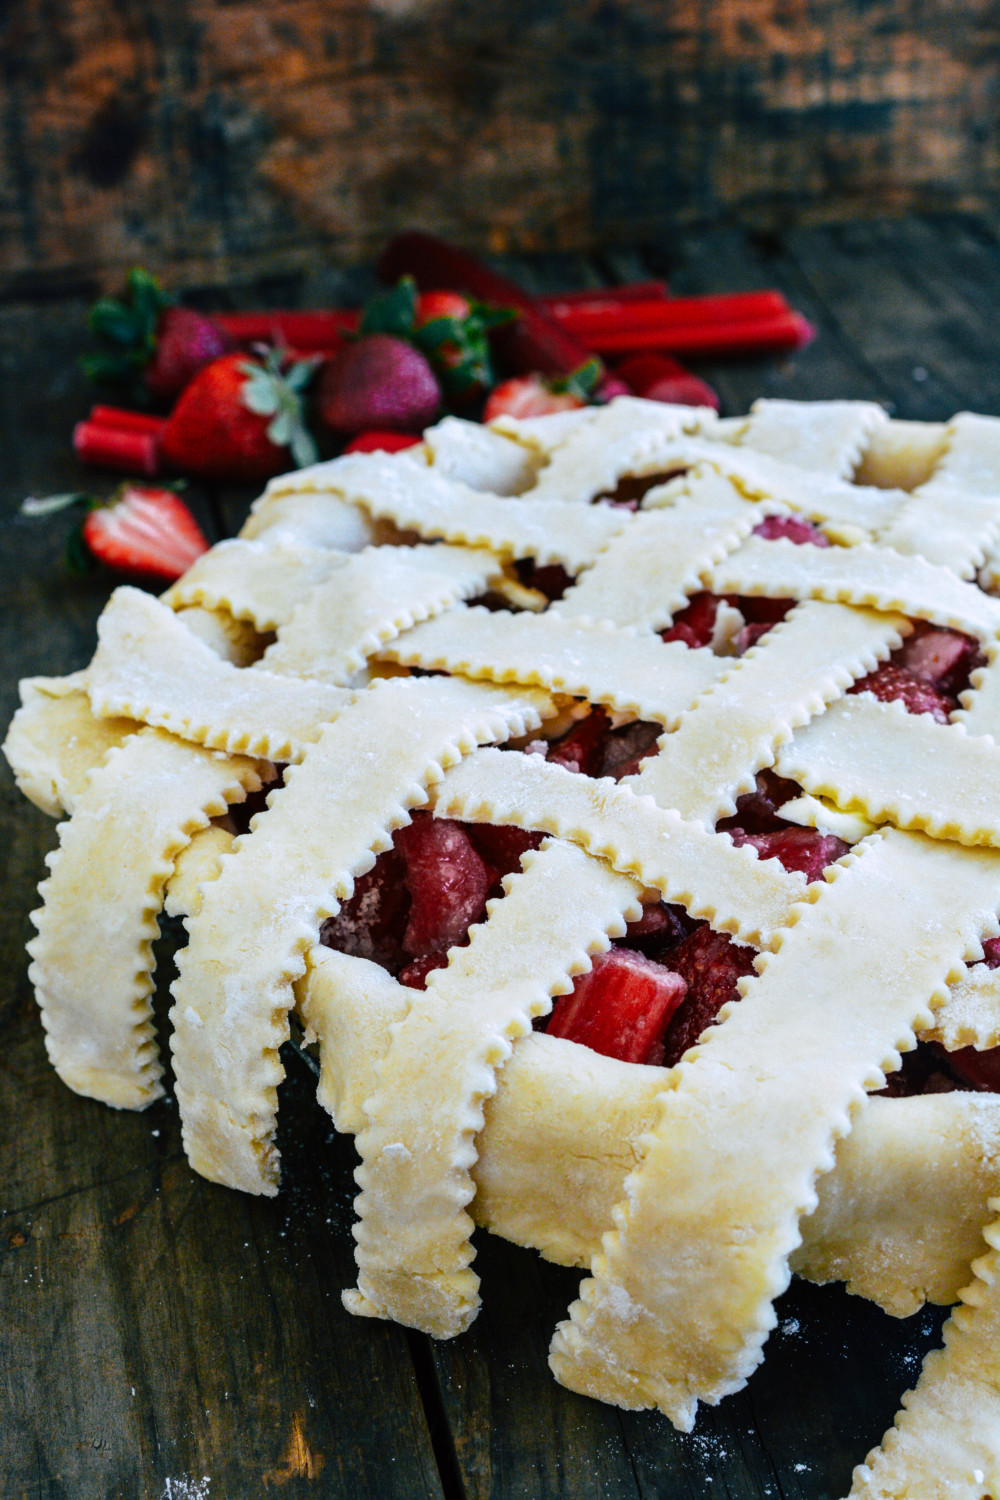
It, coupled with the sweetness of sliced strawberries, nestled in a crust that just about made me cry (okay, so maybe I did shed a tiny tear…happy tears, they were happy tears…), was the pie I needed to make. Heaven.
With each step of my pie journey, from apple, with a crust made exclusively of shortening, to my rustic pear crostata, made with a butter-based crust, to this Classic Strawberry Rhubarb, using a combination of butter and shortening….I feel like I’m ready for anything…
What have I learned?
- Cold is where it’s at! (Even the pie pan should be refrigerated before filling.)
- Trust (your) taste. Once the ingredients for the filling are combined, take a taste. Don’t be afraid to add or subtract until it pleases you. Make it your own.
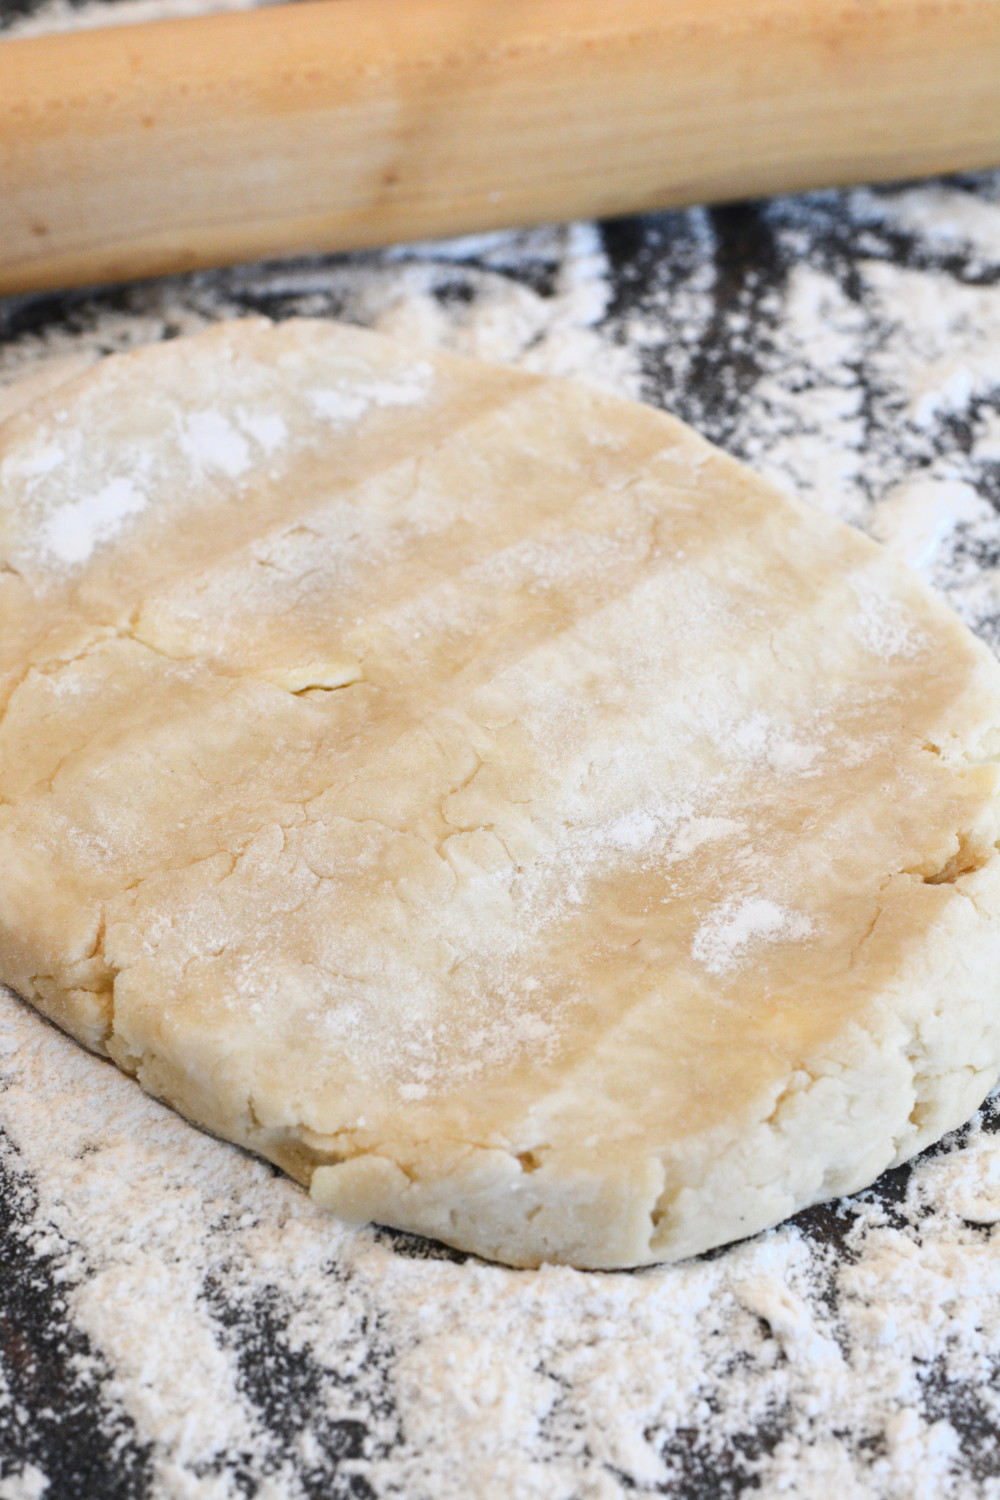
- When rolling out the dough, begin in the center and using a steady pressure, roll out toward the edge without falling off. Stop at about 1-inch from the edge to keep it from becoming too thin.
- Have fun with the decorating!
Do I recommend a dough that uses both butter and shortening? YOU BET!
Do I recommend stepping out of one’s comfort zone to play? With dough? YOU BET!
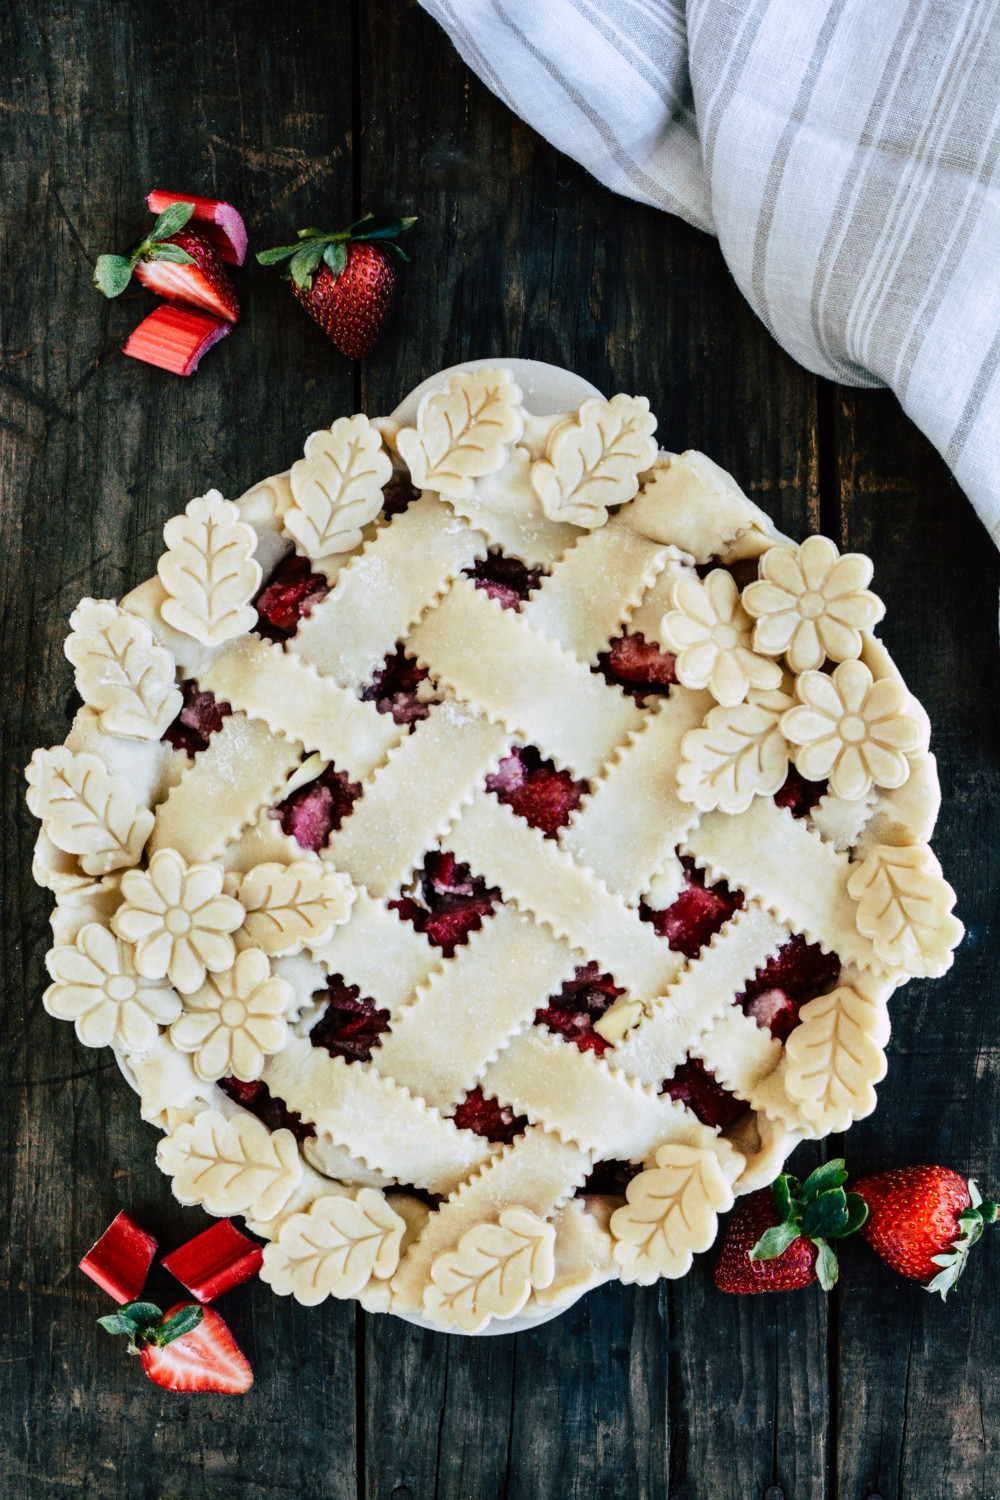
Do I think magical powers exist in a dough where fluted lattice and springtime flowers can be found? YOU BET!
This recipe’s a keeper….
If I do say so myself!
Buon Appetito!
Print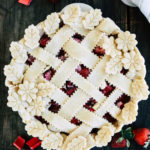
Classic Strawberry Rhubarb Pie
- Prep Time: 1 hour 15 mins
- Cook Time: 1 hour
- Total Time: 2 hours 15 mins
- Yield: 8 slices 1x
- Category: Dessert
Description
Classic Strawberry Rhubarb Pie is a springtime favorite!
Ingredients
- 2 1/2 cups all-purpose flour (plus more for rolling)
- Pinch of salt
- 1/2 cup cold butter, cubed
- 1/2 cup cold vegetable shortening, cubed
- 1/2 cup ice water
- 2 cups strawberries, sliced
- 4 cups rhubarb cut into 1-inch pieces
- 1 cup granulated sugar
- Juice from half a lemon
- 1/4 tsp of nutmeg
- 1/3 tsp salt
- 2 Tbsp quick-cooking tapioca (or cornstarch)
- 1/4 cup flour
- 1 Tbsp butter, broken into small pieces
- 1 egg white plus 1 Tbsp water, mixed with a fork
- 1 Tbsp granulated sugar for sprinkling on top
Instructions
- In a large mixing bowl, place the first four ingredients.
- With clean hands, quickly combine the ingredients until they look like cracker crumbs with pea-sized lumps.
- Sprinkle the ice water over the mixture and stir lightly with a fork.
- Squeeze a handful of dough to see if it sticks together. (Mix in more water by the teaspoon, as needed, until it sticks together.)
- Divide the dough in half and make two discs about 5-inches across.
- Wrap them separately in plastic wrap, and chill for an hour.
- In the meantime, prepare the filling.
- Begin by preheating the oven to 425 F, and place a 9-inch pie pan in the fridge to chill.
- Place strawberries and rhubarb in a large mixing bowl and add the sugar, lemon juice, nutmeg, salt, tapioca, and flour. Mix with a spoon until the fruit is coated well. Set aside.
- Remove discs from the fridge and let them temper until they feel slightly soft to the touch and easy to roll out.
- Unwrap one disc and place it on a well-floured surface.
- Sprinkle some flour onto the top of the disc and thump with your rolling pin several times. Turn it over and thump again.
- Sprinkle more flour onto the top of the dough as needed (to keep from sticking to the rolling pin) and roll the crust out from the center in all directions.
- Remove pie pan from fridge.
- When the dough is 1 to 2 inches larger than your pie pan, brush off the extra flour on both sides.
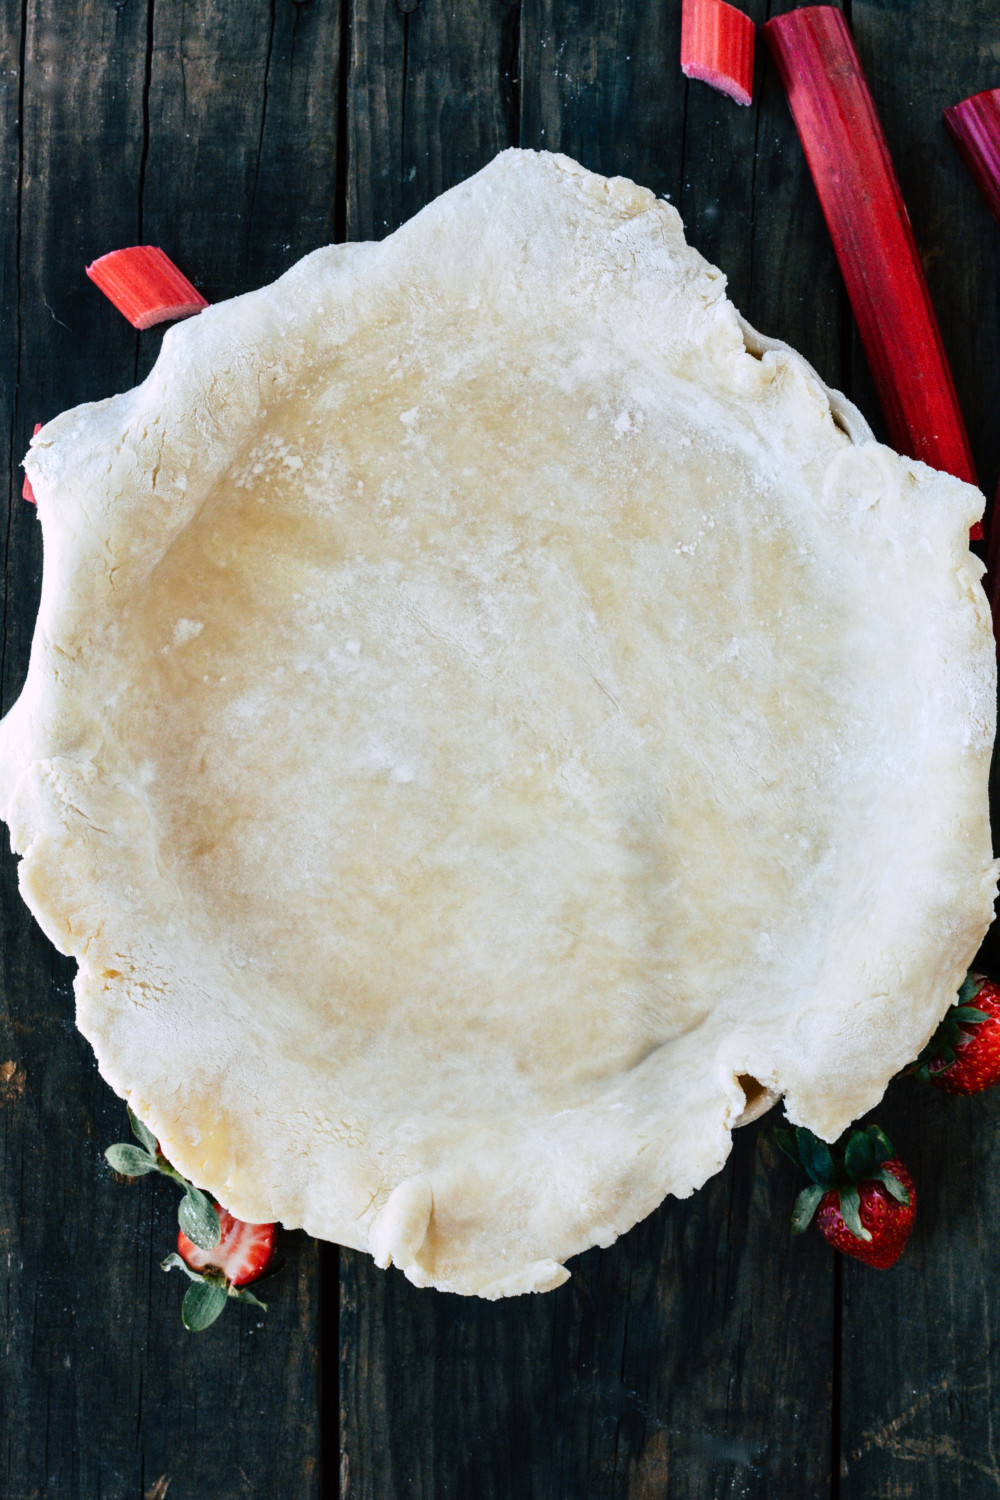
- Fold the dough over the top of the pin and lay it in the pie pan carefully.
- Spoon the strawberry-rhubarb filling in the pie, and dot with little pieces of butter.
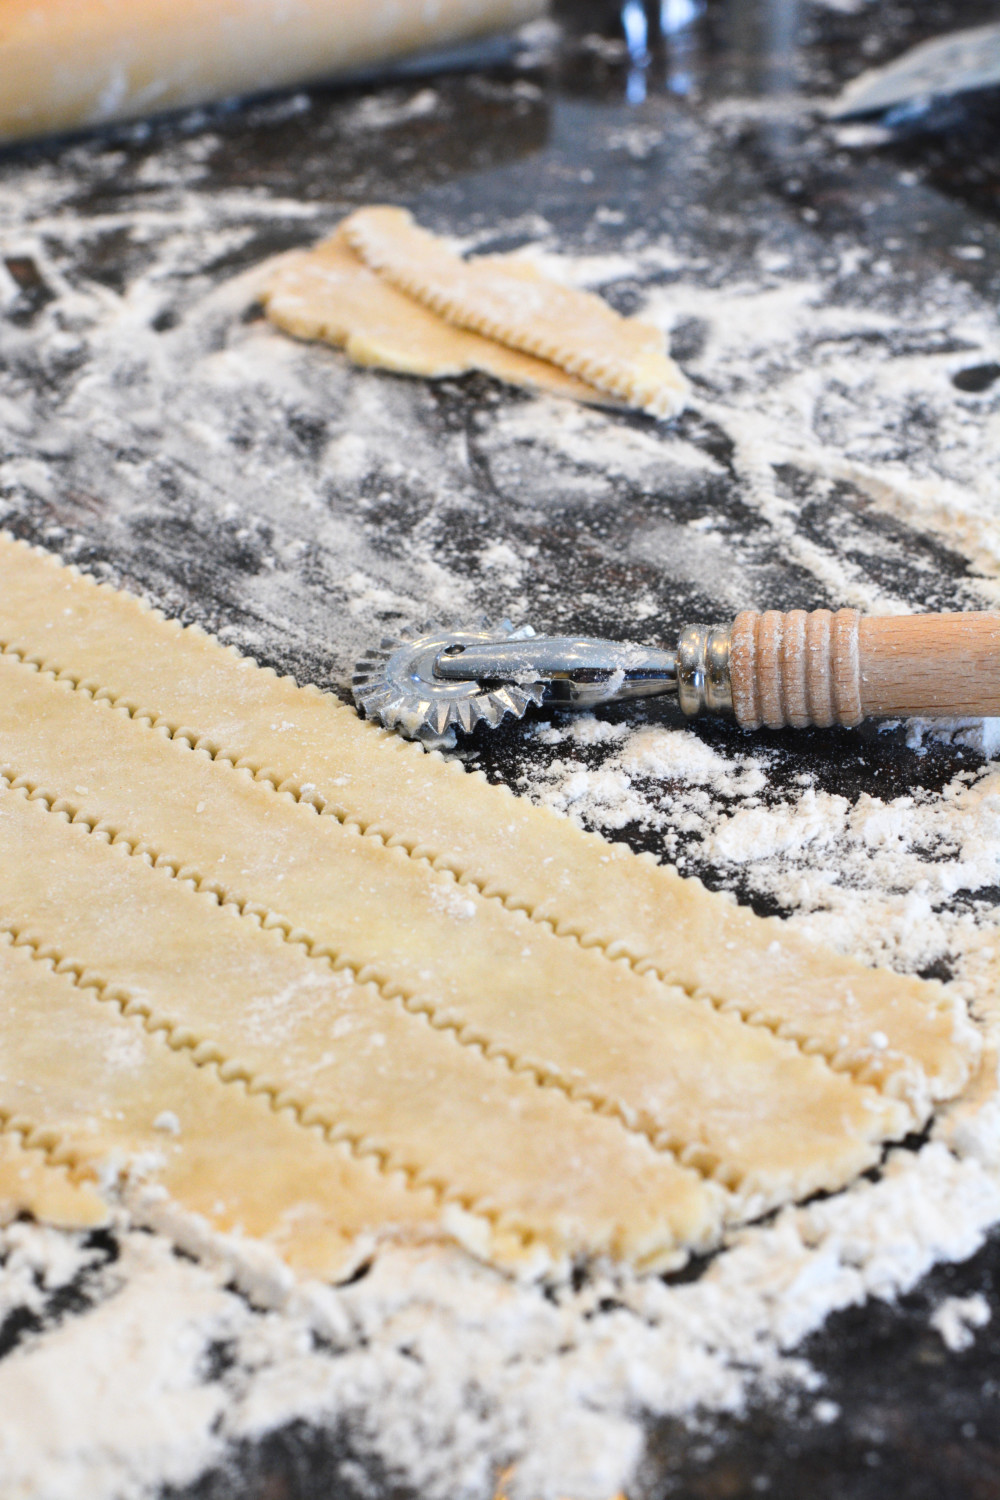
- Repeat the process for rolling out the other disc, lay over the fruit and cut 5 to 6 vents, or cut strips and make a lattice top and decorate if you wish with the remaining dough cut from the edges.
- Lightly brush some of the egg white wash over the entire pie, including the edges.
- Bake for 20 minutes.
- Reduce heat to 375 F, and after 25 (more) minutes, open the oven and quickly sprinkle the top with 1 Tbsp of sugar.
- Close the oven and continue baking for another 10 to 15 minutes, or until you see bubbling in the filling coming through the vents or lattice.
- Remove the pie from the oven and completely cool before serving.
- The longer the pie cools, the better it will set up, and the less runny it will be.
- Enjoy!
{Recipe adapted from Kate McDermott.}
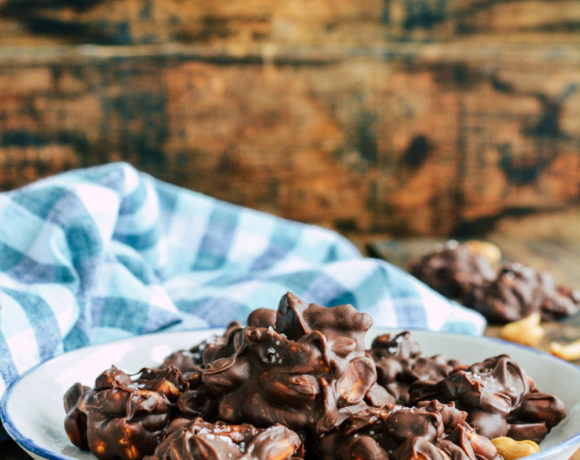
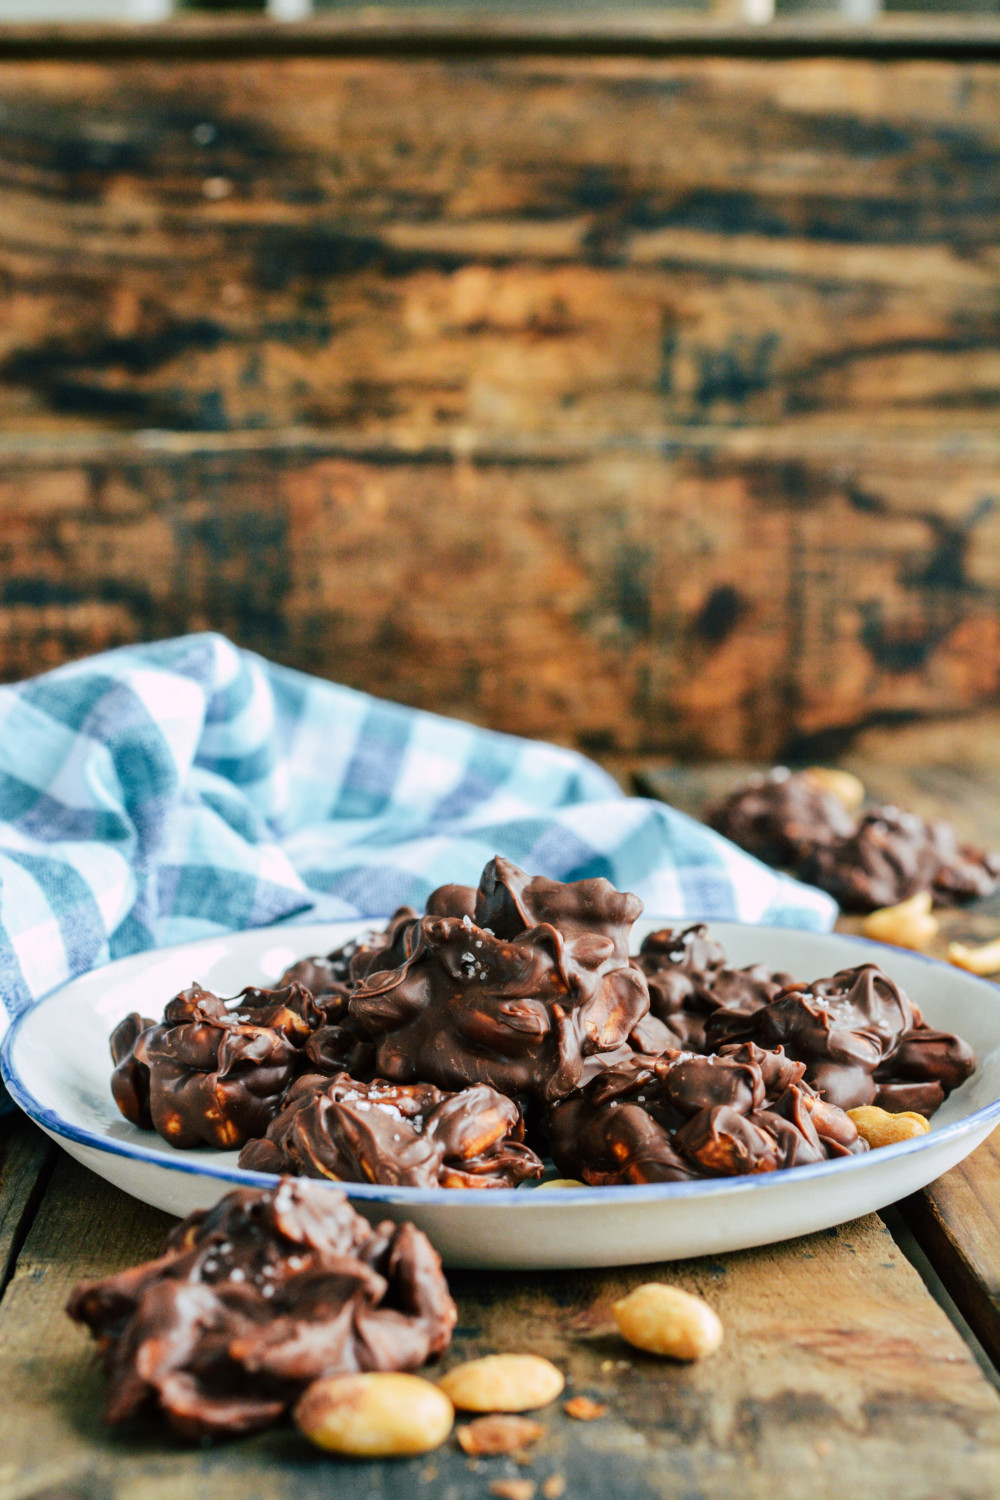
Milk Chocolate Roasted Peanut Clusters
If you’re a fan of salty-sweet, these Milk Chocolate Roasted Peanut Clusters are for you!
You never know where your next great idea will come from.
Case in point – Dom and I were sitting at the kitchen table after dinner the other night, enjoying a glass of my new favorite wine (Nero d’Avola), when Dom got up and walked to the pantry.
He reached inside and asked if I had tried them yet.
“Tried what?”
“Milk chocolate chips. Not baked in a cookie, just a scoop from the bag for a sweet snack.”
I had not.
So he poured a little on a napkin and brought them to the table. And honestly, they were a perfect complement to my glass of wine.
Here’s where the story gets good. 😉
We agreed that milk chocolate combined with hearty roasted Virginia peanuts (his favorite), would make quite the snack! And then the flood gates opened….
What else could we add to melty milk chocolate?
- pretzels
- marshmallows
- popcorn
- dried fruit
- caramel corn
The options are endless!
But – at the end of the day – we went with the classic. I added a sprinkle of sea salt to the top, but feel free to add whatever type of nut (I recommend roasted) or additional mix-ins that appeal to you.
Quick, easy and perfect for so many occasions, Milk Chocolate Roasted Peanut Clusters are the perfect homemade confection for when you want your sweet made your way!
Buon Appetito!
Print
Milk Chocolate Roasted Peanut Clusters
- Category: Dessert
Description
If you’re a fan of salty-sweet, these Milk Chocolate Roasted Peanut Clusters are for you!
Ingredients
- 12 oz. good milk chocolate for melting
- 1 – 2 cups roasted Virginia peanuts
- sea salt for topping
Instructions
- Line a baking sheet with parchment. Set aside.
- Place chocolate in a microwave-safe bowl and set in the microwave at 30 second intervals, stirring between each interval. Do not go beyond 1 minute 30 seconds. The heat of the bowl will continue to melt the chocolate as you stir.
- Once the melted chocolate is completely smooth, add the peanuts and give it a good stir until all the nuts are coated.
- With a tablespoon, scoop mixture and place on the lined baking sheet.
- Sprinkle sea salt on the tops of each cluster.
- Allow to set on the counter or refrigerator.
- Store in an airtight container.
CIAO!