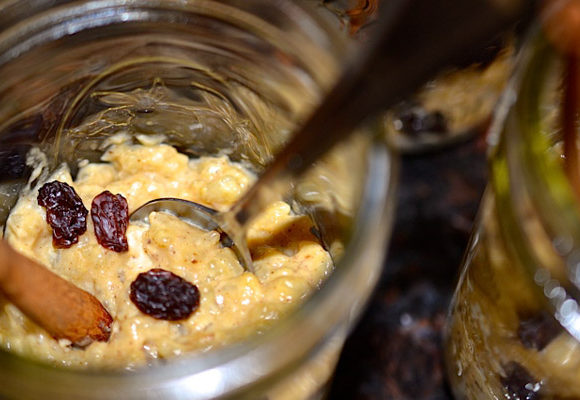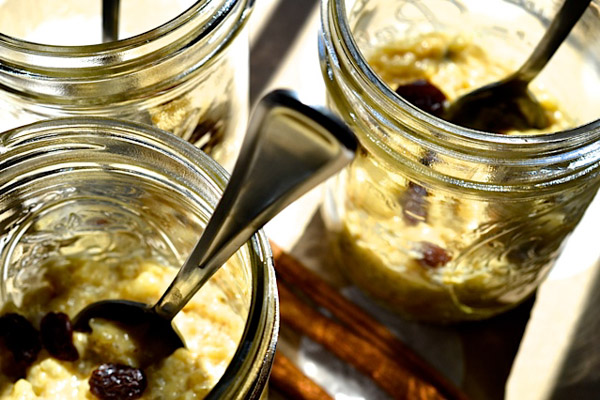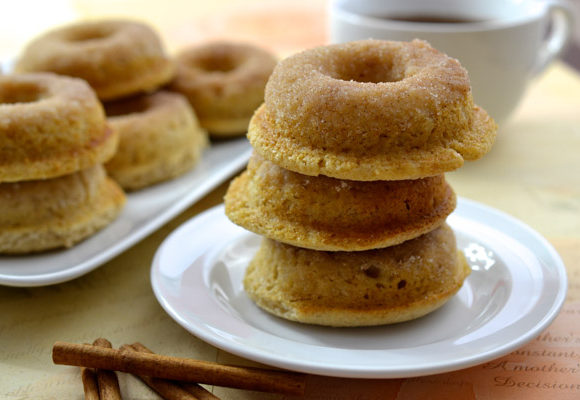
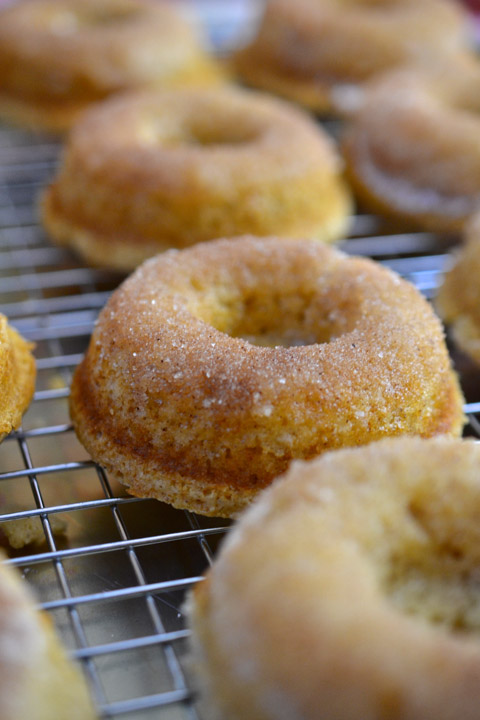
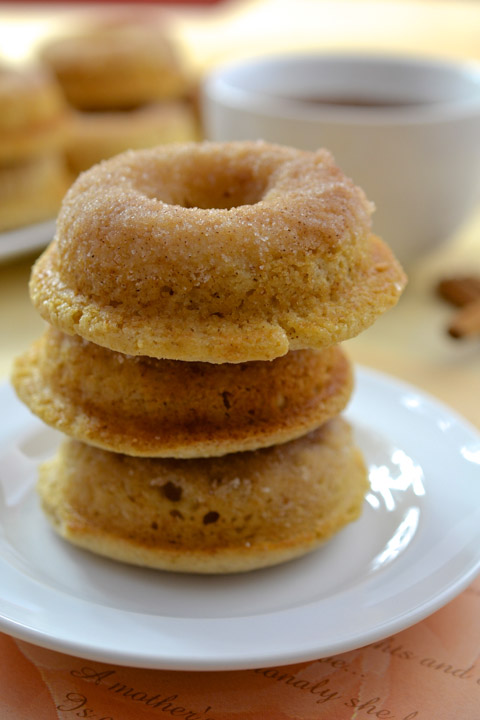
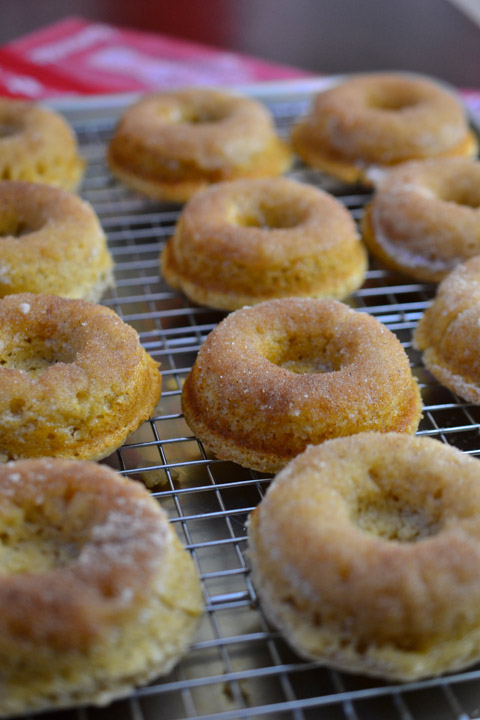
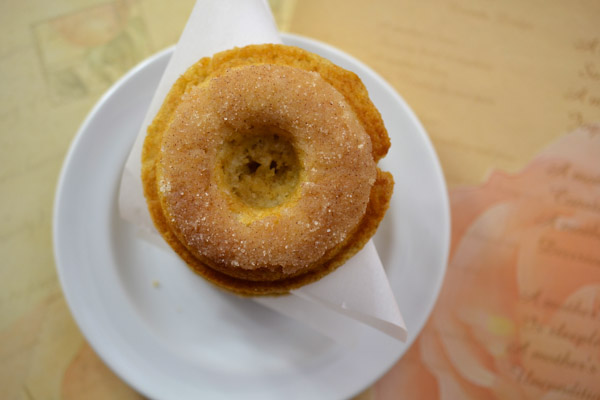
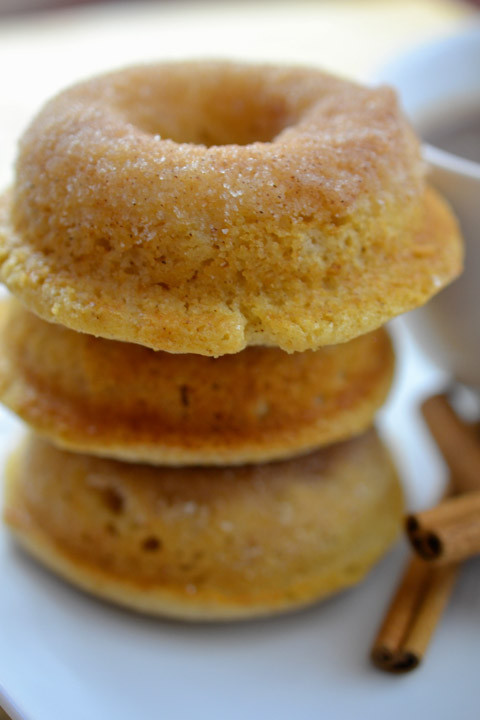
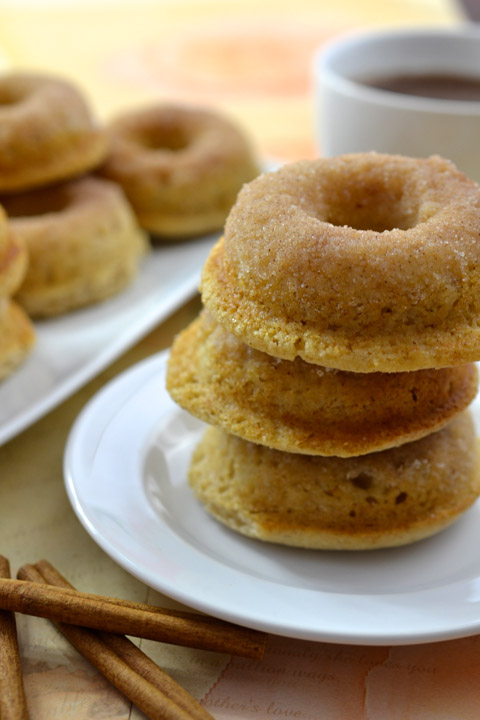
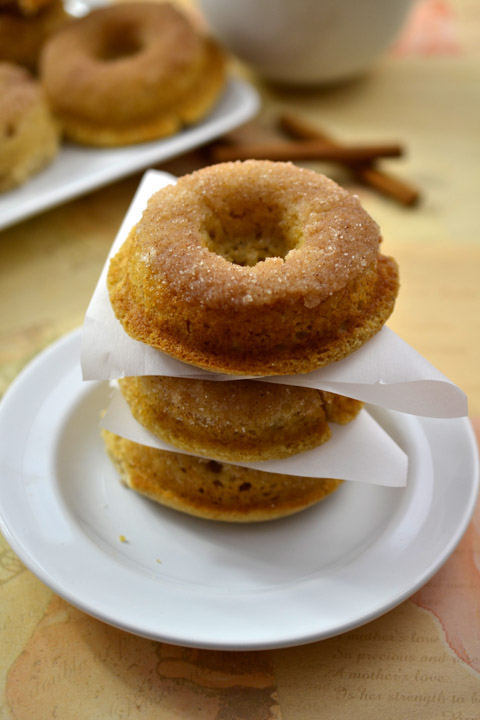
Light, fluffy, pillowy rounds of dough ensconced in a light blanket of cinnamon-sugar. Cinnamon-Baked Doughnuts. These sublime little sweet-cakes settle comfortably in a melted-butter bath followed by a brisk powdering of cinnamon-sugar.
Do you do that too? Spoil your doughnuts? I don’t normally take such tender-loving-care with my doughnuts, however, these little ladies are taking such good care of us – they deserve the extra attention.
What makes them so special?
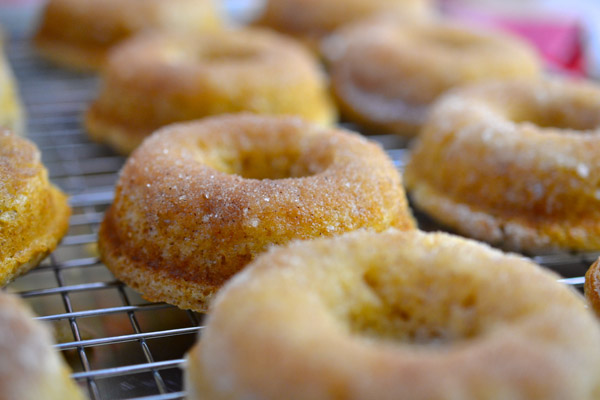
They’re baked.
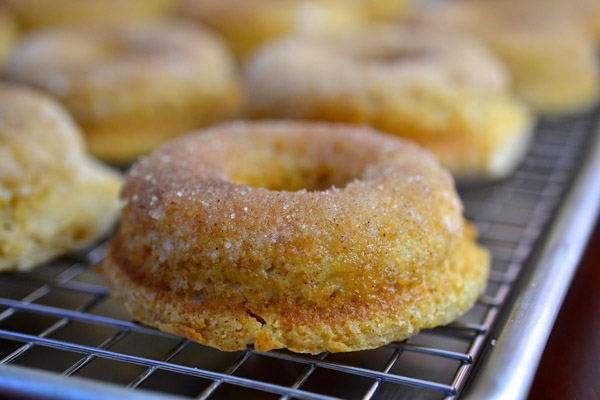
Not fried!
When I saw this recipe – I knew I had to try this no-fry doughnut!
I apologize for my sorry attempt at poetry…

I haven’t been able to fall asleep before 3:00 am since returning home from California.
Little tired… little fuzzy…
Thanks for cutting me some slack.

This doughnut recipe came paired with the Mexican Hot Chocolate in FoolProof.

So guess what I did?
Made more hot chocolate.
And guess what?

We loved it.
Buon Appetito!
Ciao!
Print
Cinnamon Baked Doughnuts
- Category: Dessert
Ingredients
- Baking spray with flour
- 2 cups all-purpose flour
- 1 1/2 cups sugar
- 2 tsp. baking powder
- 1 tsp. ground cinnamon
- 3/4 tsp. ground nutmeg
- 1/2 tsp. kosher salt
- 1 extra-large egg, lightly beaten
- 1 1/4 cups whole milk
- 2 Tbsp. unsalted butter, melted
- 2 tsp. pure vanilla extract
- 6 Tbsp. unsalted butter
- 1/2 cup sugar
- 1/2 tsp. ground cinnamon
Instructions
- Preheat the oven to 350 degrees. Spray 2 doughnut pans well.
- Into a large bowl, sift together the flour, sugar, baking powder, cinnamon, nutmeg, and salt.
- In a small bowl, whisk together the egg, milk, melted butter, and vanilla.
- Stir the wet mixture into the dry ingredients until just combined.
- Spoon the batter into the baking pans, filling each one to just full.
- Bake for 17 minutes, until a toothpick comes out clean.
- Allow to cool for 5 minutes, then tap the doughnuts out onto a cooling rack.
- For the topping, melt the 6 Tbsp. of butter in a small saute pan.
- Combine the sugar and cinnamon in a small bowl.
- Dip each doughnut first in the butter and then in the cinnamon sugar.
(*Recipe adapted from Ina Garten.)

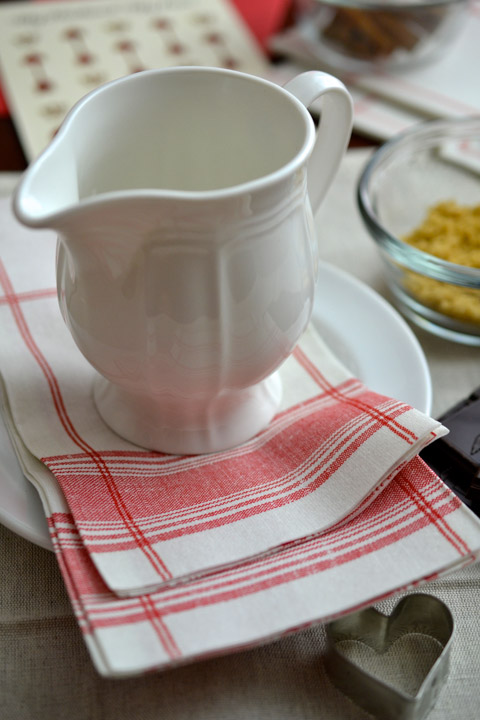
Mexican Hot Chocolate

Oh man…we just got back from a glorious vacation. We took some time and headed west to visit our chickies in California. What a treat!
You know – as difficult as it is to say good-bye… well, we don’t really ever say good-bye, it’s actually something to the tune of, “See ya”…but even as difficult as that is…it’s worth the joy of seeing our beauties so happy in their habitat. We hung where they live, laughed with their pals, visited their workplace, and ate at their favorite joints…all against the backdrop of bright sunshine and baby-blue skies.
Lauren and Chels did a great job of weaving us into their very busy schedules, but there were a couple of days in the middle of the week that Dom and I were going to be on our own, so rather than kick around LA without them – we decided to take a road trip north to Sam Clam’s Disco… I mean San Francisco. (I hope you’ve all heard that joke or that’s gonna seem pret-ty weird.)
Anyway, Dom and I had been to San Francisco a number of years ago – but only briefly for a conference, plus I was far along in my pregnancy for Nick, and feeling, welllll, pregnant, so we had always hoped to make our way back for some of the seafood and chocolate I wasn’t much in the mood for the first time. (Besides, all I really craved for him were potatoes cooked in the microwave – but I’ll save that for another post!)
So yes – we needed to get back for that long-lost culinary adventure and boy did we!!
We managed to fit in clam chowder, crab legs, shrimp, mussels, pollock, scallops and cioppino… Oh yeah! Steaming chowder with oyster crackers and cracked black pepper on the pier before our guided tour out to the Golden Gate Bridge and around Alcatraz Island, and all the rest (some breaded and some steeped in a saucy stock) for dinner at a great little place called Scoma’s. The day was drizzly, but perfectly staged, with ominous gray skies above Alcatraz…
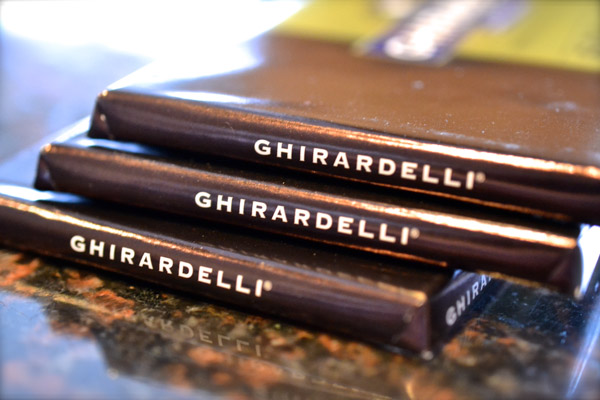
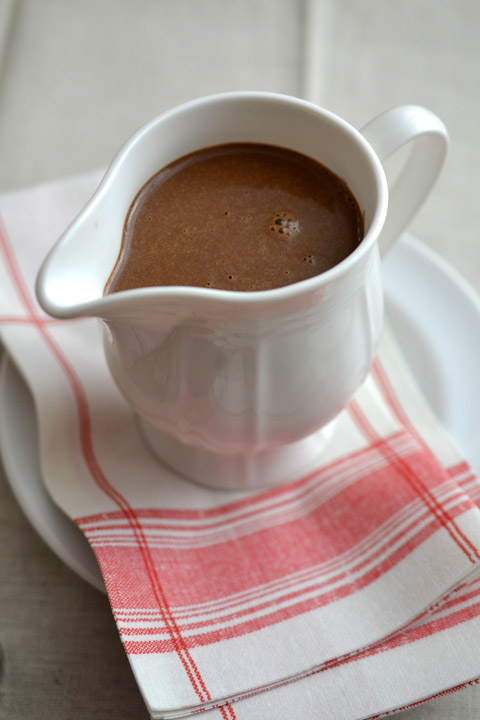
On our way back to the hotel we of course had to stop for dessert. Dessert that included, you guessed it, Ghirardelli chocolate. Dom got an ice-cream sundae in a waffle bowl trimmed in dark chocolate, and I, believe it or not, got hot cocoa. But not just any hot cocoa. It was the most luxurious, decadent, aromatic mug of melted chocolate that I have ever had. I decided then and there that I must not go another 19 years before having it (or something close to it) again. So here we are, just six days later and we’re swimming in chocolate.
It was definitely my lucky week because while doing a little shopping before heading back home, Chels stumbled upon Ina Garten’s most recent cookbook, FoolProof, which just so happens to have a recipe for Mexican Hot Chocolate.
Meant to be my friends, meant to be.
I’m not sure there’s ever been a recipe of Ina’s that I don’t love, especially since she and I share the same taste for cilantro. And this hot chocolate is no exception.
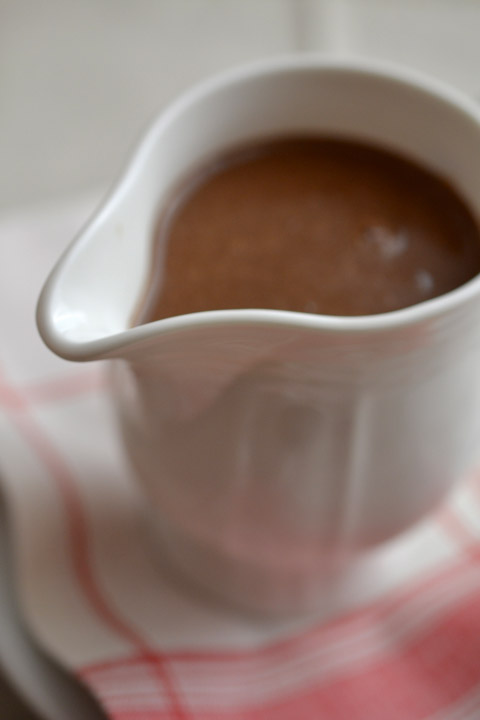
I will admit – I turned the heat up just a little bit more than Ina – but you can easily adjust the cayenne to your liking…

I’ve decided that this will be one of my Valentine gifts for Dom this year. The older I get the more I realize that the best gifts for this sweet day are homemade…just one more thing in a long line of life’s full-circle moments. Am I right? Like the little red hearts we used to cut out of red construction paper folded in half then affixed to white paper doilies with chunky paste. We’ve all made them, and have all received them. Is there a better Valentine?
So on this day which calls for good food and warm company, we’ll relive a special moment that we don’t have to go too far back in our memory-banks to enjoy.

Mexican Hot Chocolate will be the star!
Buon Appetito!
Ciao!
Print
Mexican Hot Chocolate
- Category: Dessert
Ingredients
- 2 cups whole milk
- 1 Tbsp. light brown sugar
- 4 1/2 ounces bittersweet chocolate, chopped
- 1/2 tsp. pure vanilla extract
- 1/8 tsp. ground cinnamon
- 1/8 heaping tsp. ground cayenne pepper
Instructions
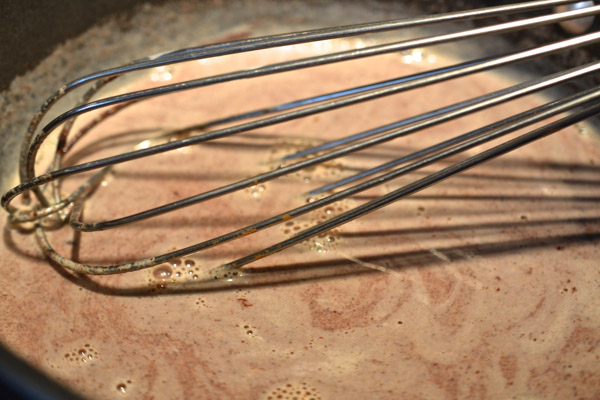
- Place the milk and brown sugar in a medium saucepan and bring to a simmer.
- Remove from heat and whisk in chocolate, vanilla, cinnamon, and cayenne pepper.
- Allow to steep for 3 minutes.
- Reheat the mixture over low heat until it reaches a slow simmer.
- Pour into mugs.
- Serve.
(*Recipe adapted from Ina Garten.)
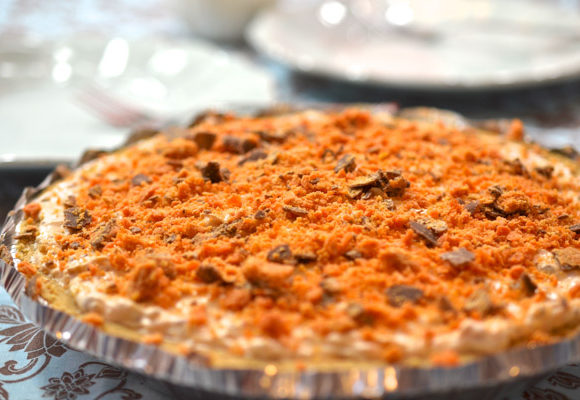
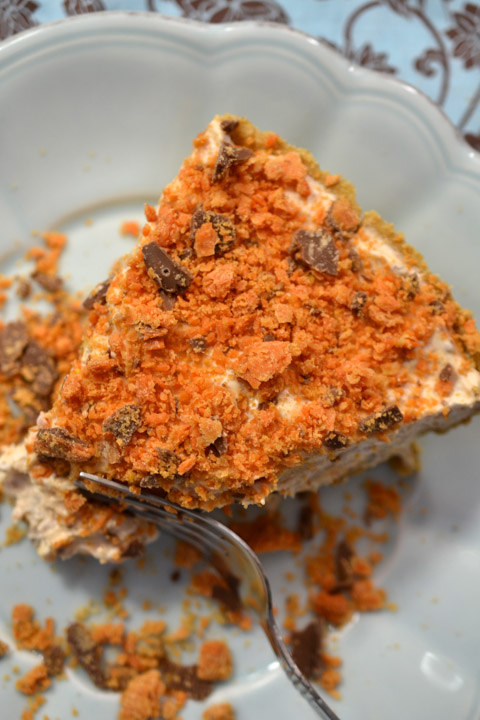
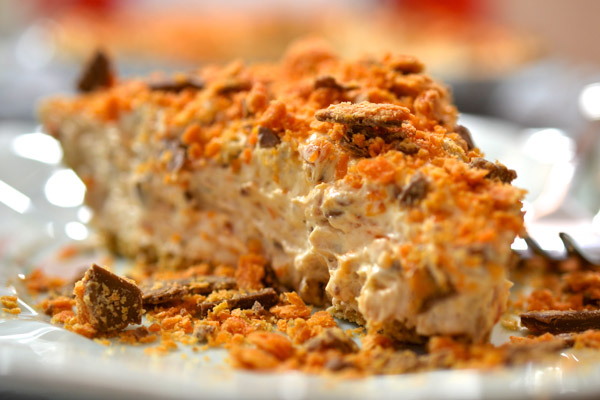
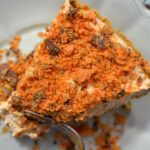
Skinny Butterfinger Pie
Guys! Guys! Guys!
Do yourselves a favor! Try this pie! You’ll be glad you did!
I wanted to make something new for dessert; something sweet and lite and deliciously decadent – you know – the stuff our dreams are made of. Well, I found it! Skinny Butterfinger Pie. Mhmmm.
It’s creamy, peanut-buttery, crispety-crunchety, and it’s just about as healthy as a Butterfinger Pie can get.
The original recipe from Food.com calls for 6 full-sized candy bars, cream cheese, Cool Whip, and a graham cracker crust. I’ve slashed it down to create a healthier version while still maintaining its integrity, and I promise you, you don’t miss a thing.
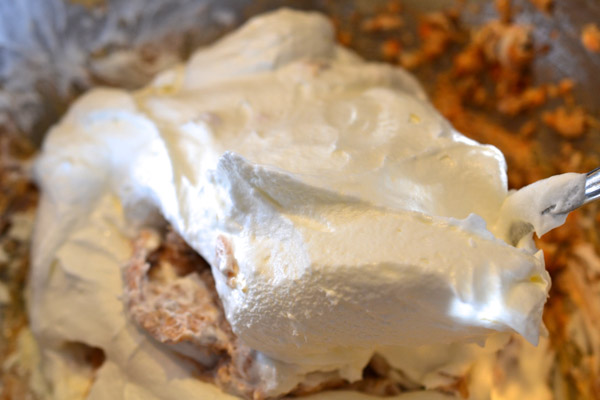
Ours actually came together a little bit by accident…Dom, being the sweetie-pie that he is, offered to pick up my ingredients, but as a result of a little miscommunique he brought back an 8 oz. fat free Cool Whip instead of the 12 oz. that I asked for. But guess what? It worked! It was very good just the same.
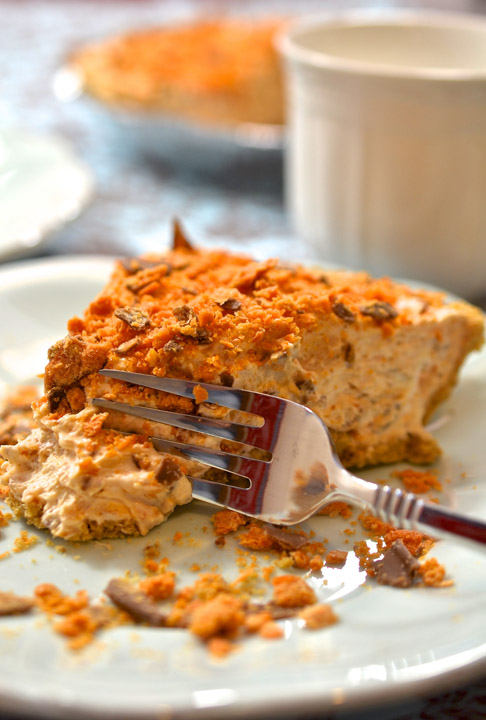
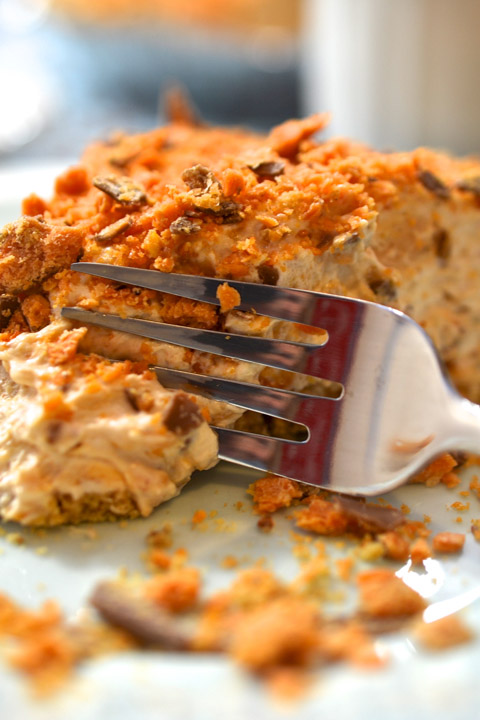
This Skinny Butterfinger Pie recipe is so easy…so fabulous…you’ll see…
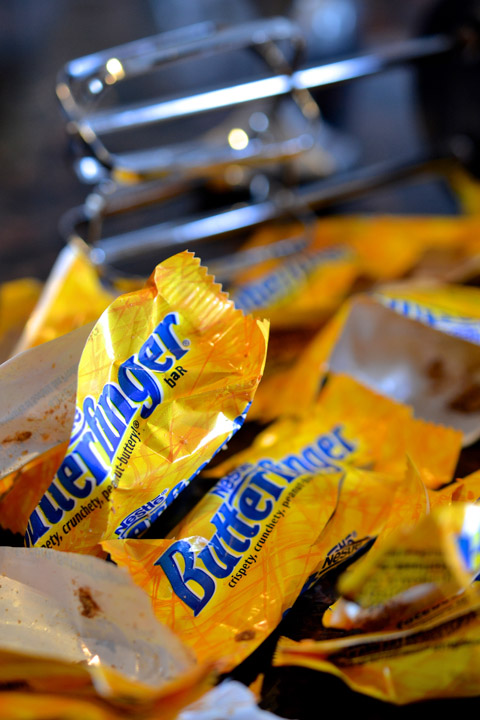
Begin by crushing all but four of your candy bars.
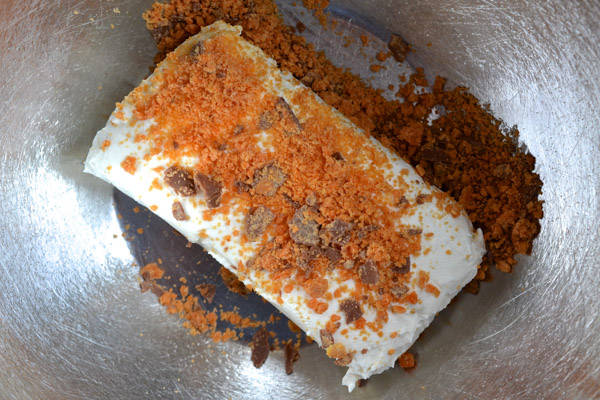
Next, add the baby butterfingers to the softened cream cheese.
Mix. Mix. Mix.
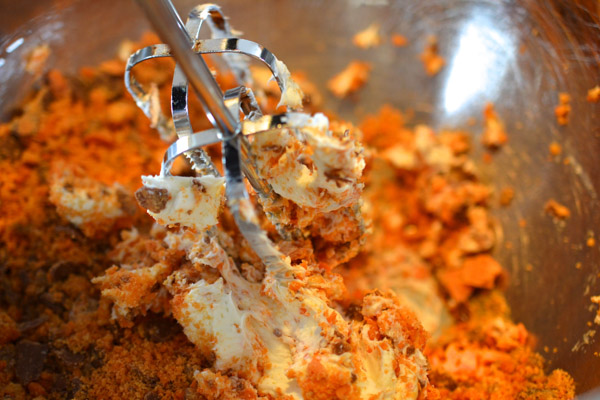
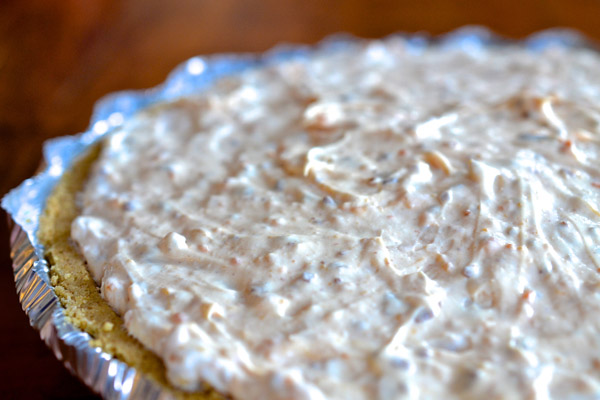
Fold in your creamy Cool Whip until it’s thoroughly combined.
Add the filling to the graham cracker crust, then chill for at least an hour.
Once you’re ready for dessert, crush the remaining candy bars and sprinkle away…
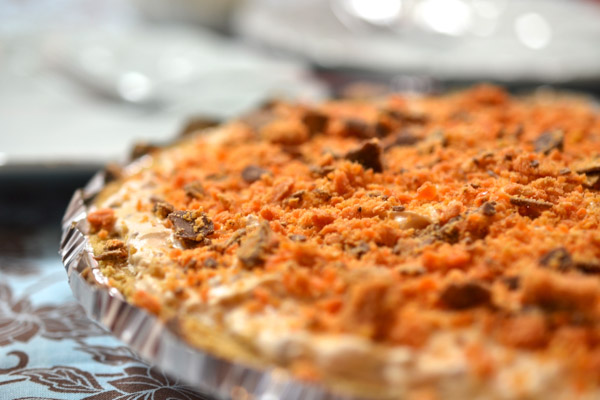
Next…wait for the oohs and ahhhs to commence…because they will…
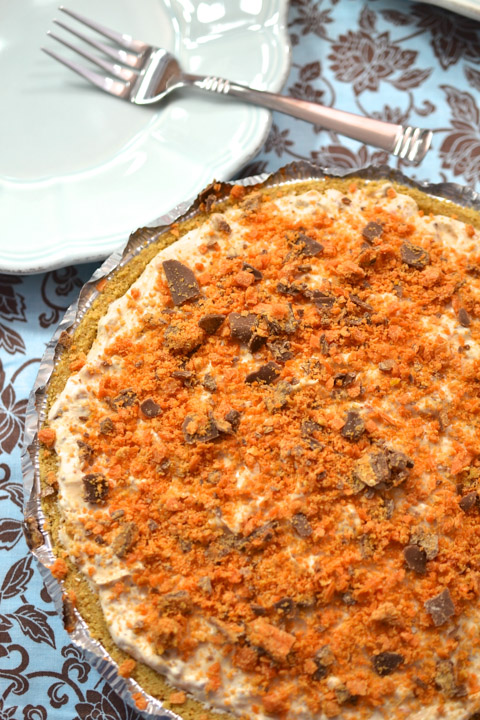
Be prepared – it’s kind of embarrassing…
Didn’t I tell you this was easy?
So whether you make it with an 8 oz. Cool Whip or the 12 oz. – you are in for a treat!
I know what I’ll be passing out for Halloween this year!
Buon Appetito!
Ciao!
Skinny Butterfinger Pie
- Category: Dessert
Ingredients
- 11.5 oz. bag Butterfinger fun-size candy bars
- 8 oz. 1/3 less-fat cream cheese, softened
- 12 oz. fat-free Cool Whip
- 1 pre-made Graham Cracker Crust
Instructions
- Crush all but four of the fun-size candy bars.
- Add crushed bars to a medium sized bowl with softened cream cheese.
- Blend with a hand mixer.
- Fold in Cool Whip.
- Add to crust.
- Chill for at least an hour.
- Crush the remaining four Butterfingers and sprinkle on top of pie before serving.
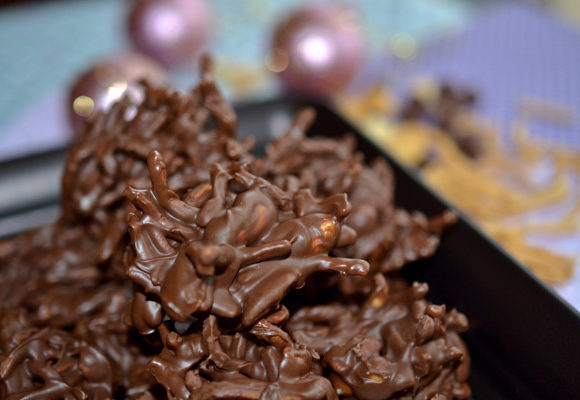
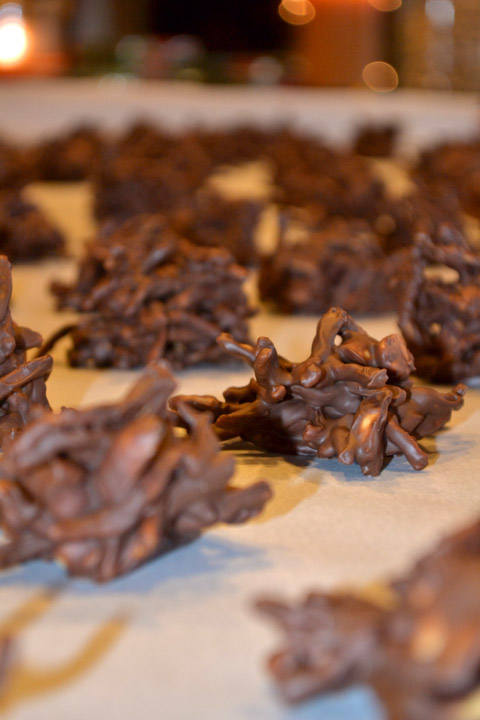
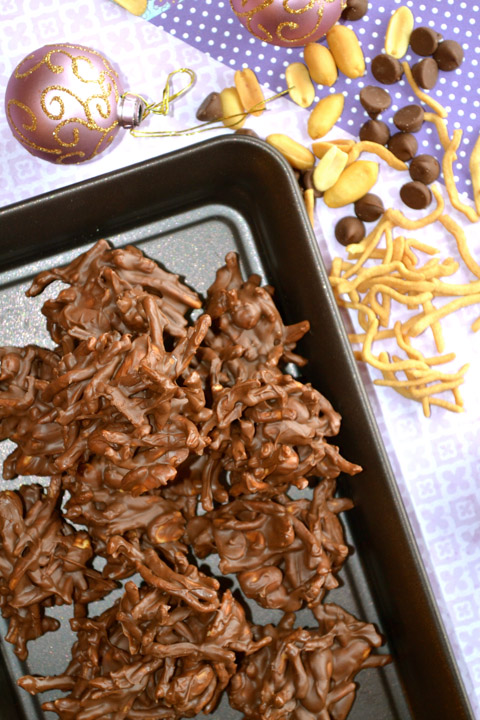
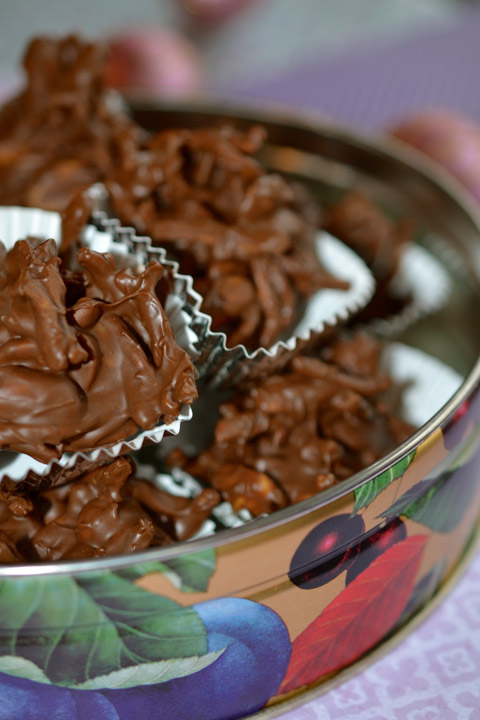
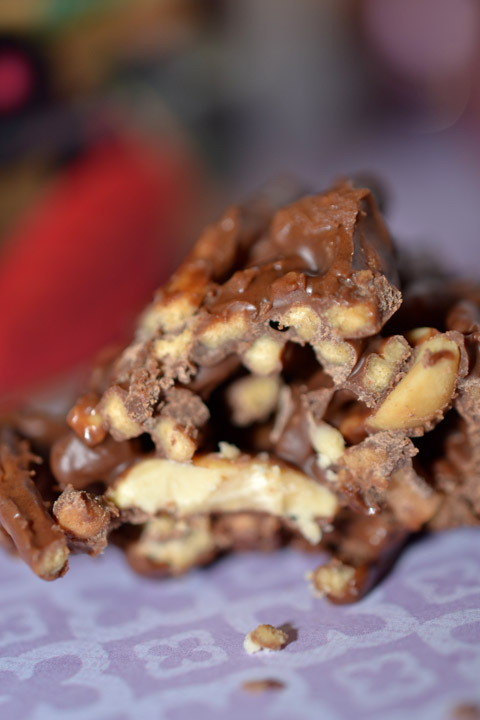
3 Ingredient Chocolate Haystacks

Looking for a simple confection you can whip up in just minutes during the holiday season?
Well – look no further!
You’ve found it!
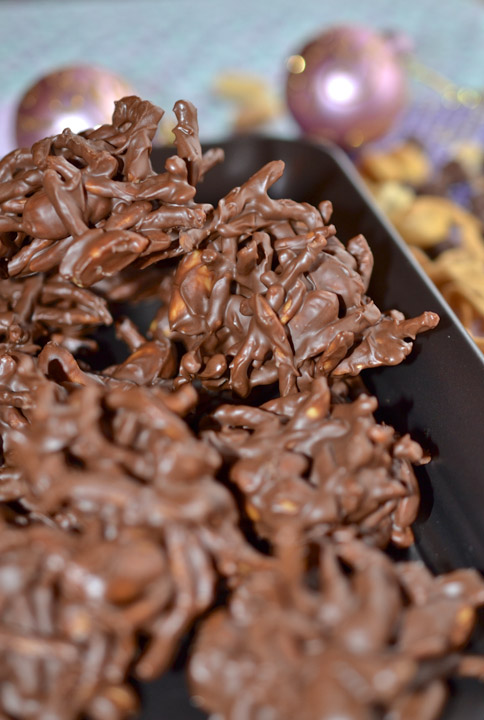
3 Ingredient Chocolate Haystacks!
This sweet little treat is so versatile. It can be made any number of ways. I’ve had them with coconut, white chocolate, almonds, and peanut butter. The sky’s the limit.
But today – we’re going old-school. Milk chocolate morsels, chow mein noodles, and lightly salted peanuts. BAM.
Begin by readying your cookie sheets with parchment paper. Set aside.
Using a double boiler, melt the chocolate chips then add the crunchy noodles and peanuts.
Mix until thoroughly combined then scoop onto pans using a tablespoon for measure.
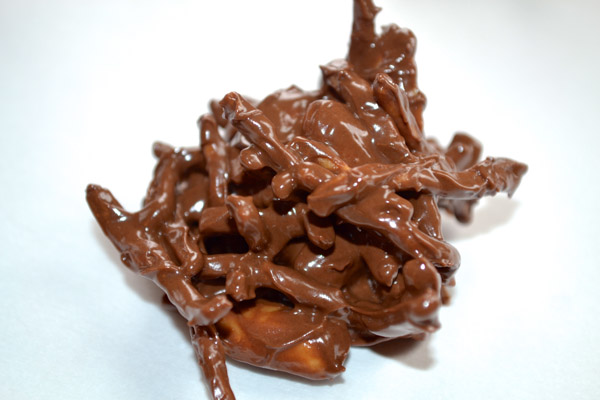
We don’t have small kids in the house anymore, but this is one recipe you’ll have fun doing with kids… Once you scoop the mixture, spend a minute identifying pictures that you see in the dollop of chocolate (like you would with cloud formations)… for example, in this next photo, I see a turtle crossing a finish line clearly having won the race (as illustrated by his victory fist pump!)! Ask the kids what they see. They’ll love it!

Fun, right??? Okay – so once you’re done playing… allow the chocolate haystacks to harden in the refrigerator. If there’s no room in the fridge – you can let them firm up on the counter or on a shelf in the garage (providing you live in a chilly climate!).
This is an ideal dessert. It meets all of my requirements for a perfect treat… sweet… salty… crunchy… chocolatey… and no-bake…does it get any better?
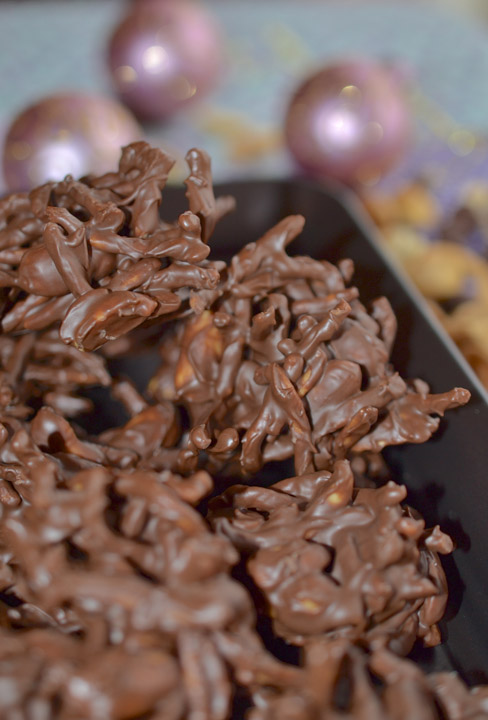
It also makes a great gift!
Buon Appetito!
Ciao!
Print
3 Ingredient Chocolate Haystacks
- Category: Dessert
Ingredients
- 23 oz. milk chocolate morsels
- 12 oz. crunchy chow mein noodles
- 1 1/2 cups lightly salted peanuts
Instructions
- Line four cookie sheets with parchment paper.
- Melt half the chocolate over a double boiler, stirring constantly.
- Once the chocolate is melted, add 6 oz. of the chow mein noodles and 3/4 cup of peanuts.
- Stir until combined.
- Using a 1 tablespoon measure, scoop haystacks onto lined cookie sheets.
- Repeat with the remaining ingredients.
- Chill until firm.

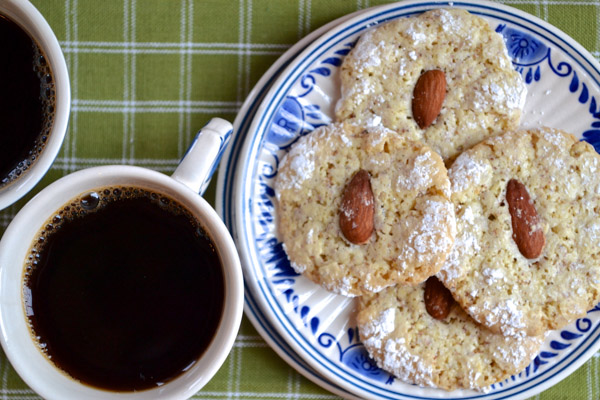
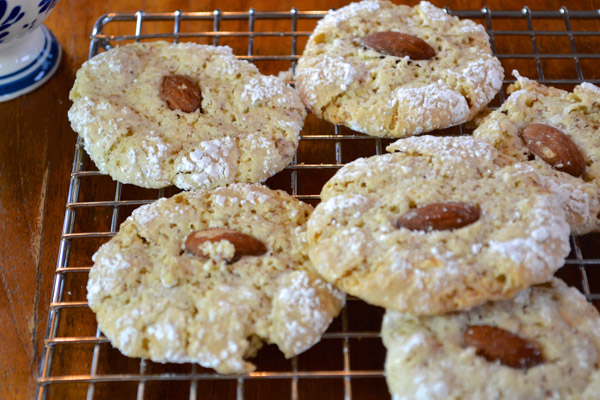
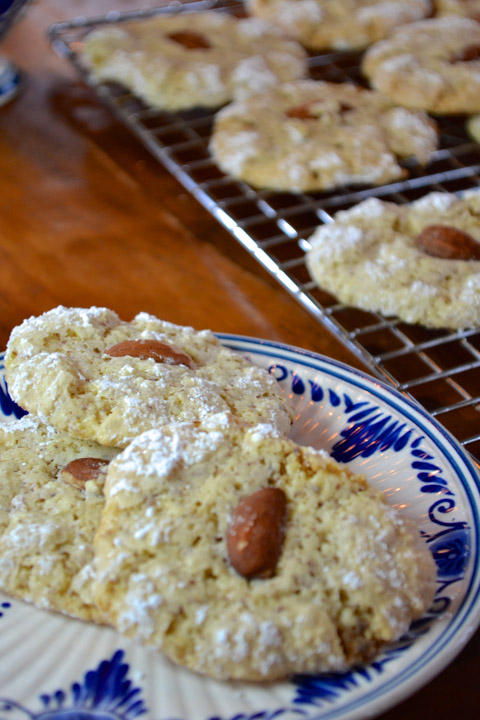
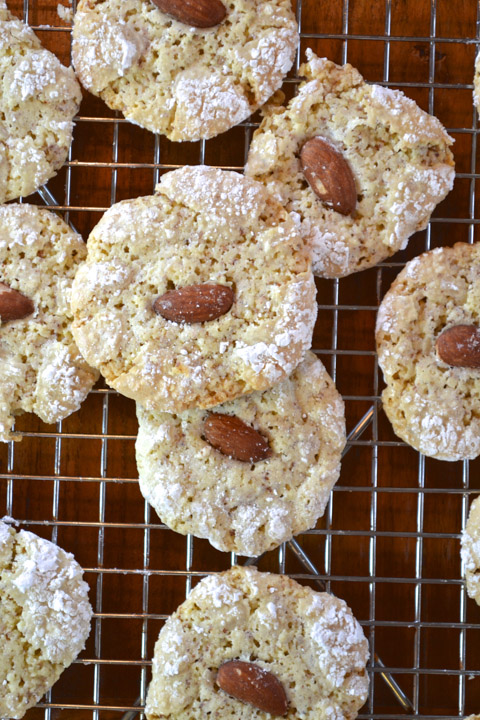
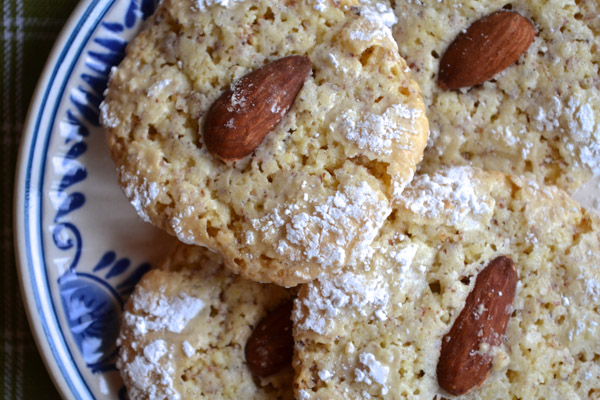
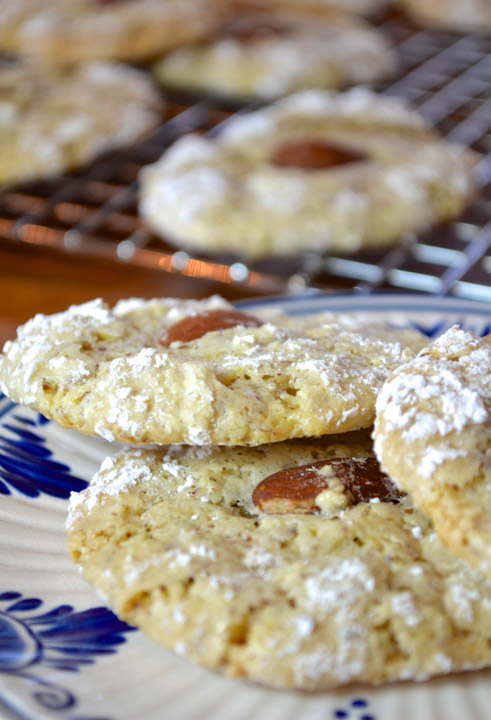
Amaretti Cookies
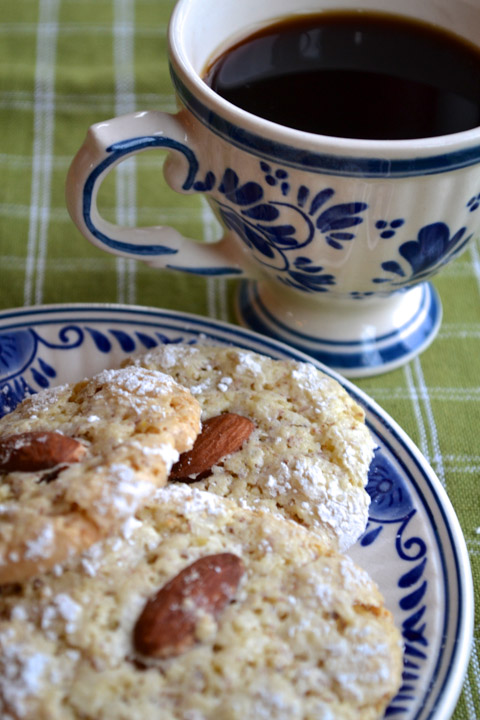
Dom’s favorite cookie is Italian Almond Paste. So it was a very happy day when our resident Cookie Monster was treated to these almond based cookies.
I had the unique pleasure of meeting the woman who created this special recipe. Her name is Maria Filice and she is a woman after my own heart. Maria published her beautiful cookbook, Breaking Bread in L’Aquila, a few short years ago. This trattoria-style recipe book introduces readers to the incredibly tasty flavors of L’Aquila, Italy. It offers homey, yet elegant, straightforward recipes which spoil our palates as well as our eyes. This book is stunning. Her food styling, exquisite. It’s easy to imagine sitting at her dining table where warmth and hospitality are served up right along side the bread and wine. This book invites you in from page one, and beckons you to stay to the very end. Which reminds me…and maybe you guys can relate…we have this thing in our family, we call it the “Italian Goodbye”. We spend an hour at the door saying bye, after having visited all night. This book catches you in the same way – once you pick it up, it’s difficult to part, until you absolutely have to.
Maria and I met at a Women TIES event. I had the good fortune of being seated next to her for the lunch program. We had the chance to chat and I was surprised to discover that we both have ancestors that came from the same province in the Calabria region of Italy…Cosenza. Is it a small world or what?! I was seated directly next to my paisano…
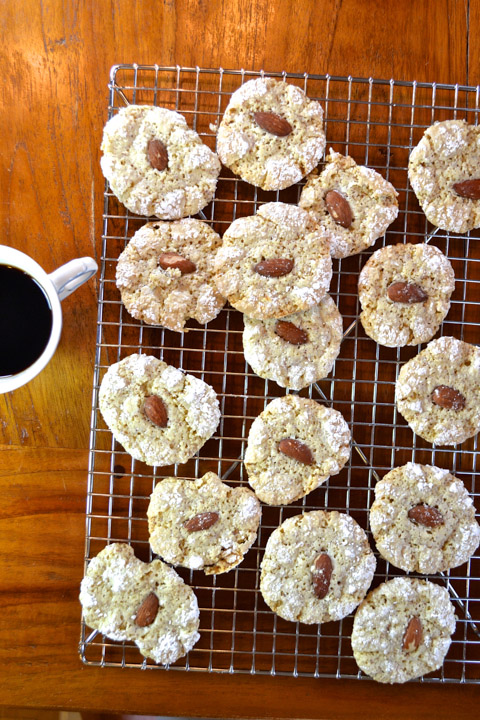
I’m very excited to try the recipes in this book, however, it was the Amaretti Cookie or Biscotti Amaretti, as it’s also called, that I needed to begin with!
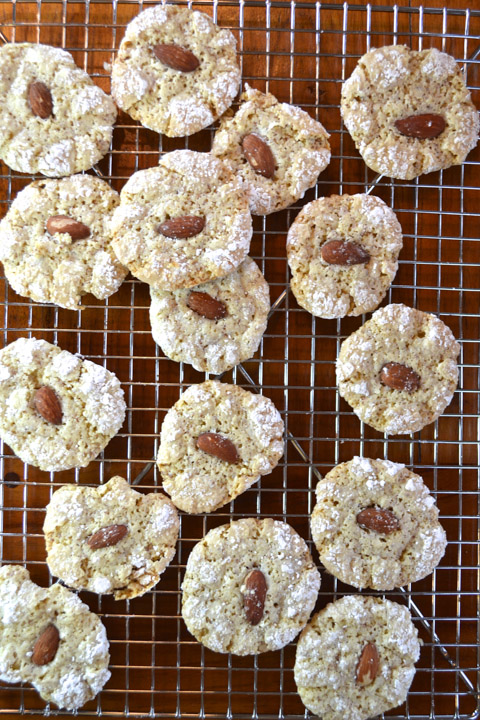
It’s always nice to have a little homemade treat in the house when we can. A little something to have with our coffee, tea or espresso.

This recipe fits that bill.
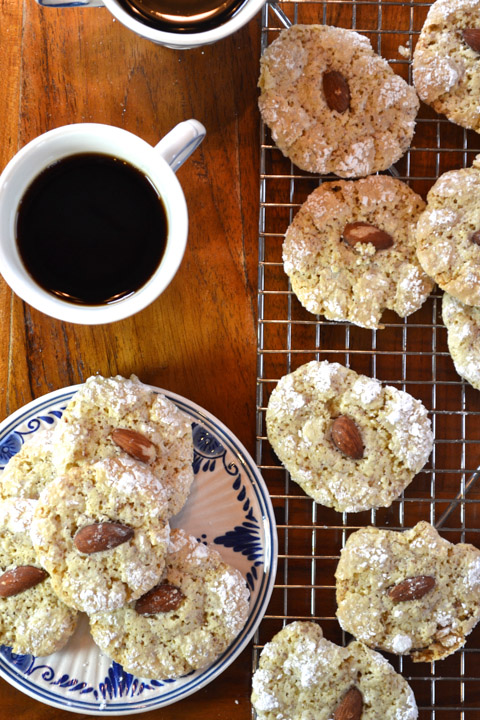
The other thing you may appreciate is it’s a cookie that is both lactose and gluten-free.
So it’s good any way you slice it!
So the next time you’re seated next to someone you’ve never met – strike up that conversation – you just might be related! Hey – it could happen!
Buon Appetito!
Ciao!
Print
Amaretti Cookies
- Category: Dessert
Ingredients
- 3 cups almonds (with skins), plus an additional 36 whole almonds
- 1 cup granulated sugar
- 2 large eggs
- 1 tsp. almond extract
- 2 cups of confectioner’s sugar, spread on a plate (for rolling)
Instructions
- Preheat the oven to 350 degrees
- Line three baking sheets with parchment paper.
- Using a food processor, pulse the 3 cups of almonds until they are finely ground.
- In a separate bowl, beat eggs, sugar, and almond extract.
- Add the ground nuts and gently fold them together until you have a moist mixture that you can form into balls.
- Using a teaspoon, scoop up the batter and form balls, and then roll them in the confectioner’s sugar.
- Place the balls at least an inch apart on the greased baking sheet.
- Prior to baking, press one almond into each ball.
- Bake for 15 minutes or until the cookies are golden in color and firm to the touch.
- Let them cool before removing them from the baking sheets.
*Recipe from Maria Filice.
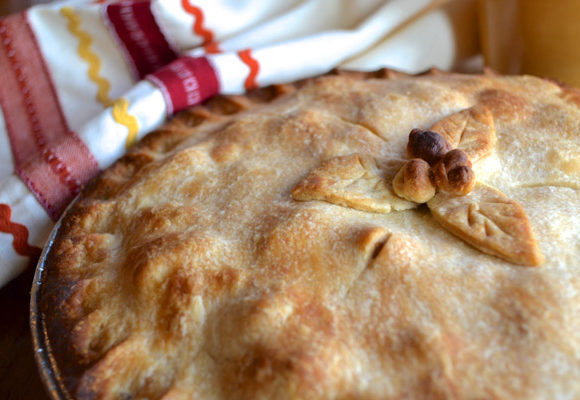
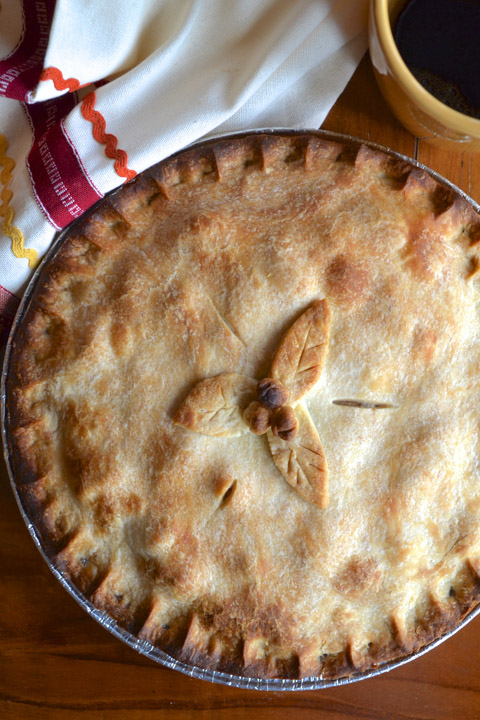
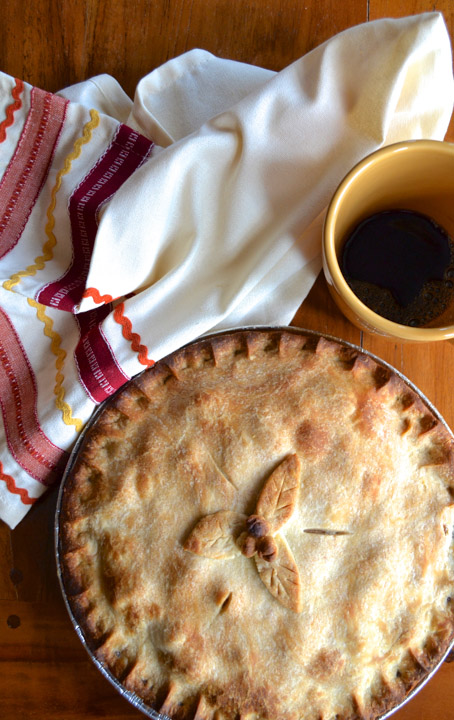
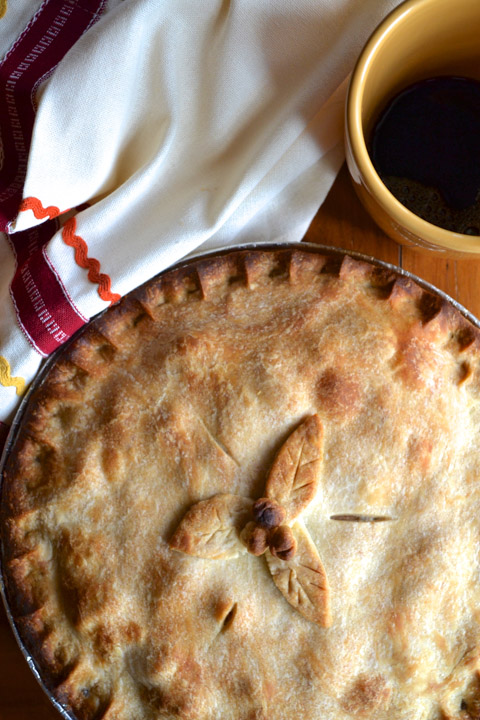
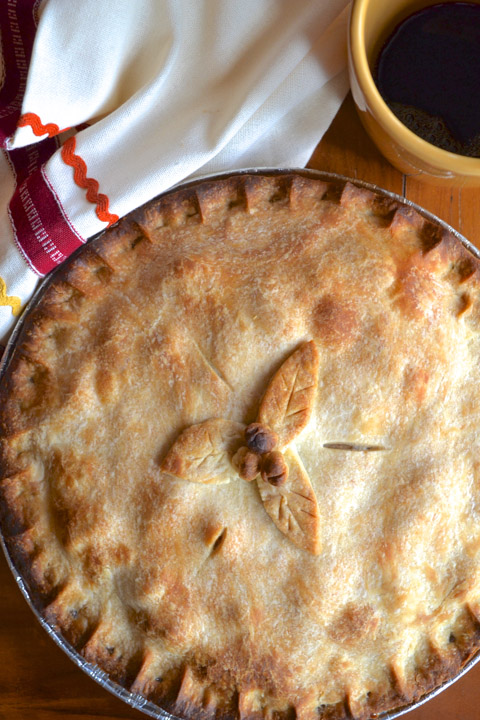
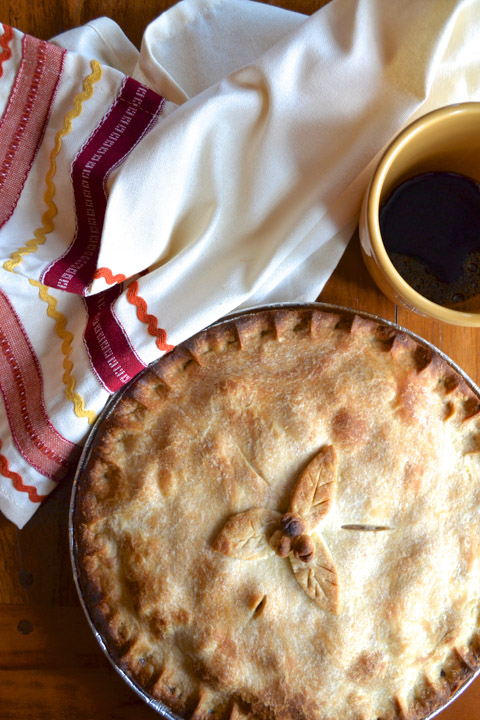
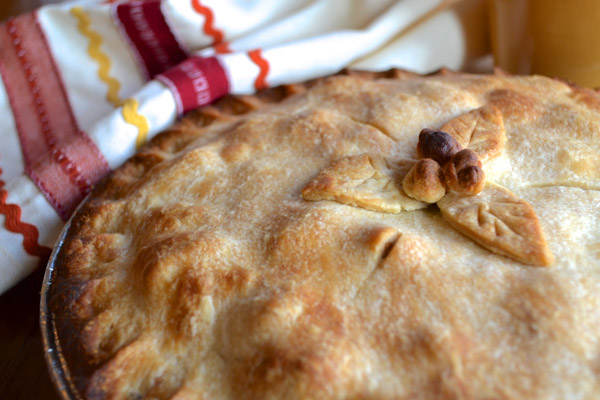
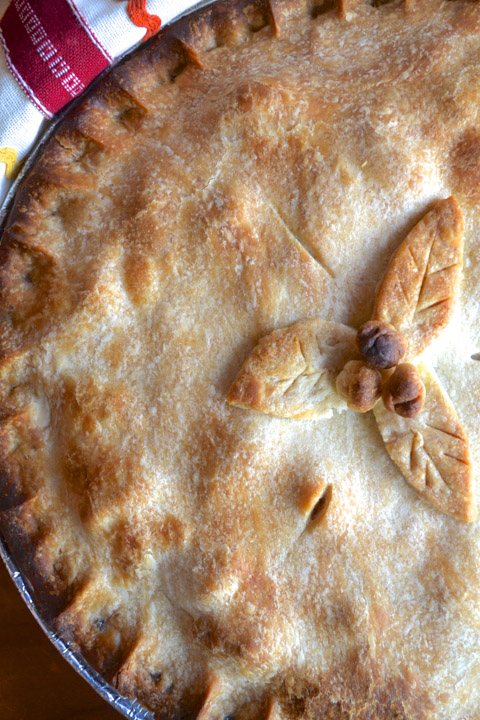
Apple Pie
I believe in family rituals. Big time.
One of my most vivid rituals from childhood involves a Mr. Johnny Mathis and a very skippy “Sleigh Ride”. Best part? We all sang the skips… and laughed every time! I would lay money that we all still know them. And now that I’m thinking about it, even today, I am challenged to sing along with Johnny without including the skips. I mean, as soon as that album came out of hibernation each year – we were keenly aware that the holidays were upon us – and we played it all the time. Talk about programming! That album, that song, held so much meaning and created so much joy for our family. THE BEST! This version will forever take me back to very warm, very special times. And that is what family rituals are all about.
I realize it’s a little premature to be singing Christmas songs, but hey, if the radio stations can do it (95.3 in Syracuse)…so can I! Besides – it makes me happy. (Yes, I am one of those people who will tune in to Holly-FM starting on October 5th. Don’t judge.)
So…what do Apple Pie and Johnny Mathis have in common? Ritual, of course.
I made my first apple pie of the season today. Apple pie says autumn. It says, refreshed breathing, crisp cool air, falling leaves, and Thanksgiving. And for our family, it also says, more time to linger at the table, more cinnamon and brown sugar in the pantry, and a bumpy hayride at our favorite orchard. It says, aromas wafting, taste-buds anticipating, and stretchy pants welcome.
Oh yeah, apple pie’s a pret-ty big deal in our house.
I first learned this recipe back in the late 1990’s. We were new to our community and I became part of a women’s church group that made apple pies for the annual Fall Festival. These ladies produced pies like it was nobody’s business. I can’t tell you how many they assembled in an hour’s time. It was such a sight to behold as well as an awesome education. And let’s just say our church community never left the festival hungry.
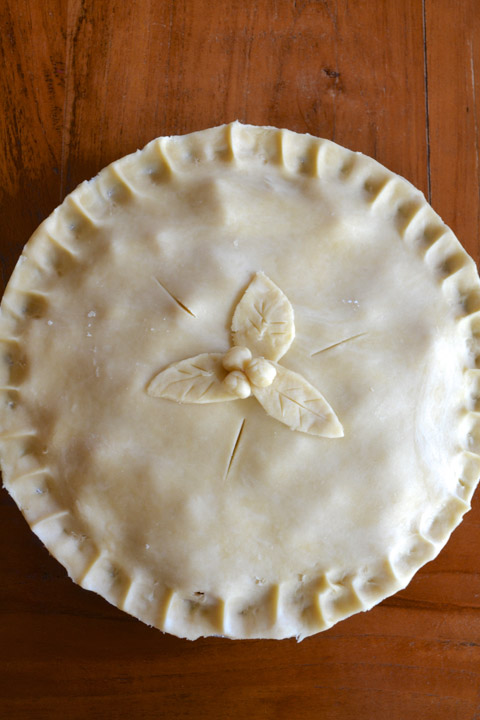
Making apple pie, correction, making crust for apple pie had always intimidated me. But this recipe was so simple that even I could do it – which means – even you can do it!
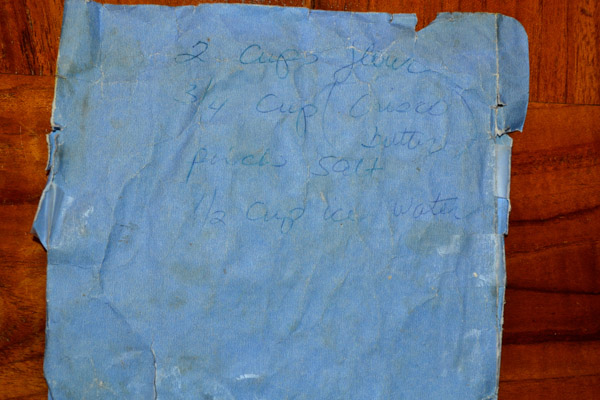
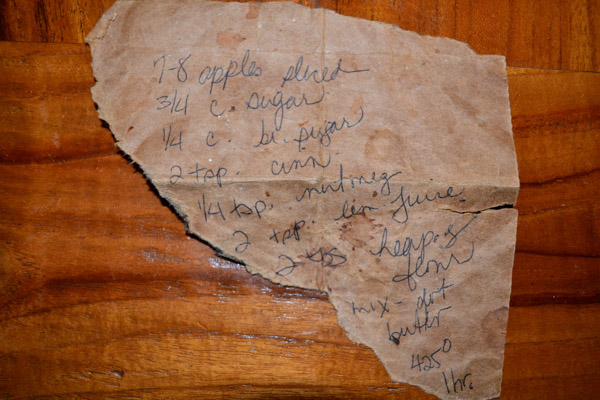
I remember scratching out ingredients on the only paper my friend had available at the time, a blue envelope. And because there wasn’t enough room to write the remainder of the recipe on the envelope, she tore me a piece of brown paper bag to finish writing. This is so funny to think about. I guess we were fearful that we might shut down the entire operation if we stopped even for a minute to look for a decent piece of paper. But, what I could not have known then, that I do know now, is that this recipe would become one of our family’s all-time favorites and that the paper that it’s written on is almost as special as the pie itself. My kids won’t let me replace the envelope with a recipe card. So to this day, this is what I refer to when I make my pies…
I can’t tell you how many times I’ve had to tape up the sides.
So how can something so not pretty, be so beautiful? I guess that’s what rituals will do to “a thing”. Scratched records, tattered recipes… I suppose that is what love, over time, looks like.
I’ll take tattered and torn, any day. It says, ‘we’ve stood the test of time’. That means something. That means everything.
So what’s tattered and torn in your house?
I’d love to know!
Ciao!
Print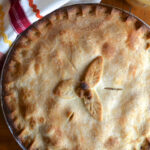
Apple Pie
- Category: Dessert
Ingredients
- 2 cups all-purpose flour
- 3/4 cup butter-flavored shortening
- pinch of salt
- 1/2 cup ice water
- 7–8 apples, sliced
- 3/4 cup sugar
- 1/4 cup brown sugar
- 2 tsp. cinnamon
- 1/4 tsp. nutmeg
- 2 tsp. lemon juice
- 2 Tbsp. flour
Instructions
- Combine flour, shortening, salt, and water in a large mixing bowl.
- Mix with your hands until all ingredients are well combined.
- Pat dough into a ball and wrap in plastic wrap.
- Place in refrigerator for the time it takes to make the filling. (30-60 min.)
- Preheat oven to 425 degrees.
- In a large bowl combine apples, sugar, brown sugar, cinnamon, nutmeg, lemon juice and flour.
- Remove dough from the refrigerator and cut in half.
- Roll out each half to use for the bottom and top crusts.
- Place first dough in pie plate.
- Fill with apple mixture.
- Place remaining dough on top.
- Crimp edges and poke holes in top to release steam.
- Decorate with remaining bits of dough. (Optional)
- Bake for 50-60 minutes.
- Remove when golden brown.
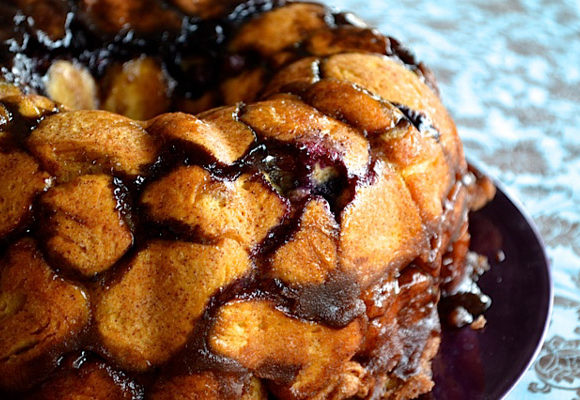
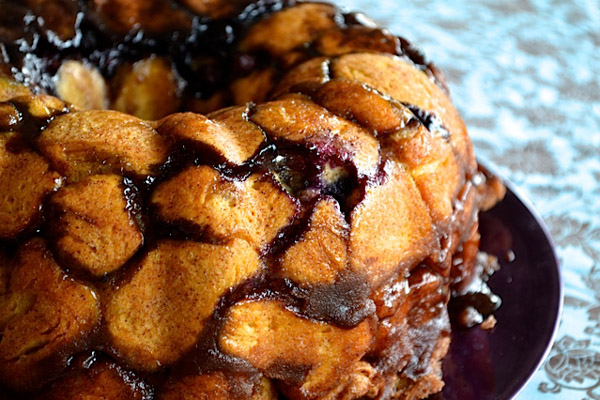
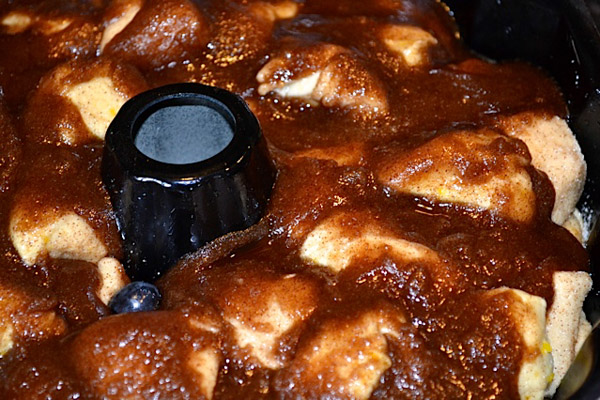
Blueberry Monkey Bread
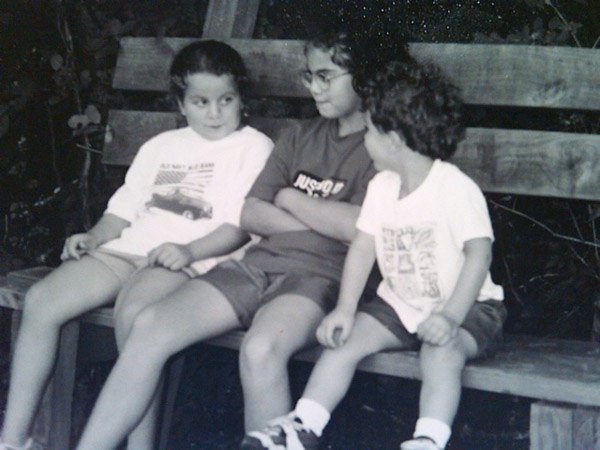
Have you ever reflected on a moment and wished you could step into a time machine and linger there for just a little while longer?
The photo below represents one of those moments for me…I am sandwiched between my two sisters. Connie on the left and Nicole on the right. To say we were buds is an understatement.

Each of us, in our own way, was just on the cusp of a new stage of life. Nicole – relatively new to high school and experiencing all of the fun, drama, and self-discovery that comes along with that…Connie, relatively new to college and experiencing all of the rigors, independence, and self-growth that comes along with that…and I, relatively new to marriage & career and experiencing all of the joys, new-partner focus, and future planning that comes along with that. Whoa!
This photo was taken by Dominick (honorary sister back then) during a “sister weekend” in Albany. It was the late 80’s and we were visiting Connie at school.
Man! Look at those eyebrows and all that hair and those denim jackets! I think we kept Levi and scrunchies in business!
There are a few things I remember most about that weekend. First, the drive to Albany with Nicole. I was teaching in a middle school then and had just started a new unit on Paleontology. Poor Nicole…by the time we arrived, she knew more about the Mesozoic Era, Triceratops, and Herbivores, than she probably ever wanted to know. She was a very good sport and quite a captive audience! Not that she had a choice…I was very excited about dinosaurs back then and I wouldn’t shut up about it!
The other thing I remember is more a feeling than an event…I’m actually not sure if I am attaching this feeling to the memory now, but I’m certain that even then I knew that those times would become further and fewer between, causing me to feel so blessed to have that time together. I see it on our faces. They were my peeps.
My sisters were the catalyst that first launched my maternal stirrings…it is true. I think siblings strike a special chord in our capacity for unconditional love in a way that nothing else does during childhood.
You can probably tell that my sisters and I have had some fun times through the years both outside the kitchen and, of course, in it. The stories I could share about cinnamon toast, Steak-ums and fried onions, Archway cookies, flour fights and monkey bread….you don’t really have to read between the lines to know we reallllly liked these things. A lot. So much so that I’m pretty sure we all experienced a sugar-induced coma as a result of our over-indulgence on monkey bread one day. There’s actually a very colorful story surrounding monkey bread, if only I could remember it…
The story is blurry for me now, and perhaps the ladies could tell it better… but I’m certain that fateful day did the most damage to me…I only recall preparing the bread, eating the entire bread, along with my partners-in-crime, and then POOF! The memory of the rest of the day is GONE! It is a mystery! I haven’t had monkey bread since, and I’m almost certain my sisters haven’t either. How sad. However, we learned a very important life lesson that day – we cannot be trusted alone with anything that contains brown sugar, cinnamon, butter and biscuits.
We’ve grown. We’ve matured. It’s time. Let’s do this thing!
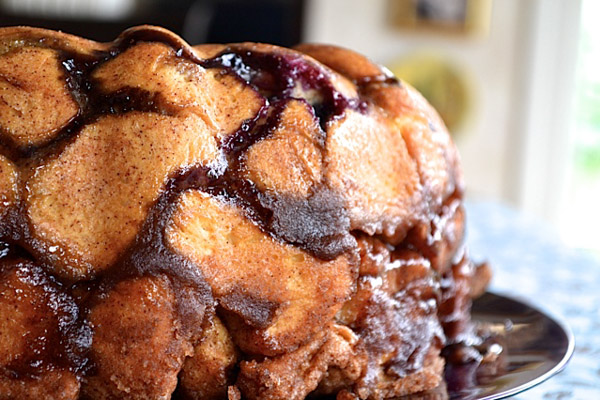
As a nod to our blue-jean jackets I thought I’d make Blueberry Monkey Bread.
Enjoy….with a little moderation, please!!! Yes, I am talking to myself!

Blueberry Monkey Bread
- Category: Dessert
Ingredients
- 3 pkgs. of Pillsbury Country Style Biscuits (16 oz.)
- 2 Tbsp. cinnamon
- 1 1/2 cups granulated sugar
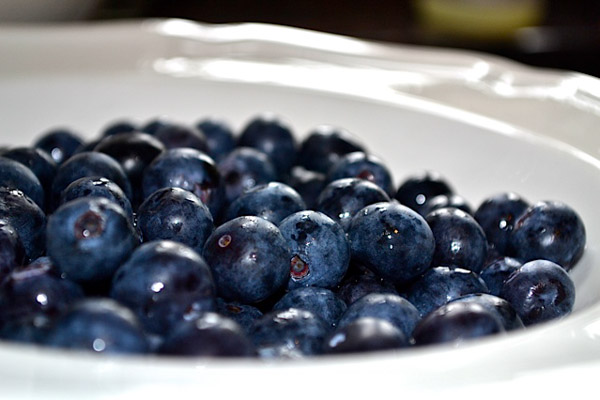
- 1 cup fresh or frozen blueberries
- 1 stick of butter
- 1/4 cup brown sugar
- 2 Tbsp. water
Instructions
- Preheat oven to 350 degrees.
- Thoroughly grease a bundt cake or round cake pan.
- Mix sugar and cinnamon in a bowl.
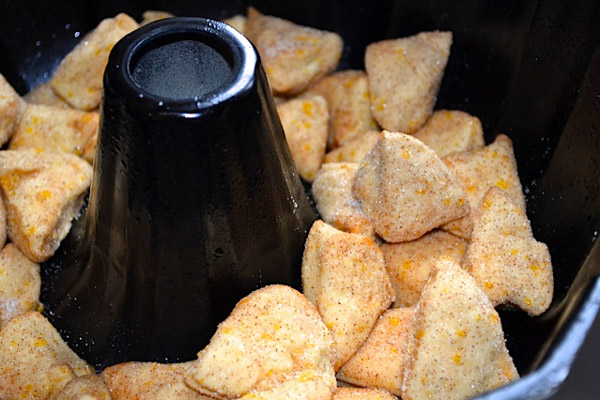
- Cut each biscuit into 6 pieces.
- Cover each piece in the sugar mixture.
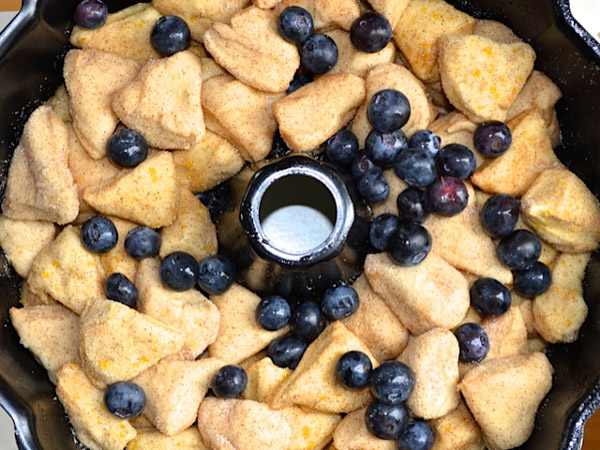
- Arrange one layer of of biscuit pieces in the bottom of the pan.
- Sprinkle about a quarter of the blueberries on top of it.
- Repeat adding layers until you reach the top of pan.
- In a saucepan combine the butter, brown sugar and remaining sugar cinnamon mixture.
- Bring to a boil.
- Add water if mixture is too thick.
- Pour over biscuits and bake for 45-50 minutes or until done.
- Lift and turn out onto a cake plate.
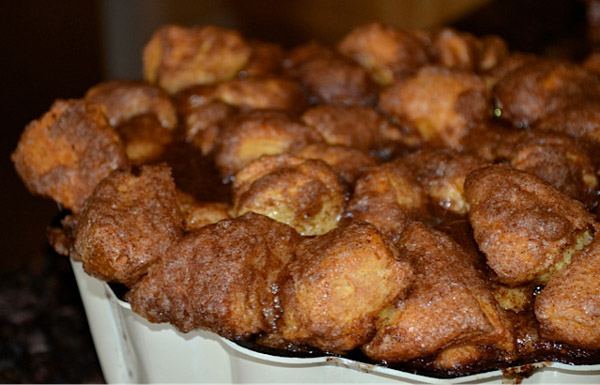
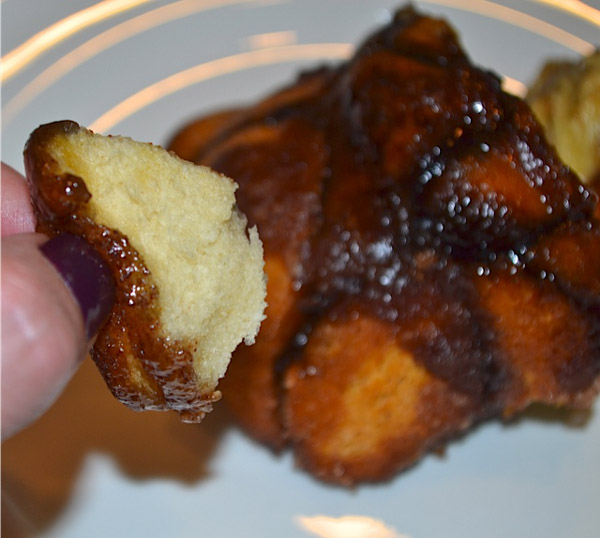
Enjoy it while it’s warm! And my advice to you my friends…never, ever, be alone with it! Play it safe! Find a partner or two or three…
Ciao!
UPDATE: Yes – I was correct in saying the details are blurry now…my sister Nicole said she wasn’t there for that rather delicious day! Oh boy – that means Con and I did all the damage!! Sorry Nic, you would have enjoyed it!! XO
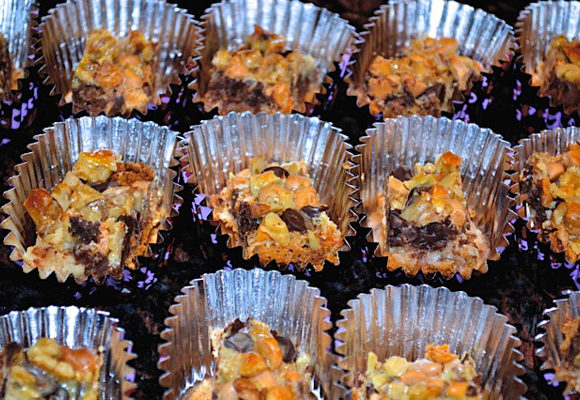
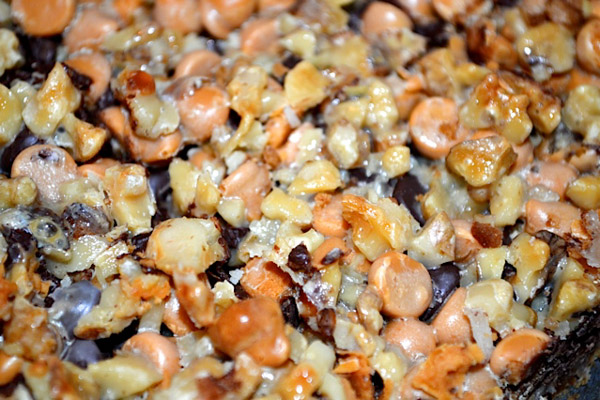
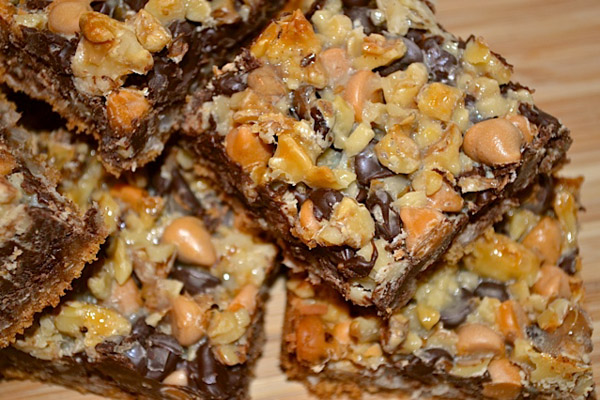
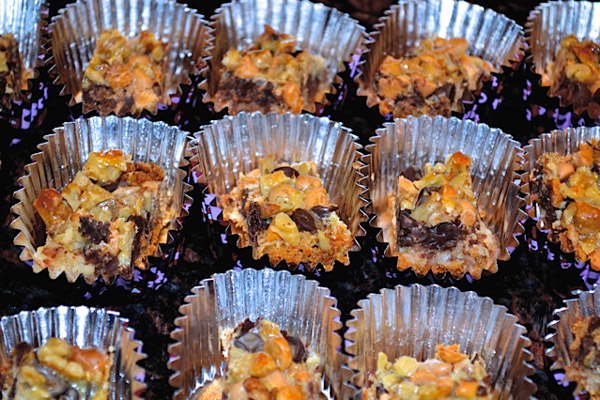
Hello Dollies
Hello Dollies come in the form of seven layers of delectable!
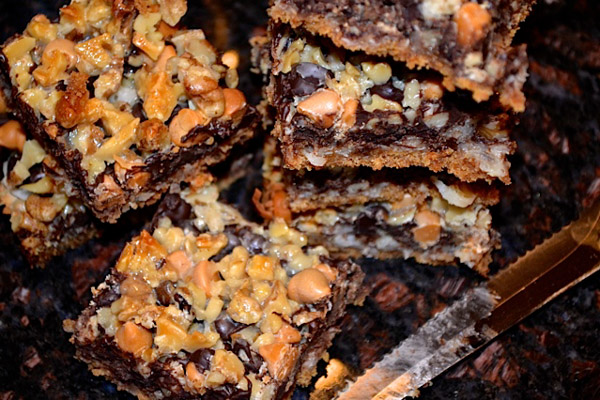
Hello Dolly, well, hello Dolly, It’s so nice to have you back where you belong…whether it’s Louie Armstrong or Carol Channing – you can hear it, right? Yes, but I can also see it and taste it in the form of seven layers of complete mouth-watering goodness. Gooey, melty, buttery, delectable deliciousness (say that three times fast!).
As a young girl, I learned patience by having to wait for my mom to cut and serve them…
It was one of her go-to-treats when we were growing up and one I like to share now. Hello Dollies never disappoint! It’s a great potluck dessert, PTA treat, weekend snack for the kids and their friends…and it always looks beautiful on a tray of Christmas cookies!
Of course, like many amazing recipes, especially those that are passed down, this recipe from Mom contains no exact measurements…after she melts her butter in the pan, she covers each layer with a generous amount of each ingredient and then bakes to melty goodness. So like her – I say, go for it, add as much or as little as you want, but if you need a little help as you go…here’s a plan…have fun!
Print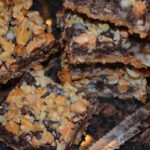
Hello Dollies (7 Layer Cookies)
- Category: Dessert
Ingredients
- 1 stick of unsalted butter, melted
- 1 cup graham cracker crumbs
- 1 cup flaked coconut
- 1 cup semi-sweet chocolate morsels
- 1 cup butterscotch morsels
- 1 cup chopped walnuts
- 1 can sweetened condensed milk
Instructions
- Preheat oven to 350 F.
- In a 13×9″ pan layer ingredients starting with the melted butter.
- Bake at 350 degrees for 30 – 35 minutes or until golden brown.
- Let cool before slicing into bars.
- Enjoy!
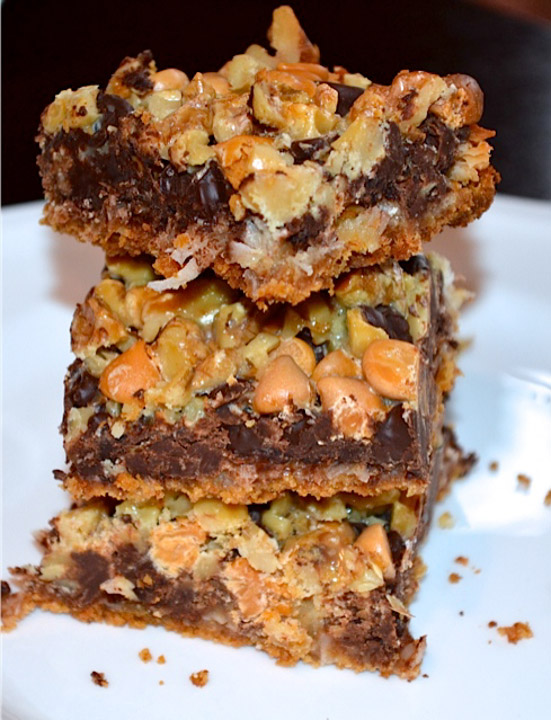
I call this last one… Helloooooo Dolly! (The 21 Layer Cookie!)
Ciao!
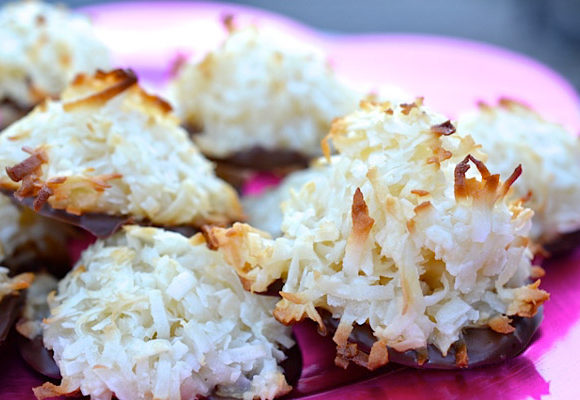
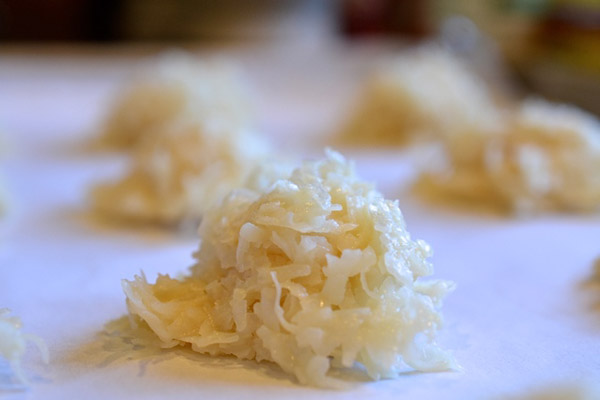
Nutella Dipped Coconut Macaroons
HAPPY MOTHER’S DAY!

“Thank you, Mom!”

Certainly one of the biggest influences in our young life is our mom. We watch, we learn, and we ultimately hold on to those qualities that stand the test of time in a family, those attributes that weave themselves through many generations…the traits that “brand us”…that make us part of something bigger.
Moms are conduits.
Some of the many lessons I have learned from my mom that I hope to pass along to my kids are as follows: To feel is to live. Laughter is ALWAYS the best medicine (yes, we’ve gotten into trouble on more than one occasion for this one!) And good meatballs are all about the cheese!

Mom might be little but don’t let her size fool you. Though petite in stature, she’s huge in passion! When something is important to her – you know it! She took some courageous steps a little bit later in her life…for example, she first started driving at the age of 50; she boarded a plane to Italy and enjoyed a lengthy vacation with her family (something she thought she would never do); and she began a whole new career in Education.
We are all very proud of Mom for these accomplishments, and many others! And if I know her, she’s not finished yet!
You Go Girl!

I thought I’d make a sweet treat in honor of Mom. It represents what she likes and who she is…a whole lot of flavor in a tiny little bite…
Okay – the coconut is for her and the Nutella is for me…Hey, I’m a mom too!
Print
Nutella Dipped Coconut Macaroons
- Category: Dessert
Ingredients
- 1 egg white
- 2 tsp. vanilla
- 1/8 tsp. salt
- 2/3 cup sweetened condensed milk
- 3 1/2 cups sweetened flaked coconut
- 7 oz. Nutella
Instructions
- Preheat oven to 325 degrees.
- Line two cookie sheets with parchment paper.
- In a large bowl, stir together the egg white, vanilla, salt and sweetened condensed milk.
- Stir in the coconut until well blended.
- Drop the dough by rounded tablespoons about 2 inches apart onto the cookie sheets.
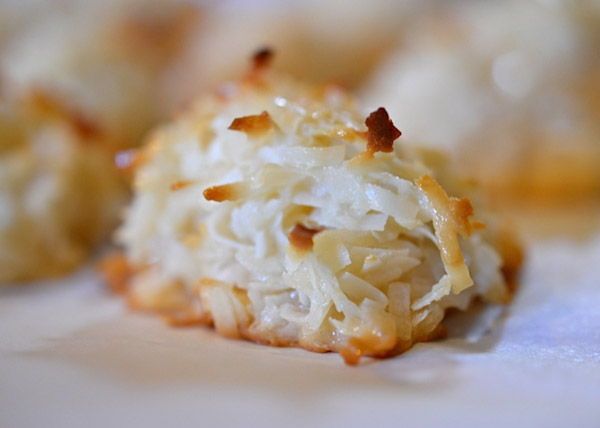
- Bake one sheet at a time until the cookies are light golden brown, 15 – 20 minutes.
- Cool the cookies on the baking sheets until slightly set.
- Remove to a wire rack with a wide spatula.
- Once the cookies are completely cooled, line two baking sheets with parchment paper.
- Melt 7 oz. of Nutella in a small heatproof bowl set over a pan of simmering water, stirring until smooth. (Double boiler)
- Remove from heat.
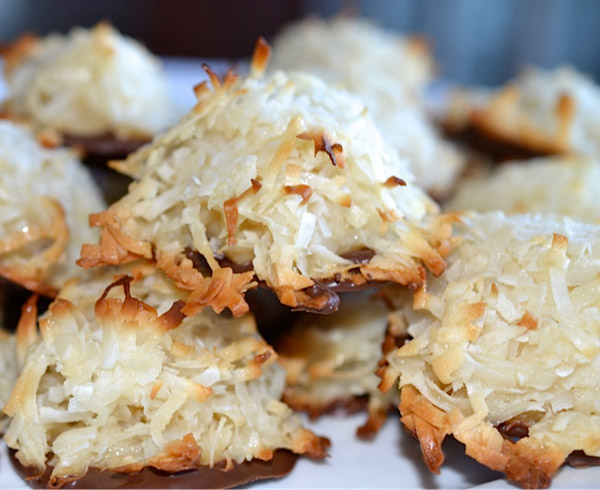
- Holding macaroon by its top, dip the bottom into the melted Nutella.
- Scrape off the excess and place the macaroon on the prepared baking sheet. Repeat.
- Refrigerate the macaroons until the Nutella sets, 15 – 30 minutes.
Sweet little coconut haystacks!
Good right out of the oven – but resist!!!! There is still more to come!!!
Look at that chocolate-hazelnut foundation!

How about a pretty pink plate for Mom…

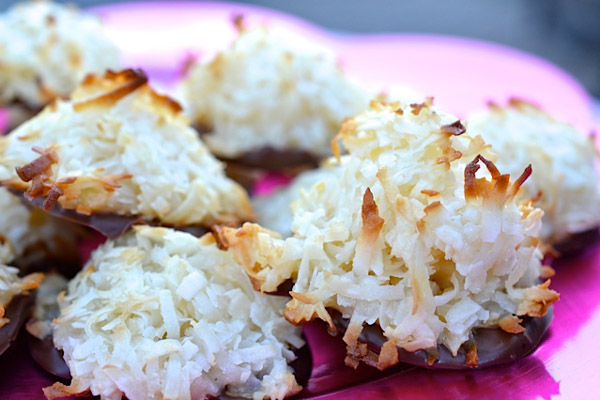
Happy Mother’s Day, Mama! We love you!
Ciao!